Dovetail Joints
Description
This section is from the book "Workshop Notes & Sketches For Handicraft Classes", by Thomas A. Clark. Also available from Amazon: Workshop notes & sketches for handicraft classes.
Dovetail Joints
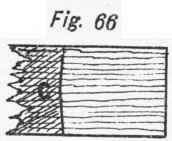
Dovetail jointing is largely used for the same purpose as the rebate joint. It is a much stronger and more durable method of union, but rather more difficult to make. a, b, c, Fig. 63, show different views of this joint in its simple form. Fig. 64 will give a clear idea of what the joint is like. Fig. 65 may indicate how the intervening parts between the pins P p, etc, are removed, a shows one drawn on ready for cutting out. The tenon or dovetail saw is taken to cut down the vertical sides of the pins to the lines, after which the pieces between the pins may be removed. This is done by cutting in with the chisel from both sides, a little away from the line, as at b, or better still, by means of the bow-saw (if it can be got), which has a narrow, thin blade, and if passed down the vertical saw-cut, it may easily be turned round and made to cut along by the line as at c. The holes in the other piece, a, Fig. 64, would be cut out either way, except that the outside ones should be done with the dovetail saw. In lining off for making this joint, lines should be drawn round the ends, a little farther away than the thickness of the piece to be joined thereto, allowing about 1/16 in. over for the end in which the holes are to be made, and 1/8 in. more on the other for the pins. The pins would now be marked off on the inside, care being taken, as with the rebate joint, that all the faces are outside and the edges to one side. After the widths are set off on the inside, say half the thickness of the wood, and twice its thickness between their centres, the square would be used to draw lines at right angles from the ends to the cross lines, or parallel to the edge. From the ends of these, lines should next be drawn across the end of the wood with the sliding bevel, giving proper taper to the pins, and taking care not to bring them to a sharp edge, while at the same time giving sufficient taper for strength. Lines would then be drawn from the ends of these, down the face, to the cross line and parallel to the edge, or at right angles to the end. This would finish the drawing on of the pins. When all the pins are marked off, the wood should be fixed upright in the vice, and the tenon or dovetail saw used to cut down the side of the lines, this being done as exactly as possible. The large intervening portions should now be cut out, which may be accomplished, as already explained, by means of the bow-saw, or paring chisel and mallet. A very sharp chisel should be used to clean out to the lines, as at d, Fig. 65, and the surface at the bottom should be slightly hollow, so as to ensure close bearing on the outsides, as at C, Fig. 66, which is a section on a b. All other surfaces should be as flat as possible to ensure a correct fit, and if the saw has been carefully used, very little should be left for the paring chisel to do.


When the pins are finished, their exact size and forms must be transferred to the end where the holes are required to be made. This is accomplished by placing the piece, just described, with its pin points resting on the inside of the other piece of wood, the inner surface of the pins touching the line formerly drawn on the ends of the said piece, and the edges flush. Both should be held firmly in this position, and lines traced exactly round the pins by the marker. The lines should now be examined and produced to the end, any error being corrected; then they should be carried square over the end of the wood, and those drawn on the inside should be reproduced on the face by the aid of the sliding bevel. This is to ensure the holes being the same size and shape at both sides, but it will become unnecessary after proficiency in using the tools is arrived at. Everything being now ready for cutting out the holes, the wood is to be fixed in the vice, end up, as in cutting the pins, and with dovetail or tenon saw, cut down exactly inside each set of lines. For cutting out the useless portion, the same remarks apply as to the similar process in forming the pins. Before driving the joint together or home, a small chamfer or corner should be taken off the points of the pins, to give more easy entrance and prevent the other piece being damaged when the pins go through, as in the mortise and tenon joint.
Continue to:
My Books

