Doors. Part 2
Description
This section is from the book "Inside Finishing", by Charles A. King. Also available from Amazon: Inside Finishing (1912).
Doors. Part 2
30. The doorframes, if the finish is to be in the natural wood, should be of the same kind of wood as the trimming of the rooms which the door connects. Usually they are made 1 1/2" or 1 3/4" thick, and in width equal to the thickness of the partition, and rabbeted to fit the thickness of the door.
Upon common work, the door jamb is often made of 1 1/2" stock. However, when rabbeted, this is not thick enough to hold the screws of the hinges properly. If this thickness of stock is used, a stop is sometimes nailed on to form the rabbet. This is not a workmanlike thing to do, as the stop is apt to be loosened by the slamming of the door. If 1 1/2" jambs have to be used, grooves should be cut into them as shown at a, Fig. 28, to hold the stops.
There are several styles of door jambs or frames, but those shown are the ones most commonly used. Figure 28, b, is a popular form, as the door may be hung upon either side of the jamb. Doorframes between rooms which are finished in different woods are veneered to match the rooms in the best class of work.
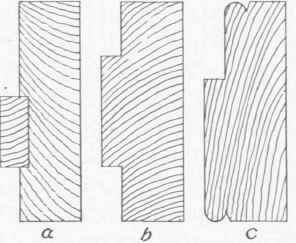
Fig. 28. - Door Jambs.
Door jambs like a and b, Fig. 28, generally are fitted together with a butt joint, as shown at a, Fig. 29, and those like c are mitered, as shown in Fig. 29, b. They should be fastened together by spikes, and squared, being held by battens tacked diagonally across the openings from stile to header, and across the bottom of the frame to hold the stiles parallel. This is very important since, if the doorframe is not square, there will be trouble all through the casing and in hanging the door.
31. The doorframes of a brick house are wider than those of a frame building, as the walls are thicker. The frame is sometimes set as shown in Fig. 30. In this way any size of frame stock may be used, though a paneled frame as wide as the thickness of the wall is often preferred.
32. Setting doorframes. - To set a doorframe economically, the opening left in the studs should be plumb on the sides, both ways, and 1" wider and 1/2" higher than the outside of the doorframe. In this opening, the doorframe should be set perfectly plumb and out of wind, in which position it should be wedged and fastened securely.
The time spent in setting a doorframe accurately is more than compensated for in fitting the casings around it, and in fitting and hanging the door. If the doorframe is not set plumb, the door will swing of itself unless it is fastened open or closed.

Fig. 29. - Joints of Door Jambs.
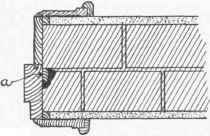
Fig. 30. - Setting a Doorframe in Brickwork.
Wedges or "shims" should be placed between the frame and the stud to allow the frame to be nailed straight; they are used also where the hinges are to be set, so that if it is ever necessary to put a long screw in the hinge, there will be wood to hold it. In setting a 1 1/2" frame this always should be done.
In setting the doorframes of a brick house, a piece should be nailed the entire length of the wall side of the frames, so that the wall may be built around it, as at a, in Fig. 30. It should be so placed that the bricks will have to be cut as little as possible. A piece of 2" X 4" or 2" X 6" should be laid in the brickwork at the bottom of the door opening, level with the floor, to give a nailing for the flooring and the threshold.
It is the carpenter's business to assist the mason in setting the frame, and he should see that it is securely braced plumb and out of wind before the wall is built around it.
33. Jointing. - A door should be jointed before the threshold is cut down, and the edges made to fit the rabbets of the frame closely. In doing this, the advantage of setting the doorframe accurately will be appreciated.
The door should be fitted carefully to the header or top of the doorframe, at a, Fig. 31, pushed into its place, and wedged there, as at b.
The threshold, or a piece of the same thickness, should then be placed against the bottom of the door, as at c, and a pencil line (d) made on the door, to indicate the exact length of the door after the threshold is in place. The door should be sawed off about 1/8" shorter than this line. If a carpet is to be laid over the threshold, either the door should be still shorter, or the threshold planed thinner.
It is a good plan to dispense with a threshold by building up 3/8" or 1/2" under the floor; this generally will allow the door to swing over a carpet or rug.
34. Hanging a door. - In hanging, or fitting the hinges to a door, trouble will be saved by using care and accuracy at each step of the work. If the hinge stile of the door is not perfectly straight sideways, the rounding side should be placed next the rabbet, as a good joint between the door and the back of the rabbet can be more easily made than if the hollow side of the stile were to be fitted. This applies more especially to the hinge joint, as a slight hollow in the lock stile will be remedied by the latch.
After the door has been fitted to the side and head rabbets, as at a, e, f, Fig. 31, it should be dropped 1/16" by drawing out the wedge (b). Make a knife mark 8" from the top of the door, at g, to which the top end of the upper hinge should be placed; for the bottom of the lower hinge, make another mark at h, on line with the top of the bottom rail of the door. These marks should be made upon both door and doorframe simultaneously.
Remove the door; stand it edgeways on the floor with the hinge edge up; lay the hinge carefully in its place, the top end at g, Fig. 32. With a knife, mark carefully the other edge of the hinge at s. Make corresponding marks in the rabbet of the doorframe, at j, Fig. 32. Gauge from the rabbet or back side of the door, or the side which fits against the rabbet, the distance, k, which marks the location of the back edge of the hinge. This distance is governed by the thickness of the door, and the projection of the round of the hinge beyond the face of the door, necessary to allow the door to swing wide open and clear the finish.
Continue to:
My Books

