Doors. Part 3
Description
This section is from the book "Inside Finishing", by Charles A. King. Also available from Amazon: Inside Finishing (1912).
Doors. Part 3

Fig. 31. - A Fitted Door.
With a piece of wood of the same thickness as k, or the above gauged distance, laid in the rabbet of the doorframe, make the mark, m. This is the exact location in the rabbet of the back edge of the other half of the hinge.
Square the top and bottom marks of the hinge (g, s and j, j) to the lines k and m. Make the gauge mark upon the face of the door at n, and upon the frame at p, to denote the depth of the slot, in which each half of the hinge is to rest.
This should be of such a depth that the joint between the door and the frame at r will be a little less than 1/16, to insure that the paint upon the door and upon the frame will not make the door " hinge-bound." With a sharp chisel, cut carefully to the lines of both the top and bottom hinges; bore holes for the screws, and fasten the hinges on. Ordinarily a l\" screw is used for this purpose.

Fig. 32. - Cutting in the Hinges.
If the door is sprung, and strikes the rabbet of the frame on the hinge stile, or does not fit the rabbet on the lock edge (/, Fig. 31), do not plane the stile of the door to fit, but instead mark the rabbet carefully, and with a rabbet plane take from the jamb the wood which prevents the door from closing.
The lock edge of the door should be jointed a little under so that it will clear the frame easily. It is quite a general rule among carpenters to fit the face of a door so that a twenty-five-cent piece will just slip into the joint all around it. After the door is fitted satisfactorily, it is ready for the lock.
The loose-pin butt (a, Fig. 33) and the loose-joint butt (b) are the types of hinges generally used. The latter has an advantage over the former in the ease with which a door may be removed and replaced, though some trouble may be caused in keeping the right and left hinges separate. The terms "right" and "left' as applied to hinges and locks refer to the direction in which the door swings when it is pushed open.

Fig. 33. - a, Loose-pin Butt; b, Loose-joint Butt.
Also there are several forms of spring and special hinges, which are for use upon doors swinging both ways, or self-closing. Hinges should be set so that the door will swing wide open without touching the finish, as shown at z, Fig. 32. The pins of all the hinges should be upon the same vertical line. Hinges for cupboard doors and other common work are often cut entirely into the door, as at a, Fig. 34; but upon the best work they are halved into both the door and the casing, as at b.
35. Fitting locks. - (A.) The rim lock, shown in Fig. 35, is less expensive than a mortise lock, and as it may be put on very easily, is used upon the cheapest work. If the door rattles, the striker or latch plate (a) may be set back into the frame, or the lock itself may be set out by means of pasteboard or thin wood between it and the door.
Padlocks are useless unless the hasp and staple by which they hold the door are fastened firmly in the wood; if padlocks are to be exposed to dampness, those should be selected which have brass or bronze tumblers, otherwise they will rust so badly as to be worthless in a little while.
(B.) To fit a mortise lock (Fig. 36), bore a 3/4" hole for the knob spindle, as at a, and a 5/16" hole at 6, for the key, being sure that they are accurately located before boring. The mortise should then be marked, and "beat out"
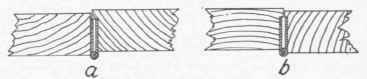
Fig. 34. - Cupboard Hinges.
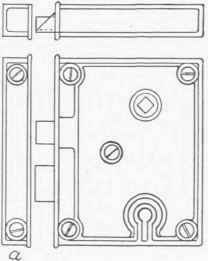
Fig. 35. - A Rim Lock.
or cut out with care, so that the sides of the mortise shall be parallel with the sides of the stiles of the door. No more wood should be cut out than is necessary, as the door stile may be weakened. Put the lock in the mortise and mark around the face plate with a sharp knife; remove the lock and cut to these marks carefully, just deep enough to allow the face of the plate (c) to come flush with the edge of the stile.
The striker id, Fig. 36) should be located in the doorframe as in Fig. 37, which shows a cross-section at /, / of Fig. 36, so that the inside of the door (e) will be held closely against the rabbet of the doorframe at b, to prevent rattling. It should be placed at such a height that the bolt and latch will enter their places as near the vertical center of the hole as possible. It is important that the distance c should be the same both in the door and in the rabbet, otherwise the latch will not enter the striker, or the door will rattle. Be sure that the wood is cut away so that the latch and bolt will enter the openings in the striker easily.
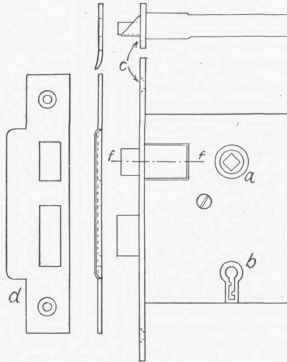
Fig. 36. - A Mortise Lock.

Fig. 37. - Placing the Striker or Latch Plate.
Usually both rim and mortise locks are reversible, that is, their latches may be changed to suit either a right or left hand door.
Cupboard locks are usually screwed to the inside of the door.
36. The threshold. - In cutting down a threshold, considerable skill is necessary to make a good job. Figure 38 shows the different steps of the process. Drive nails in the floor at a, a, opposite each side of the doorframe, at exactly the same distance from each rabbet (d), and far enough from the plinth to allow the threshold to be moved endways without touching it. Mark lightly upon the floor the line b, b, the edge of the threshold when it is in place; this line should be parallel with the threshold when the edge c, c of the latter is resting against the nails a, a. The distance (z) between b and c should be taken with a pair of dividers, and with one leg touching the rabbet (d) make lightly a short scratch at e upon the threshold, marking the other end also. Without changing the dividers, lay off the same distance from the jamb (/) and from the face of the plinth (g), as these denote what will have to be cut out to allow the threshold to go back into its place.
Continue to:
My Books

