Glazed Sash
Description
This section is from the book "Inside Finishing", by Charles A. King. Also available from Amazon: Inside Finishing (1912).
Glazed Sash
The glass should be held in place by glazier's points while the putty sets. These are small triangular pieces of sheet metal which are driven into the sash with a chisel as shown at a, Fig. 49. The putty, as soft as can be handled, should be laid in and run down with a putty knife to the angle shown at b (also at 6, Fig. 47), care being used that the putty does not project beyond the rabbet of the sash, so as to be visible from the other side.
If an old sash requires a new light of glass, the old putty should be cut out with a chisel, or if there is time, soften it with hot, soapy water, or some of the preparations made for the purpose of removing paint and putty, of which there are several upon the market. After the glass is set, the putty should be painted the color of the rest of the sash.
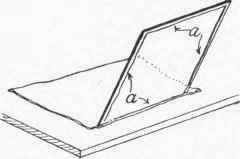
Fig. 48. - Bedding Glass.
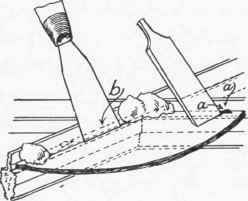
Fig. 49. - Setting Glass.
40. Stock sizes of sash. - Common sash are made in stock sizes in a variety sufficient for almost any purpose. These are determined by the regular sizes of glass, as the following list shows.
This list is for four-light windows, all 1 3/8", or 1 3/4" in thickness; it will be noticed that an allowance of 5" in width, and 6" in height, is made for the outside sizes of the sash, or the size of the frame, between the pulley stiles in width, and the stool and header in height at b, c, Fig. 39; if a different allowance is desired, it easily may be made.
Size of Glass | Size of Window | |||||
10" | X | 20" | 2' 1" | X | 3' | 10" |
10" | X | 22" | 2' 1" | X | 4' | 2" |
10" | X | 24" | 2' 1" | X | 4' | 6" |
10" | X | 26" | 2' 1" | X | 4' | 10" |
10" | X | 28" | 2' 1" | X | 5' | 2" |
10" | X | 30" | 2' 1" | X | 5' | 6" |
10" | X | 32" | 2' 1" | X | 5' | 10" |
10" | X | 34" | 2' 1" | X | 6' | 2" |
10" | X | 36" | 2' 1" | X | 6' | 6" |
12" | X | 20" | 2' 5" | X | 3' | 10" |
12" | X | 22" | 2' 5" | X | 4' | 2" |
12" | X | 24" | 2' 5" | X | 4' | 6" |
12" | X | 26" | 2'5" | X | 4' | 10" |
12" | X | 28" | 2' 5" | X | 5' | 2" |
12" | X | 30" | 2'5" | X | 5' | 6" |
12" | X | 32" | 2' 5" | X | 5' | 10" |
12" | X | 34" | 2'5" | X | 6' | 2" |
12" | X | 36" | 2'5" | X | 6' | 6" |
12" | X | 38" | 2' 5" | X | 6' | 10" |
12" | X | 40" | 2' 5" | X | 7' | 2" |
12" | X | 42" | 2'5" | X | 7' | 6" |
12" | X | 44" | 2'5" | X | V | 10" |
12" | X | 46" | 2' 5" | X | 8' | 2" |
12" | X | 48" | 2' 5" | X | 8' | 6" |
14" | X | 24" | 2' 9" | X | 4' | 6" |
Size of Glass | Size of Window | ||||
14" | X | 26" | 2' 9" | X | 4' 10" |
14" | X | 28" | 2' 9" | X | 5' 2" |
14" | X | 30" | 2' 9" | X | 5' 6" |
14" | X | 32" | 2' 9" | X | 5' 10" |
14" | X | 34" | 2' 9" | X | 6' 2" |
14" | X | 36" | 2' 9" | X | 6' 6" |
14" | X | 38" | 2' 9" | X | 6' 10" |
14" | X | 40" | 2' 9" | X | 7' 2" |
14" | X | 42" | 2' 9" | X | 7' 6" |
14" | X | 44" | 2' 9" | X | 7' 10" |
14" | X | 46" | 2' 9" | X | 8' 2" |
14" | X | 48" | 2' 9" | X | 8' 6" |
15" | X | 24" | 2' 11" | X | 4' 6" |
15" | X | 26" | 2' 11" | X | 4' 10" |
15" | X | 28" | 2' 11" | X | 5' 2" |
15" | X | 30" | 2' 11" | X | 5' 6" |
15" | X | 32" | 2' 11" | X | 5' 10" |
15" | X | 34" | 2' 11" | X | 6' 2" |
15" | X | 36" | 2' 11" | X | 6' 6" |
15" | X | 38" | 2' 11" | X | 6' 10" |
15" | X | 40" | 2' 11" | X | 7' 2" |
15" | X | 42" | 2' 11" | X | 7' 6" |
15" | X | 44" | 2' 11" | X | 7' 10" |
15" | X | 46" | 2' 11" | X | 8' 2" |
15" | X | 48" | 2' 11" | X | 8' 6" |
Sash are spoken of as 2-, 4-, 8-, or more light; a hung window is composed of two sash, the upper and the lower. Thus in speaking of a window, a carpenter would say, "a 14 X 28, 4-light window," or "a 10 X 12, 12-light window," omitting the word "inches," as that is always understood.
To find the outside size of a sash, its different members must be estimated. To allow for any slight variation in cutting, or for the sash being out of square, the glass should have 1/8" play; that is, the opening for a 14 X 30 glass should be 14 1/8" X 30 1/8". To this must be added the width of the stiles between the rabbet and the outside edge, and the width of the muntins between the rabbets; the same rule applies in finding the height of the opening.
Thus the outside dimensions of the sash of a 14 X 30, 4-light window, are 33" X 66".
Single sash may be described as being so many lights of a certain size, and to avoid mistakes, the size of the glass and the size of the outside of the sash should be given in an order, omitting nothing which will make the order plain.
41. Fitting a sash. - (A.) In jointing the sash to fit a window frame, the upper one should be fitted first, the edges being jointed so that the meeting rail will be as nearly level as possible. The edges of the lower sash should be jointed so that the tops of the meeting rails of both sash will be parallel in about the relation shown at 6, Fig. 50; this distance should be taken with dividers and scribed off the bottom rail of the lower sash, as at either c or d. If a glazed sash is being fitted, it is obvious that the scribing should be done upon the inside of the sash at d, before the stool cap of the window finish is nailed on, though it is equally plain that the best place upon which to scribe the bottom rail of an unglazed sash is upon the outside at c, as the inside, at d, will be out of sight when the stool cap is in place. A bevel should be set to the angle of the window stool with the pulley stile, and the bottom rail of the sash planed to fit it. The sash should be made to bear a little harder upon the outside than it does upon the inside, as at e, to prevent the water from driving under. When the sash are properly fitted, the tops of the meeting rails will be flush, as at /. The sides of the sash should be made to run easily, but not enough to rattle perceptibly.
(B.) Sash generally should be fitted and hung before the house is plastered; at all events before the finish is put up, as the house is thereby closed against the weather. Another advantage in hanging the sash before the finish is put on is that the cord may be pushed through the pulley from the window opening, and the weight tied on; the cord may then be cut and fastened to the sash without taking the pocket of the frame out, obviously an easier and more economical way than to hang the sash after the house is finished inside. If it is necessary that the house should be finished before the sash are hung, the weights are usually put in, and the cord run through the pulley from the back of the stile. A knot is then tied in it, so that it will not slip back, after which the sash may be put in at any time, as the cord is ready for it. This is not a desirable thing to do, as the cord is in the way in jointing the upper sash.
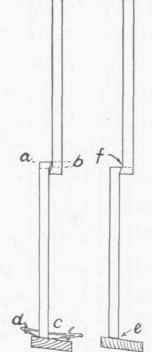
Fig. 50. - Fitting Sash.
If sash are not hung, nor the cord put in before the standing finish is put on, it will be necessary to remove the pocket of the window frame and to pass the cord over the pulley from the outside, and to pull it down to the pocket between the back of the pulley stile and the stud by means of a "mouse." This is a small weight which can be pushed through a pulley; it is often made on the job by tying a nail on a string, or by rolling a piece of sheet lead around the end of a piece of twine. After the other end of the twine has been tied to the end of the window cord which is to go through the pulley, the mouse may be pushed through the pulley and allowed to drop down between the stud and the pulley stile until it may be grasped by the hand through the pocket, at p, of Fig. 39. The weight is then tied on and pulled up to the back of the pulley; the sash is put in its place at the bottom of the opening in which it is to slide, and the cord cut off about 4" below the 1" hole in the edge of the sash at f, Fig. 43.
Continue to:
My Books

