How To Use The Tools. Part 6
Description
This section is from the book "Our Workshop", by Anonymous. Also available from Amazon: Our Workshop.
How To Use The Tools. Part 6
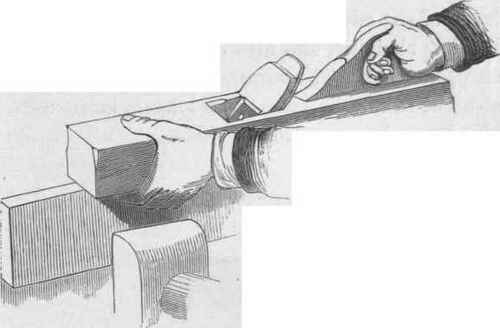
Fig. 15.

Fig. 16. - The Square.
The square (fig. 16) is the tool by which the truth of all right-angled surfaces is. ascertained. The joiner's square consists of a steel blade, which is made quite straight on the edges, which also require to be perfectly parallel to each other. This blade is firmly fixed exactly at right angles in a stock formed of hard wood, which is faced with brass on the inner edge to increase its durability. The inner edge of the stock must be firmly held against the flat surface of the board, taking care that it rests fairly; the square must then be gradually lowered till the edge of the blade comes in contact with the edge of the board. If the edge be square to the sides, the blade of the square will touch throughout the thickness of the board, but if the work be untrue, the blade of the square will rest on the highest point, which must be reduced till the square bears fairly. The square must be applied at intervals of a few inches throughout the length of the plank, and frequently during the progress of the work.

Fig. 17. - Rule.
When the edge has been made true, both in the longitudinal and cross directions, the board must be removed from the chops and laid flat on the bench. The finished width of the board is now to be marked. If the plank be more than six inches wide, the rule (fig. 17) will be the proper means to employ. Suppose the plank is required to be six inches wide throughout its length or parallel, the width can be measured and marked at each end on the surface; a straight-edge must then be adjusted to the marks and a line ruled. If the work to be marked is only two or three inches wide, the marking-gauge (fig. 18) is used. This tool is made of hard wood, and consists simply of a stem furnished with a closely-fitting block, which is capable of sliding stiffly along it, and of being fixed in any desired position, either by a wedge or a set screw. Near one end of the stem a flat steel point or scriber is inserted, for marking or scoring a line on the work. The point should not project more than one thirty-second part of an inch, or it will make a deep unsightly mark.

Fig. 18. - Marking-gauge.
To adjust the gauge it is only necessary to slacken the wedge or screw which fixes the movable block or head, and to hold the latter in the hand and strike either end of the stem against the bench, or tap it with the hammer. If the distance from the point of the scriber to the face of the head be two inches, and we wish to gauge a line, say two inches and a half, or any greater distance within the range of the gauge, we must strike the opposite end of the stem to that in which the scriber is fixed; and the reverse, if we desire it, to decrease the space between the head and the point.
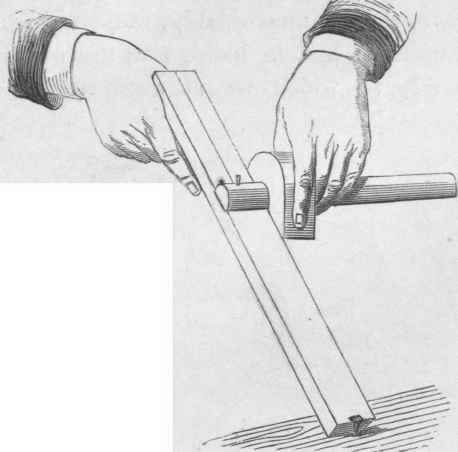
Fig. 19
The correct way of holding the marking-gauge is shown in fig.19. The work, if light, is supported in an inclined position by the left hand, and the gauge is applied by the right. It is necessary to keep the head of the gauge firmly against the edge of the work to which it is wished to make the line parallel, otherwise any crookedness in the grain of the wood will be liable to send the gauge askew.
We have, though unavoidably, wandered from the operation we had in hand, viz., the planing of a board, to which we at once hasten to return.
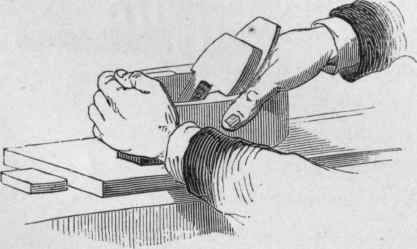
Fig. 20.
Both edges of the plank are now supposed to be true and parallel to each other; it is therefore only necessary to finish the surfaces with the smoothing-plane to complete our first attempt at carpentry, Fig. 20 represents the manner of holding the smoothing- plane. The right hand is placed behind the wedge, so that the thumb shall press against one side of the stock, and all the fingers on the other. The left hand is clasped round the front end of the plane, and the thumb rests on the upper surface. The workman has complete control over the plane, and if the grain of the wood be short and cross, or hard, knotty, or tough, he imparts a "side-long" sweep to the tool, which somewhat facilitates its action as a smoother by enabling it to attack the grain as-favourably as possible. If the wood be clean and of uniform hardness, the course of the plane should be quite straight, and the strokes of moderate length. At the termination of every stroke the plane is entirely lifted off the work, and is reapplied at any point, where, either from the indication of the straight-edge or the appearance of the work, it may be deemed requisite by the carpenter.
If the thin "stuff" which we have "planed up" be intended for forming the "carcase" of a box or any similar piece of rectangular work, the sides must now be marked out and cut off. The plank is suffered to lie flat on the bench, and the square is applied, so that the stock may rest fairly against one of the edges which has been carefully planed. The square must be adjusted, so that the outer edge of the blade may be within the lowest part of the end of the plank, which is next the "stop" of the bench. A pencil line is now to be marked, taking care that it be perfectly square to the edges of the plank. The board must next be removed and fixed in the chops of the bench, so that the end just marked may stand a little above them. The end is supposed to have been sawn tolerably square to the edges, when the wood was "roughed out;" but if, owing to bad workmanship, the end is much out of truth with the line marked from the square, the saw must be employed to remove the greater part of the material, previously to applying the plane. The smoothing-plane must be very finely set, otherwise it will "tear up" the fibre of the wood, which is exceedingly fragile in the cross direction of the grain. The plane must be used cautiously when shooting the ends, to avoid the "spalling off," that is, breaking away the fibre as a splinter on the front edge towards which the plane is moving. The tendency to "spall off" may be lessened by holding the plane somewhat obliquely, to enable the iron to attack the fibre in the cross direction, and by running off the stroke by lifting the plane from the work just before the extreme corner is reached.
Continue to:
My Books

