How To Use The Tools. Part 7
Description
This section is from the book "Our Workshop", by Anonymous. Also available from Amazon: Our Workshop.
How To Use The Tools. Part 7
The result of this treatment will be to leave the far corner too high, but this can be rectified by turning the board and bringing the front edge towards the workman. The plane is again used as before, till the high corner is reduced to the proper level. The square must now be applied from the edge, to discover if the end be truly at right angles to it, and also from the surface, to test the accuracy in the direction of the thickness. Before using the square, any roughness on the edges of the work must be removed, otherwise the square will fail to indicate its actual condition, and will lead the workman astray.
If the longitudinal edges of the work be strictly parallel to each other, the end of the work will be square, or at right angles to both of them. By applying the square to the edges respectively any discrepancy which may exist will be made apparent.
Sometimes the square is untrue. If the blade be badly fitted or ill-secured in the stock it is liable to shift, and occasion much trouble. The truth of the square may easily be tested by applying the stock to the edge of a board, which has been carefully "shot," and drawing a line against the outer and inner edges of the blade. The square must then be turned over, and if the edges still agree with the lines it is true. It may also be tested by another square which is known to be accurate.
The length of one side of the box is now measured off from the end which has just been completed, and a line is squared across. The saw must be kept outside this line, which is to be approached only by the plane. The end of the plank is again squared and planed up, and and so on successively until the four sides are cut off. The opposite end of each of the sides must then be planed, after which the carcase may be nailed or glued together. The various methods of uniting works will be considered hereafter.
If the work be thin, the edges are not sufficiently wide to afford a steady base for the sole of the plane, consequently the difficulty of "shooting the edge true" is materially increased. The shooting-board is a valuable auxiliary when the work to be planed is long and thin. Fig. 21 is an end, and fig. 22 a perspective view of a shooting-board, suitable for the longitudinal edges of work. It consists of a stout plank, about four feet long and sixteen inches wide. To the upper side of this piece, which is called the bed, and which must be quite true, is secured a strip, c d, of the same length, and about twothirds of the width of the bed. A stop, s, is fixed at the end of the strip, to keep the work steady. It is important that the strip on which the work, w w, is laid be quite flat, and square to the upper side of the bed, a b, to which it is permanently fixed by screws.
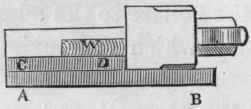
Fig. 21.
If the bed and strip of the shooting-board be true, and the side of the plane, which rests and slides on the bed, be strictly at right angles to the sole, the edges of the work will be made accurately square to its sides. The work must be tested with the square, and if the edges be not at right angles, the defect is probably occasioned by the "iron," which may not be square in the stock; a few taps on the corner of the iron will rectify the discrepancy.
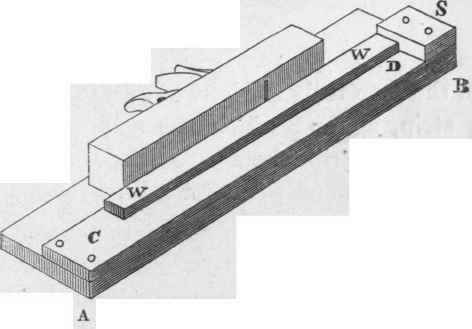
Fig. 22.
Fig. 23 shows the work, w, placed at right angles to the course of the plane, to enable us to finish the end. It is important to have the end, f, of the stop truly at right angles to the edge of the strip, against which the sole of the plane runs. The strip should be made as wide as possible, to afford room for a broad stop, which is of much assistance in keeping the work square while it is being planed.
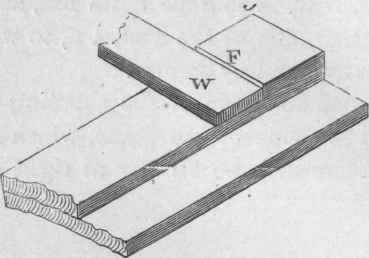
Fig. 23.
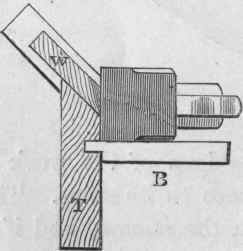
Fig. 24.
The edge of work is sometimes beveled, instead of at right angles, to the sides. When this is to be done, the shooting-board must be modified, as in figs. 24 and 25. The bed, B, has a rebate planed along one of its edges, r, which fits a groove formed in the side of the board, t, the upper edge of which is beveled to the angle we desire to impart to the work, generally forty-five degrees.
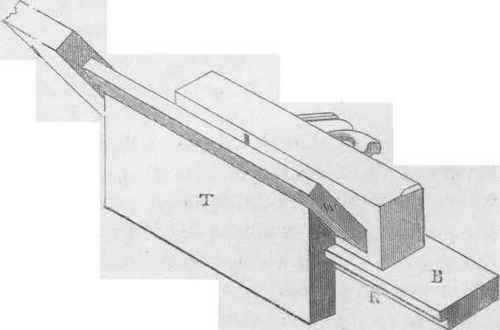
Fig. 25.
If we require the end of the work to form any other than right angles with the edges, a separate block, I (fig. 26), of the correct angle, must be temporarily attached to the shooting-board, which is similar in every respect to the one represented in fig. 23. The loose blocks are usually made to an angle of forty-five degrees, which is very frequently employed in joinery works.

Fig. 26.
The stop of the shooting-board acts beneficially in checking the tendency to spall off, to which the work is so liable when planed across the grain. If the work be kept firmly against the stop, the wood, which otherwise might spall off, is well supported.
The use of the hand-saw and the plane seemed to call for special notice, but it is unnecessary to consider the several other tools employed by the carpenter and joiner, until we require them for our work.
Continue to:
My Books

