Simple Works In Wood. Part 8
Description
This section is from the book "Our Workshop", by Anonymous. Also available from Amazon: Our Workshop.
Simple Works In Wood. Part 8
Fig. 40.
Fig. 41.
A hole must be made for the screw, but not larger than is absolutely necessary, as any excess of size will rob the screw of a part of its hold. There is, however, danger of splitting the wood if the hole be too small; and sometimes the screw, after entering a short distance, "strips" the thread or hold it had obtained, and requires to be replaced by one of larger size. This is very likely to occur if the wood be hard and brittle, as the point of the screw drives the fibre of the wood before it, and contracts the hole so much that the slight hold the screw has obtained is insufficient to enable it to overcome the resistance. The hole should be as nearly as possible the size of the screw at the bottom of the thread, and if made in hard wood the material must be removed by a gimlet like fig. 42, if the hole be small, and if large, by a twisted gimlet, fig. 44. Very small screws require so little room that, generally speaking, the hole for them may be made by a brad-awl, which is also used for making holes in soft wood like deal, etc, the fibre being so yielding that it is unnecessary to remove ii, as it may be so easily displaced.

Fig. 42.
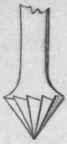
Fig. 43.

Fig. 44.
It is necessary when screwing two pieces of wood together to make the hole in the piece which receives the head sufficiently large to allow the screw to slip through easily. The head of the screw must be let into the wood by removing the "stuff" round the edge of the hole by a counter-sink bit, fig. 43. The counter-sink should only be deep enough to suffer the head to lie fairly on a level with the surface of the work. In the absence of a counter-sink bit the edge of the hole must be pared away by a chisel.
A little tallow rubbed over the threads of the screw will greatly facilitate its progress, and also preserve it from rust, which powerfully opposes any future attempt to remove the screw. In the act of unscrewing, the downward pressure on the screw-driver should be only sufficient to keep the tool in the nick, otherwise the thread in the wood will be strained, and perhaps stripped, by the needless resistance it has to overcome. Considerable pressure may be required to keep the screwdriver in the nick when endeavouring to start a screw which is very firmly fixed; but no injury is occasioned at this time, as the entire length of the thread in the wood is sustaining the resistance.
We have endeavoured to point out the difficulties which are likely to arise where nails and screws are employed, and to suggest the best remedies in each case; but as practice alone can enable our readers to avoid casualties incidental to amateur workmanship, we will leave this subject and consider some of the tools of which we have not yet spoken.

Fig. 45.
The table, compass, or lock-saw (fig. 45), is used for cutting out curved or sweep work. In general formation it is similar to the hand-saw (fig. 2), of which it may be considered a diminutive copy. The blade is sufficiently narrow near the extremity to enable it to follow a curve of two or three inches radius.
A somewhat similar but more delicate instrument is met with in the key-hole or fret-saw (fig. 46). The blade of this saw is thinner and more flexible than that of the table-saw, and is fixed in the handle by two set screws which can be slackened by an ordinary screw-driver. A narrow slot penetrates the handle in the direction of its length, through which the blade can pass, so that it may be shortened or lengthened at pleasure, to suit the character of the work in hand. This provision is necessary to save the blade from being bent or broken when the point is used.
Fig. 46.
Neither of these saws is capable of withstanding rough usage, and if they stick fast in the work must be carefully extricated. These saws do not always make their first incision at the edge of the wood, but sometimes in the middle of a board; consequently, a hole must be bored at one, and occasionally at both ends of the intended skerf, for the introduction and removal of the saw. Most of the curved works that amateurs are likely to attempt may be executed by these tools.
For some purposes, however, a very fine saw-kerf may be necessary, and the curve is perhaps too small for either the table or the key-hole saw.
In this case the turning saw (fig. 47) would be wanted. The blade is so slight and flexible that it cannot be driven forward by one end in the usual manner, and must necessarily be stretched in a wooden frame, to impart sufficient rigidity to enable it to act satisfactorily. The extremities of the blade are secured by pins to round handles which are formed with circular necks fitting stiffly into the lower ends of the frame.
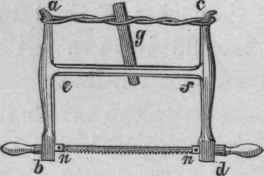
Fig. 47.
The two end-pieces or side-rails, a, b, c, d, which form the principal members of the frame, are kept apart by the cross-bar or stretcher, e f, the ends of which penetrate a short distance into them, but are not secured, as the side rails are required to rotate slightly on their extremities. To the top of the frame, at a c, is secured a coil of cord which is twisted by a lever (g) until, by shortening, it contracts the top of the frame and expands the lower extremity, thus imparting the requisite degree of tension to the saw. The circular necks of the handles are longer than the thickness of the frame, and diametrical slots or kerfs are made in the projecting portions (n n) for the reception of the ends of the blade, which are secured by small pins, one in each neck. One extremity of the blade must be disconnected from its handle if the saw cannot be introduced or withdrawn at the margin of the work. The frame, by slightly rotating on the circular necks, can assume any angle which convenience of handling or the outline of the work may require, and without affecting the course of the saw.
Continue to:
My Books

