The Mallet
Description
This section is from the book "Art And Education In Wood-Turning", by William W. Klenke. Also available from Amazon: Art And Education In Wood-Turning.
The Mallet
Lignum-vitas is the best wood for a mallet head, Plate VIII, but in public schools where only the cheaper grades of wood are supplied, it is necessary to fall back on good hard maple.
The turning of a mallet is very simple; the only part needing great care and attention will be the boring of the hole in the head and then the fitting of the handle to that hole, Fig. 34.

Fig. 34. Boring a Mallet Head.
In order that the hole in the head may be at right angles to the axis, and true in every direction, it will be necessary to locate this hole with the greatest accuracy.

Plate VIII.
Fig. 35 illustrates one method for locating the hole in the head accurately. While the wood is in the lathe, and before sandpapering, mark the center line around the head. The next step will be to cross this line in two places, so that a line passing thru these two points will be at right angles to the axis. Set the surface gage on the shoe of the tee-rest, and the point of the gage so as to coincide with the point of either the live or dead center (removing the wood, of course, in order to set the gage).
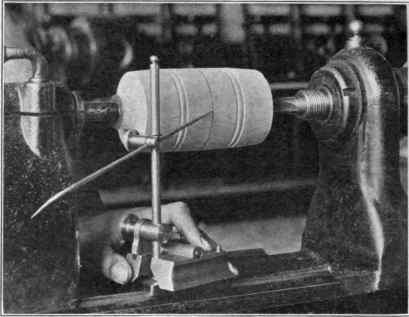
Fig. 35. The Surface Gage to Locate the Center for Boring.
Place the wood back in the lathe, tightening on the hand-wheel of the tailstock so that the wood cannot turn. Hold the surface gage flat on the shoe of the tee-rest, being careful not to move the adjustments on the gage; then mark the intersection. Place the gage on the opposite side of the head, not disturbing the position of the wood, and again mark the intersection. The two intersecting points obtained are the centers for the holes to be bored.

Fig. 36.
The second method, Fig. 36, illustrates a circle drawn on paper, equal to the diameter of the head of the mallet at the center line. Step the radius around the circumference six times, and any two opposite points, as connecting with a line passing thru the center of the circle, will be the points to use. Cut the paper from B to A and around the circle as indicated in Fig. 36, and place it over the head at the center line. Without moving the paper, mark the intersection of the center line in two places, C and D, Fig. 36.
After having carefully located the necessary points, make a deeper impression with a pair of dividers; then sandpaper and finish. If a chuck is available for boring in the lathe, place the point of the dead center into one of these holes (mentioned above). and the drill into the other. Fasten the tailstock to the bed of the lathe, and while the left hand holds the mallet head, let the right hand turn the hand-wheel and force the wood against the drill, thus boring the hole. Care must be taken not to use high speed, and not to force the hand-wheel too hard, otherwise the drill will become very hot. A metal drill works better in the lathe than an auger bit. When the hole is almost thru, remove the dead center, butting the head of the mallet against the spindle where the drill can bore into it without ruining the dead center pin.
By means of a V block and a drill press, it is also easy to bore the hole.
Continue to:
My Books

