Model VIII. A Lamp Ok Vase Stand
Description
This section is from the book "Manual Instruction: Woodwork. The English Sloyd", by S. Barter. Also available from Amazon: Manual Instruction: Woodwork.
Model VIII. A Lamp Ok Vase Stand
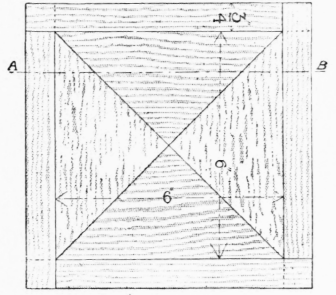
Fig. 175. - Face and edge planing, angle bridle joint, parquetry laying, and blocking are involved. No fresh tools are required to make this model.
The drawing should include all those in the illustration to give a correct representation of all the dimensions of the model.
Four pieces of wood 7 ins. long and 1 in. square will be required for the outside framing. These may be in two colours, or all of the same wood.
The grain in the pieces of parquetry runs parallel to the edges of the square, and the opposite triangles being of the same wood, two rhomboidal slabs, one of mahogany or walnut, and one of sycamore or bass-wood, will be required, 6 1/2 ins. in length on the greater sides, but in cutting them out, as in previous exercises, timber can be saved by sawing each rhomboid successively from a plank of the correct width, 3 1/8- ins. and 1/4 in. thick, using the bevel set at 45°
The base of the parquetry should be a slab of yellow deal 1/2 in. thick and 6 1/2 ins. square. The blocks to support the slab are made from a strip of any common wood 1/2 in. square.
Having planed all the wood true, the framing had better be made, and as each side will have a mortice at one end and a tenon at the other, they can be all held together, and made of absolutely equal length by squaring a cut line across close to each end, marked on the face side. Note the face-mark in the illustration (fig. 176). Mark a cut line at one end and a pencil line at the other, to give the depth of mortice and tenon; when the joints are fitted together, the sides will be of equal length.
Section on a b.
Side elevation.
Plan.

Plan of portion of back.

Isometric projection of joint at the angle of the framing.
Fig. 175.
Complete the angle bridle joints as in the previous exercise, but do not glue them up yet.
The rhomboids for the parquetry should now be very carefully sawn in halves along the short diagonal, and shot true on the long edges in the shooting board. Now one of the shorter edges of each piece should be shot at 45° and the triangle finished, so that its altitude is 3 ins. full, and the long sides when finished are consequently a full 6 ins. in length. The four pieces when placed together will make a square.
The triangles can now be glued to the foundation of yellow deal, which will be large enough to admit of nails being driven in outside the corners of the parquetry to hold the pieces together, as in Exercise VII., fig. 166.
When the glue is quite dry cut off the 1/4 in. of waste in the foundation, and plane the edge of both parquetry and yellow deal down to the exact dimensions - the parquetry was purposely left 'full' dimensioned, or a shade over the measurements, to allow of this. Glue the framework round the inner plate, and glue the joints together. The top of the parquetry should be level with the joints, or stand up very slightly from the surface. Before the glue is properly dry, the blocks on the back should be inserted, as shown in the back plan of portion of the plate in fig. 175. When the glue is quite dry, finish the model with trying and smoothing planes, taking care, in cleaning the edges, to plane inwards from the corners across the end grain of the framing to prevent breaking it out.

Fig. 176.
Continue to:
My Books

