Model XVI.- Triangular Framing Carrying Shelves
Description
This section is from the book "Manual Instruction: Woodwork. The English Sloyd", by S. Barter. Also available from Amazon: Manual Instruction: Woodwork.
Model XVI.- Triangular Framing Carrying Shelves
Fig. 219
This model gives a slight variation of the dovetailed halving joint, and another application of the wedged mortice and tenon. It is somewhat difficult, and involves a large amount of material: exceptional boys only should therefore be allowed to attempt it.
The front and side elevations, and the plan in fig. 219, should all be drawn by the pupil.
The wood required for this exercise - yellow deal or bass-wood - is as follows: -
For the stiles, two pieces 1 ft. 7 ins. long, 1 3/8 in. wide, and 1 in. thick; for the rails and struts under the shelves, eight pieces of 1 in. by 7/8 in. wood, two of them 6 ins., two 6 1/2 ins., and four 8 ins. long. Two pieces of 3/4-in. wood, one of them 6 1/4 ins. and the other 6 3/4 ins. wide, and each 2 ft. 5 ins. long, will be wanted for the shelves.
Commence work on the framing, and having planed it all true and just over the dimensions, to allow for the final cleaning off, set out the mortice and tenon joints, marking the opposite similar pieces together, as in previous exercises. Make the mortices in the back, and cut the tenons and wedges.
To make the lapped dovetail joint, first cut the dovetails, then put the rails into the mortice of the back and lay the struts in the position they are to occupy; this gives the shape of the socket, which can be marked with a chisel, round the line of contact of the two pieces of wood. Cut out the sockets in both back and rails, and fit up the framing without glueing it, to test the joints. They should be correct, but in actual work a common fault is to make the two brackets on the same stile not exactly in the same plane, so that when looked at from the front one of them appears twisted.
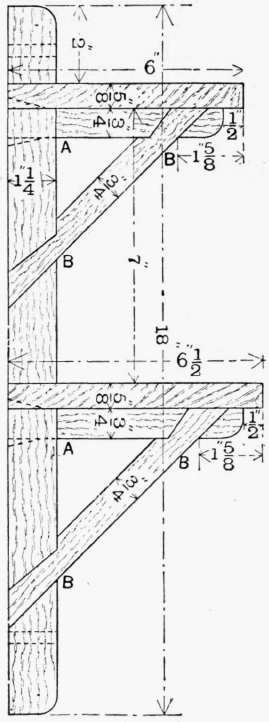
Side elevation.

Front elevation.
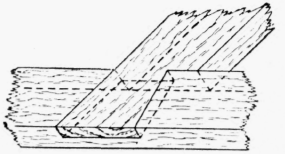
Sketch of joint of strut.
Plan.
Fig. 219.
This fault may be discovered at once, or, if not existing, it may be created in cramping up the glued joint unless great care is taken. On the other hand, any slight 'winding' which is now visible may perhaps be corrected in cramping up.
The joints may now be taken apart, plentifully glued, and cramped up. The cramps should be applied to the end of the rail and to the back, just below the mortice. This has the effect of pulling up all the joints in the triangle, and when the wedges are driven in, and the glue is well squeezed out, the cramps may be removed. The corners of the brackets and back stile should be rounded off with a chisel used vertically, finished with file and glass-paper, and the holes bored in the back. The shelves should next be planed up true to dimensions both on face edges and ends, and the corners rounded off to match those of the framing.
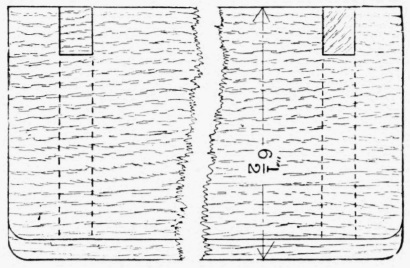
Saw out the notches to allow the stiles to pass through, and fasten the shelves to the rails, using three nails or screws to each bracket, 1 1/4 in. long.
Continue to:
My Books

