Model XV. - An Application Of The Mortice And Tenon Joint In Making A Mirror Frame - Rebating
Description
This section is from the book "Manual Instruction: Woodwork. The English Sloyd", by S. Barter. Also available from Amazon: Manual Instruction: Woodwork.
Model XV. - An Application Of The Mortice And Tenon Joint In Making A Mirror Frame - Rebating
Fig. 214
The drawings should be the elevation and the vertical and horizontal sections.
For the two sides and the bottom rail, three strips of yellow deal or bass-wood, 1 1/2 in. wide and 1 in. thick, will be required, two of them 15 ins. and one 10 1/4 ins. long; the top can be made from a piece 10 1/4 ins. long, 2 3/4 ins. wide, and 1 in. thick.
Plane all the pieces true, but do not make them quite to dimensions, as about 1/32 in. on each face and edge will be removed after the frame is glued up, in cleaning off the work.
In setting out, as usual, mark similar pieces simultaneously, remembering that the face sides must all be together, making the front in the finished model, and the face edges must be inwards. Place the face edges of the two stiles together and mark out, as in fig. 215. After marking all the dimensions on the face edges in pencil, turn the wood over, and continue on the face side, and from there on the back edge, the two lines which show the position of the mortice - i.e. the second and third lines from each end. Now set out the tenons on the two pieces of wood for the top and bottom rails. These are of unequal width, and the best way to mark them is to lay one on top of the other, with the face sides together, at the edge of the bench, with the edges together, and mark them simultaneously, using the square vertically.

Fig. 215.
Two short lines, extending about \ in. into each piece, and 7 ins. apart, as shown in fig. 216, should be first made, and then the long ones \ in. further out toward the ends. Continue the short lines on the face side, and the long ones on the back.

Fig. 216.
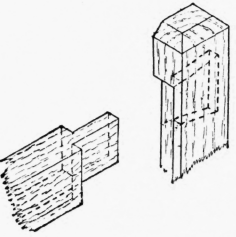
Fig. 217.
This gives the shoulders of the tenon, but the shape is shown in the isometric sketch, fig. 217.
Now mark and cut out with the bow saw the curve in the top rail. Finish this off with the spokeshave. Having removed most of the waste wood from this rail, the pupil can return to the joint, which should be marked out with the mortice-gauge set to a 1/4-in. chisel.
The rebate can now be marked with the single-toothed gauge, set to 1/4 in., on both face edge and back. Now mortise out the stiles as in the previous exercise, and saw down the cheeks of the tenon, but do not cut the shoulders yet. The rebate plane is taken up to make the rebates, for in this case it is much easier to rebate out along the entire length, and then re-insert a small piece to complete the horns to the original shape, than to laboriously cut out the rebate with the chisel. There is another method, involving the use of certain metal planes, but this plan, for various reasons, could not be adopted here.
Screw the wood up in the vice to make the rebate, hold the plane firmly round the back portion with the right hand, steadying and holding it with the left hand. At first the plane should be held vertically, and after planing nearly down to the gauge line turn the plane on its side and finish the upright side of the rebate. Fig. 218 shows the operation of rebating with plane in a horizontal position.
The ends of the rebates beyond the mortised holes should be filled up by glueing in small pieces of wood, and the tenons can now be completed by cutting the shoulders. The wedges should be prepared, and the rails can now be fitted into the stile to test their accuracy, and if correct the work may be glued up. Cover the tenons plentifully with very thin glue, and put each tenon into the mortice to which it belongs - they had better be previously numbered to prevent confusion. The iron cramp should be used, to pull each joint tight up. Two cramps can be used, one at each end close to the mortices, but not outside on the horns, or one only used alternately at each end; in any case wood should be placed between the cramp and the model to prevent injury. Unless great care is used in screwing up the cramp or cramps, the work will be pulled out of its proper rectangular form, and, in fact, the greatest care will hardly prevent this, unless the diagonals are measured and any error corrected.
The best method of measuring is to take a strip of wood and measure one diagonal first, making a mark to denote its length, then apply this measurement to the other diagonal, and mark the new measurement over the old. If there is a difference, as there possibly will be, another mark midway between the two already made must necessarily give the correct measurement, and the work can then be screwed up again to give this diagonal in both directions.

Fig. 218.
Now while the joints are in the cramps drive in the wedges and leave the model till the glue is dry, taking off the cramps before the work is put aside. When the work is resumed, finish the model with a smoothing plane, just touching up the curved top with glass-paper.
Continue to:
My Books

