Chapter VIII. The Handy Sportsman. A Portable Automobile House
Description
This section is from the book "Handy Man's Workshop And Laboratory", by A. Russell Bond. Also available from Amazon: Handy Man's Workshop And Laboratory.
Chapter VIII. The Handy Sportsman. A Portable Automobile House
It is the purpose of this article to show how to build an automobile house which has the following advantages: It is portable, as all sections and other parts are held together with a minimum number of bolts and screws. It requires no special skill with tools. It is easily set up and taken apart. It is light and sufficiently strong, and presents a neat and finished appearance.

Fig. 308 - Front view of the automobile house.
The complete bill of materials for the house as shown herewith costs $70. To this may be added about $10 for paint. Because of its ready portability, it may be set up by the lake shore or in the woods and used as a summer cottage. It makes but one easy wagon load for two horses. It has no masonry supports, and therefore does not revert to the owner of the land on which it is placed, but it can be moved whenever moving day comes. The open doorway gives almost seven feet clearance, which is sufficient to admit an auto with top up. It is large enough for a small touring car with room to work all around it, as well as for the storage of supplies. With a runabout it gives room for shelves and a bench for a convenient workroom at the end.
The frame is of hemlock. Fig. 310, and measures 15 feet 4 inches by 9 feet 6 inches by 7 feet 8 inches high. Above the floors the frame consists of only four corner posts, the plate frame, two pairs of rafters, two tie-pieces - not shown - across from plate to plate at the foot of the rafters, all of 2-inch by 3-inch hemlock dressed, and four roof boards, 7/8 inch by 4 inches. The gable sections serve also as rafters. The sills are held together at the corners by angle irons 6 inches by 6 inches, 3/16 inch thick and 1 inch wide, fastened with carriage holts 3/8 inch by 2 1/2 inches. Fig. 312. These should fit snugly in the sills, so that the square shoulders will prevent turning, and the heads are countersunk flush.

Fig. 309 - A side view of the portable automobile house.
The floor joists rest on straps nailed to the side sills. Two of the joists, Fig. 311, are fastened with lighter angle irons to prevent the sills springing outward. The rest are held in place by small cleats. Two mudsills, 2 inches by 3 inches, are laid under the joists to stiffen them for the load of the machine. These, as well as the whole frame, are blocked up and rest upon boards or plank pieces about 8 inches by 12 inches crossed and laid up under the sills at distances of four or five feet. If these supports settle by the action of frost, it is a simple matter to level up by adding more.
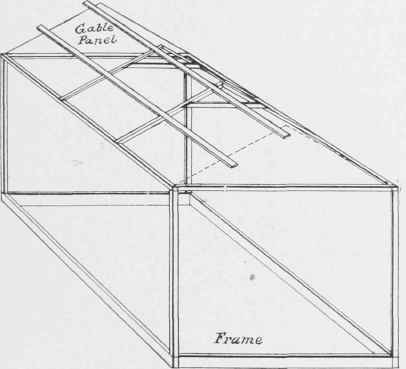
Fig. 310 - The frame of the house.
The corner posts stand on the sills, to be fastened later by corner boards. Fig. 312. The plate sticks are halved together at the corners, a hole is bored down through their ends into the top of the post, and a 24-penny wire spike is pushed into it. The plates are also held together by small angle irons at the corners.
At this point the frame must be staved up while the side and roof sections are put in place.
The side panels. Fig. 313, are of matched Georgia pine ceiling material, 7/16 inch thick, dressed and beaded one side, cleated with 7/8-inch dressed pine on the outside as shown, and cleated with a strip of the 7/16-inch material on the inside. They cover each 3 feet by 7 feet and are all interchangeable except that the corner sections are slightly modified to slip under the corner boards.
The window sections are made interchangeable with the rest. and the position of the windows may be varied to suit circumstances. The bevel on the cleats and on base and eaves boards. Fig. 314, aids in excluding the weather. The way in which the battens and cleats of the panels interlock to give tightness and strength is apparent from details of Fig. 313. Cleats, 2 inches by 7/8 inch, are fastened with 1 3/8-inch package wire nails, clinched on the outside. The inside cleat is fastened with 7/8-inch nails clinched inside. In general, the nailing is done with nails just long enough, so that the sharp points prick through slightly. The nail is driven against an iron block, and is readily bent within the wood instead of forming a clinch visible outside.
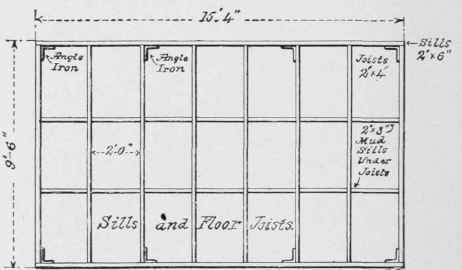
Fig. 311 - The floor of the house.
In the window panel the frame is slotted on the sides to admit the battens. This panel is further stiffened inside by a frame of 7/8-inch stuff around the window opening. The double casement windows are factory made, sash 1 3/8-inch thick, and cost $1.50 per pair or window. They are hung with parliament butts - separable - swing inside, and shut against the outside frame about 3/8 inch. The sill is beveled outside of foot of window sash, and a small square bead is run on the sill for them to shut against. The windows are rabbeted together with a simple L rabbet, and are then fastened inside with small bar bolts top and bottom. The front gable section is framed of 7/8-inch pine, with the 7/16-inch siding nailed to it. The bottom board of this frame overhangs the front plate 1 1/2 inches, and the matched stuff rests on top of the plate. This leaves the lower 1/2 inch of the plate for the doors to shut against. The gable window opening is framed around with 7/8-inch stuff outside, and with 7/16-inch stuff inside. The gable window sashes are home-made of 7/8-inch pine, and are hinged with separable butts to swing up for ventilation. The rear gable is slightly modified by narrowing up the bottom board and beveling it to overhang the plate 3/4 inch, and by fastening a beveled trim board to the plate to retain the panels below the plate in the same way, the side panels are held by eaves boards.

Fig. 312 - Corner details.
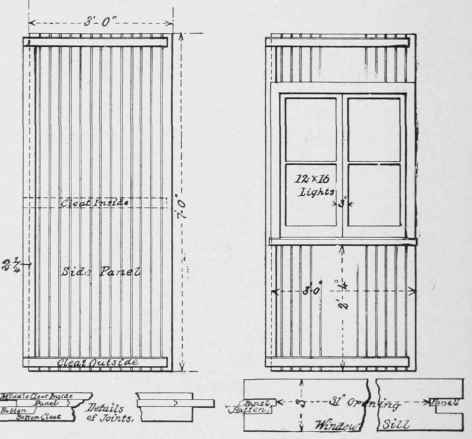
Fig. 313 - The side panels.
The floor is made in three sections strongly cleated underneath with cleats passing two inches beyond the section edges to stiffen the joints between sections. The floor serves to retain the rear panels on the sill, but stops flush with the front face of front sill.
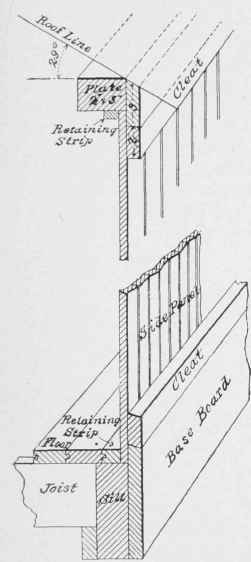
Fig. 314 - The base and eaves.
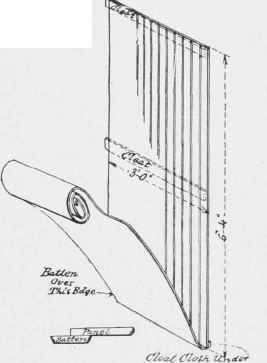
Fig. 316 - One of the root sections.
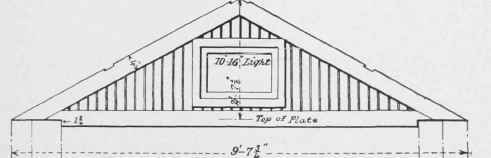
Fig. 315 - The front gable.
The front door is constructed of 7/8-inch pine. The top boards shut against the plate 1/2- inch, while the bottom boards shut against the ends of the floor. The matched stuff stands between the plate and the floor.
The roof sections have an overhang at the eaves of about 9 1/2 inches, and the same overhang at the gable ends. Ten sections cover 3 feet by 6 feet 4 inches each, and two sections cover 2 feet by 6 feet 4 inches. They have each three cleats of the same 7 16-inch material, the bottom cleat being only one inch wide. They are first cleated together (Fig. 316) with the end of a strip of unbleached factory cloth under the bottom cleat, which is nailed from the outside with all nails well clinched. The cloth is smoothed loosely over the section and cut off, and then the face of the section is given one or two coats of white lead mixed thin with raw oil and turpentine. After this dries the cloth is brought over, laid smooth without stretching, and tacked thoroughly at top and sides. Then a batten strip is nailed on at the left edge to cover the joint, as in the side panels. Care must be taken not to stretch the cloth, but to leave it as loose as possible without actual wrinkles, as it will shrink in the subsequent painting. The finished panel must now be given repeated coats of good paint until the cloth is filled and a glossy, weatherproof deck surface is formed. On each slope of the roof two roof boards of hard pine, 4 inches by 7/8 inch by 17 feet, are let into and flush with the rafters and gable sections and fastened with long screws.
After the frame is up, the base boards and eaves boards are temporarily tacked in place; then the panels are put in place from the inside, bottom end first; then the base and eaves boards are permanently adjusted and fastened to sill and plate with long screws The corner boards are set together with screws and then fastened in place with long screws into sill and post and plate. The panels next the corner boards are bolted to the corner boards at the middle cleat with roundhead stove bolts, using washers. The roof sections are held in place by stove bolts through the loose edge of the battens and the roof boards, and by screws into the plate. The ridge boards, one 4 inches, the other 5 inches wide, are beveled and put together with long wire nails. They are then put in place and pieces of the 7/16-inch siding, 2 feet 9 1/2 inches long, are slipped under the ridge boards to level up between the battens, and stove bolts are put through the ridge board, understrip, and roof section. This fastening adds much to the strength of the roof. Finish boards of the 7/16-inch material should be cut and fitted at the gable edge of the roof to give a neat appearance. To stiffen the door opening, brace boards should be put across inside from plate to post at the upper corners of the opening.
In the work of erecting the building no fastenings are to be used but bolts and screws, and to facilitate the work, provide two bitstocks, one for a screwdrive bit, the other for a proper size gimlet. After the house is finished, it should have three coats of paint well brushed into the grooves in the beading, etc. The inside of the doors should also be painted, since they are frequently exposed to the weather.
The panels, and all parts requiring time in the making, can be put together in a shop of limited space, and given a coat of priming paint before erecting the building. This coat should be of white lead and oil, possibly shaded with lampblack ground in oil, and thinned well with turpentine, so that it will strike into the pitchy surface of Georgia pine.
The house shown has been in use for a year, and has proved both tight and strong, in contradiction to the critics of the plan, who thought it would do all sorts of undesirable things under the heat and rains of summer. It is most essential that it be well painted before the weather acts upon it, and that it be kept well painted.
Continue to:
My Books

