


How To Build A Chanute-Type Glider
Description
This section is from the book "Handy Man's Workshop And Laboratory", by A. Russell Bond. Also available from Amazon: Handy Man's Workshop And Laboratory.
How To Build A Chanute-Type Glider
Many forms of glider have been tried, but the one which has so far given the most general satisfaction is known as the "Chanute" type.
Either bamboo or spruce may be used for the framework, although the latter material is the more convenient to work with. If spruce is decided upon, the following materials will be required:
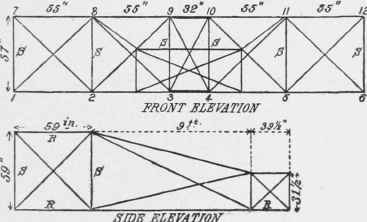
Fig. 333 - Dimensions of the frame.
92 feet 8 inches of spruce 1 inch square in 8 pieces, 11 feet 7 inches long.
59 feet of spruce 3/4 inch square in 12 pieces, 4 feet 11 inches long.
57 feet of spruce 3/4 inch square in 12 pieces, 4 feet 9 inches long.
Also 50 feet of spruce 3/4 inch square in 4 pieces 6 feet 7 inches long, 4 pieces 3 feet 3 1/2 inches long, and 4 pieces 2 feet 7 1/2 inches long, for framework of rudder.
3 square feet of sheet iron 1/8 inch thick.
24 1/2 feet of mild steel rod 3/16 inch diameter.
11 dozen 3/16-inch nuts.
Ball of strong twine.
About 5 1/2 pounds of steel piano wire, No. 16.
About 40 yards of unbleached muslin 1 yard wide.
The framework should be clamped together, as holes in the sticks would seriously weaken the joints. Two suitable forms of clamp are shown in Fig. 334.

Fig. 334 - Clamps for square and round sticks.
To make the clamp for square sticks, cut off a piece 8 3/4 inches long from the 3/16-inch steel rod and thread the ends for a distance of one inch, using a 3/16-inch stock and dies. Clamp the rod vertically in the vise at exactly 4 inches from one of its ends, and bend the projecting 4 inches over at right angles to the rest of the rod, using a hammer and making the bend as sharp as possible. Treat the other end in the same manner, taking care not to injure the thread on the ends. You will thus have bent the rod into the form of a letter U with a flat bottom, the sides of the U being 4 inches long and 3/4 inch apart. Take a piece of the 3/4-inch spruce and see that it fits accurately between them. Now clamp the U so formed vertically in the vise with its two legs projecting exactly 2 1/4 inches above the vise jaws. Bend them over at right angles in the same manner as before, and you will thus get the form shown in Fig. 334. For the clamp plate C cut from the sheet iron a piece 2 1/4 inches long by 3/4 inch wide.
To make the clamp for round sticks cut from 3/32-inch sheet iron a piece 6 1/2 inches by 5 1/4 inches, and then trim to the form shown in Fig. 335. As bamboo varies considerably in section from point to point, it is desirable to make each clamp to suit the dimensions of the bamboo at the point which it is to occupy. The dimensions given are therefore only approximately correct. The method of applying the clamp is shown clearly in Figs. 336 and 337, the two cross pieces of the T embrace the vertical and horizontal struts, while the stem portion passes round the long horizontal rod. The clamp should be bent to shape as shown, a piece of 1-inch bamboo being used to mold the circular portions. The final adjusting of the clamp should be made when it is placed in position. The two flaps of one of the T pieces pass between those of the opposite one when bolting the clamp together.

Fig. 335 - Lay-out of clamp for bamboo.

Fig. 336 - Clamp for bamboo sticks.
We are now ready to assemble the frame, which for convenience should be made in two sections.
Take two of the 11-foot 7-inch lengths of spruce (one being the upper edge of one side of the frame and the other the lower edge diagonally opposite) and mark off on each distances of 4 feet 7 inches and 9 feet 2 inches from one of the ends. At each of the points so found, and also at the end from which the distances were measured, clamp one of the 4-foot 11-inch and 4-foot 9-inch lengths of spruce in the manner shown in Fig. 334. To the free ends of the uprights and cross pieces attach the other two 11-foot 7-inch lengths in precisely the same manner. A rectangular cage or frame 9 feet 2 inches long by 4 feet 9 inches high will thus be formed, with the free ends of the longitudinal rods projecting 2 feet 8 inches from the end. Construct a similar cage out of the remaining rods. Place the two portions of the frame thus formed together so that the free ends of the longitudinal rods overlap, and lash each pair of the free ends together with strong twine, making the framework 21 feet in length, 4 feet 9 inches in depth, and 4 feet 11 inches wide. (See Fig. 337.)

Fig. 337 - General view of main frame.
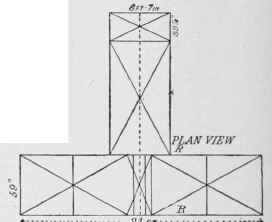
Fig. 339 - Plan view of the complete frame.

Fig. 338 - An improvised turnbuckle.
The guy wires necessary to strengthen the frames can now be attached. Cut a number of 3/4-inch lengths of small copper tubing. Take one of these, pass one end of the piano wire through it and back again, forming a loop; bend over the free end of the wire and snip it off, leaving a small hook on the end to prevent it slipping back through the tube (Fig. 334). Pass the loop over one of the screw ends of a clamp, and run the wire to the clamp diagonally opposite, securing it there in precisely the same manner. The wires running diagonally across the frame can be fastened to the clamps by passing their ends between one of the sides of the clamp and the longitudinal rods in the manner shown in Fig. 334.
It is important that all the wires should be strained to approximately the same extent, and, as this requires some little skill to accomplish, it may be as well for the beginner to provide means for adjusting the tension of the wires after they are placed in position. An ordinary bicycle spoke introduced into the length of each wire, in the manner shown in Fig. 338, makes a good turn-buckle. One end of the divided wire is wrapped around the hub end of the spoke, the other end being secured to the spoke by a strip of thin sheet steel looped over the spoke nipple, as shown. The tension of the wire can then readily be adjusted by turning the spoke nipple.
The frame is now ready to receive the fabric. Three pieces of this must be prepared from the muslin, one 21 feet 3 inches by about 5 feet 2 inches, and the other two 5 feet 2 inches by 9 feet 6 inches. About 40 strips of spruce are required for the ribs. They should be about 1 1/2 by 1/4 inches and 5 feet long. Lay the ribs on the fabric parallel to each other and spaced at equal intervals of about one foot. Strips of muslin should now be laid over them longitudinally and stitched down to the fabric, thus forming a sort of pocket, open at both ends, in which the ribs can slide. The large surface with ribs in position can now be laid on the upper deck of the frame, and the ribs lashed to the longitudinal rods by their ends at the front edge and at the point where they cross the rear portion of the frame. They will thus overhang the rear edge by about 1 foot. These overhanging portions are connected at their extremities by twine or piano wire, round which the rear edge of the fabric is lapped and glued. When this is dry the cloth can be strained into position, the front and end edges being glued to the main frame. If strong glue is used this should prove sufficient fastening, but, if desired, the fabric can be tacked to the frame as well, using small tacks. The two other pieces of cloth are secured to the lower deck in precisely the same manner, a space of about 2 feet being left between them at the center. Two pieces of spruce 3/4 inch by 1 1/2 inches should now be laid across this space from front to back about 18 inches apart and parallel to each other, and lashed to the frame with cord. They form the arm rests which support the operator. The glider is now complete with the exception of the tail, which is constructed in exactly the same manner as the main planes, the two sides, however, being covered with cloth in addition to the top and bottom. Its dimensions are given in Fig. 333. No ribs are required for the tail. It is connected to the main planes by the four rectangular rods of spruce 3/4 inch square. The lower rods are lashed to the front and rear edges of the main plane about 2 inches apart, the rods being parallel to each other and spaced at equal distances on either side of the center of the plane. The other two rods are lashed to the rear edge of the upper plane and to the front edge of the tail. The tail is further braced to the main body by the piano wire in the manner shown in Fig. 333.
Curved surfaces, although not essential in a glider, can be produced in the following manner: Slightly taper the front portion of each rib for about 1/3 of its length from the front end. If the front ends of the ribs are now lashed to the frame first, and the ribs are then pushed slightly forward by their rear ends before being fastened to the rear edge of the frame, they will assume a parabolic curve. Strong glue should be applied to all lashed joints to prevent them from working loose.
If bamboo is the material selected for the frame the following lengths will be required:
8 pieces, 11 feet 10 inches long.
12 pieces, 4 feet 11 inches long.
12 pieces, 4 feet 9 inches long.
4 pieces, 6 feet 7 inches long.
4 pieces, 2 feet 7 1/2 inches long.
2 pieces, 18 feet long.
A ground suitable for the practice of gliding must have a gentle slope of about 1 in 10. if possible in the direction of the prevailing wind. If due precautions are taken, there is little danger in the art of gliding provided the beginner commences cautiously and takes sufficient time to master the balancing of his machine before attempting long glides. While learning, it is best to have two ropes about 6 feet long attached to the lateral extremities of the machine, each rope being held by an assistant. The glider is thus prevented from ascending to a dangerous height above the ground, while the novice is learning to balance it. At first there is a tendency to place the weight of the body too far back, but this difficulty is soon overcome. Steering is effected by moving the legs. To turn to the right swing both legs in that direction, and vice versa. To stop the flight, move the weight of the body backward and at the same time swing the legs forward. This will cause the machine to tilt up in front and settle down.
Continue to:


My Books

