


The Aeroplane Kite
Description
This section is from the book "Handy Man's Workshop And Laboratory", by A. Russell Bond. Also available from Amazon: Handy Man's Workshop And Laboratory.
The Aeroplane Kite
One of the cheaper variety of toy aeroplanes is made to resemble the biplane, and is used as a kite. It has a very simple construction and will give good satisfaction in flight, if rising into the air at the end of a string can be called flight. It will rise in the slightest breeze, and if properly adjusted, so as to let the wind strike the planes at an angle, will need no balance to keep it from "dodging" around as a tailless kite would. With the kite there is furnished a small bag of sand weighing about 3 or 4 ounces. This is tied to a long string and serves, in case of necessity, as a "tail'* or balance in high winds.
To construct, cut four sticks 25 inches long, 1/4 inch wide and 1/8 inch thick, and four 28 inches long, 1/8 inch thick, 1/4 inch wide.
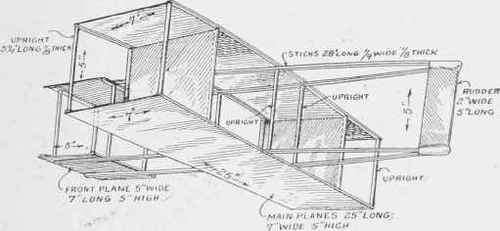
Fig. 367 - Details of the aeroplane kite.
Get some 1/8-inch round dowling and cut thirteen pieces 5 inches long. Take the four 25-inch sticks and bore a 1/8-inch hole 1/2 inch from each end. In two of the sticks bore another 1/8-inch hole 11 inches from each end. These two sticks form the rear edges of the main planes. Now, in the other two 25-inch sticks bore two more 1/8-inch holes 10 1/2 inches from each end. Cut from some good, light quality muslin two planes, 7 by 25 inches. Glue the cloth to the sticks with a good fish glue, being careful to get the sticks exactly at the edge of the cloth. While the main planes are drying, make the front planes. Cut four small sticks 7 inches long, of the same width and thickness as the other sticks, then bore a 1/8-inch hole 1/2 inch from each end. Take some more of the muslin and cut the front planes 5 inches wide and 7 inches long, gluing them to the frame sticks. Now, take the four 25-inch sticks, and at each end bore a 1/8-inch hole. Bore another hole in each stick 5 inches from one end. These sets of holes serve to receive the 5-inch upright struts. Now, again bore another 1/8-inch hole 6 inches from the last hole bored, and still another 7 inches from the last, and the parts are ready to be assembled. First, take the front planes, and after having inserted the four 5-inch upright struts in the holes, take the four 28-inch sticks, and at the ends where the holes are 5 inches apart, insert the 5-inch uprights, the cloth of the planes being cut to let the upright come through the 7-inch sticks into the 28-inch sticks. The two main planes are similarly connected with 5-inch struts, the four center ones passing through the 28-inch pieces as well. The latter pass between the planes, as shown in Fig, 367. The rudder frame -ticks will come together at the rear. Cut a piece of muslin 4 inches wide and 5 inches long. Fold it lengthwise and sew it together at each short end, leaving the 5-inch edge open. This forms a sort of a pocket, which is to be slipped over the rear end of the 28-inch sticks and sewed in position to form the rudder. The forward side of the pocket should be left open, and it serves to steady the aero-kite in the wind, at the same time serves as a drag to make it fly front end first.
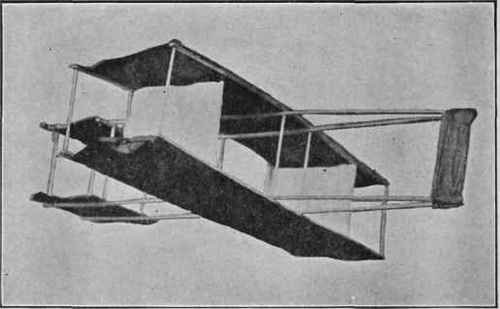
Fig. 368 - An aeroplane kite.
To fly this kite, fasten a loose loop just a little in front of the main planes. The exact position must be found by experiment, as each kite has its own peculiarities. To this loop fasten the kite string and proceed as with any ordinary kite.
N. B. - We are indebted to John Wanamaker, New York, for the use of the models described and illustrated in the four foregoing articles.
Continue to:


My Books

