"Wright" Biplane
Description
This section is from the book "Handy Man's Workshop And Laboratory", by A. Russell Bond. Also available from Amazon: Handy Man's Workshop And Laboratory.
"Wright" Biplane
One of the finest looking little aeroplanes that has as yet been offered by toy dealers is almost an exact duplicate in miniature of the "Wright" flying machine. It will fly from 20 to 40 feet, according to the skill of the operator in launching it into the air. One must master the knack of sending it out into the air properly before he can hope for any great length of flights, and he will find it at first a very awkward proposition.
The motive power is a wooden propeller mounted on a wooden shaft 24 inches long and 3/8 of an inch diameter, which fits into a hollow handle. This handle is the launching gear. Near the end of the shaft, about 1 1/4 inches from the end, is a small hole through which a string is threaded; the propeller is then turned until the string is wound upon the shaft, and then, when ready to fly, the cord is given a long, steady, and yet swift pull. This revolves the propeller with great rapidity and forces the aeroplane into the air. After a few trials, to determine the force necessary to launch the little flyer, one can become quite expert in the knack of making it go.
In this little flyer there is a great deal of room for experimenting, as it is of the lightest construction, and yet is strong enough to withstand those hard knocks it is subject to receive when landing. For instance, one can alter it very slightly to have it driven by rubber strand power. It would simply be necessary to brace it with a small 1/8 or 1/4-inch. rattan stick, running from the front to rear, then attach the propeller to rubber strands and twist them, as is done with the other types. I did this with one and got flights of from 60 to 100 feet without any trouble.
The construction of this aeroplane is very simple and at the same time strong, The materials used are rattan, silk, and small, very thin pieces of brass.
For the main planes, take 3 1/8-inch rattan and cut four pieces 23 inches long, and twenty-four pieces 3 inches long. Out of very thin light brass cut the corner braces to the shape indicated at . /. in Fig. 364. Bend them at right angles, along the dotted line, so as to form three-way braces, as seen at the corners of the aeroplane in Figs. 365 and 366. Eight of these corner braces will be enough to make the main planes. The brace is wrapped around the meeting ends of the rattan. First make two oblong planes out of the four 23-inch strips and four of the 3-inch strips and cover them with silk. Fasten the two planes together at corners with 3-inch lengths. If the corner braces were properly made you will find at each corner two little pieces of brass for the end struts. Fasten by bending the brass around the strut. Put in the first brace 5 inches from the end of the plane. To do this, cut out of light brass 16 small holders of the form shown at B (Fig. 364). This makes a four-way holder. Place the cross-shaped piece of brass against a longitudinal strip along the dotted line and bend the brass around the rattan tightly. This leaves two pieces for the vertical and horizontal 3-inch lengths. The two frames are similarly braced at 10 inches from each end.
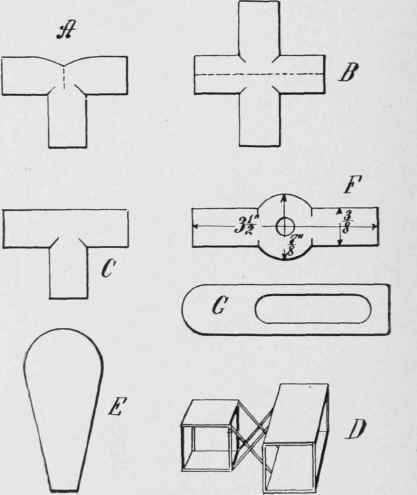
Fig. 364 - Details of the biplane.

Fig. 365 - Dimensions of the biplane flying machine.
To make the front planes (2 by 9 inches) take two pieces of rattan 9 1/2 inches long, and at each end fasten a two-way holder, made from a piece of brass cut as at C (Fig. 364). The rattan will then take the shape of the front plane shown. After having fastened the rattan firmly, cut a piece of silk to the proper shape and sew it in position. Make the bottom plane in the same way. At 3 inches from the end put in the struts, as in the main plane, except that the small piece of rattan across the front plane will be but 2 inches long. Put in another set of struts at 3 inches from the first set. Now fasten in place at each end the remaining strut shown in Fig. 365, and the front planes are finished. To fasten the front planes to the main planes, take four pieces of rattan, 6 inches long, and connect each end to the main plane, and to the front plane, so that they cross each other, as at D (Fig. 364).

Fig. 366 - The toy " Wright " biplane.
The center 3-inch section of the main plane should be opposite the 3-inch section of the front planes.
For the rudder, take a piece of rattan 4 1/2 inches long and another piece 3 inches long. Bend the longer piece and fasten it to the 3-inch piece with a three-way brass holder. The frame will take the shape of the capital letter D. Cut two pieces of rattan 1 1/2 inches long and, after making the second D-frame, fasten them as shown in Fig. 365, and sew on the silk. This done, cut two more pieces of rattan 5 inches long, fasten them to the front end of the main plane frame, so that they will pass over the rear end of the frame, and extend 2 inches beyond. To these two pieces of rattan fasten the rudder with a two-way holder. Of course, the rudder is absolutely in the center of the aeroplane.
To make the propeller, take a small wooden disk 3/4 inch diameter and 1/2 inch thick, make the edge absolutely smooth and flat, in the exact center bore a hole 3/8 inch scant, then cut in a slanting direction from one edge to the other a small saw cut about 3/32 inch deep and reaching from edge to edge 3/4 inch. The two cuts must be exactly opposite each other, and exactly in the same direction, for this is the hub of the propeller, and the cuts are to hold the two blades. Take a piece of 1/8-inch thick whitewood and mark out the shape of the blades, which should be 2 inches wide at the top, 3/4 inch at the bottom and 4 inches long. Make the top slightly rounded, as indicated at E, (Fig. 364), and cut them out carefully. Sharpen the edges and sandpaper them until they are as smooth as glass, then glue them on the saw-cuts in the hub. For the shaft, get a piece of very straight doweling, 3/8 inch diameter and 2 feet long, sandpaper it smoothly and fasten the propeller at one end with a small screw, so it can be taken off the shaft whenever desired. Bore with a gimlet a small hole about 1 1/4 inches from the end, opposite the propeller. Procure an iron washer with a 3/8-inch hole, and force it out to the shaft about 3 inches - this is to serve as a bearing against the handle that is used as the launching gear. To fasten the shaft and propeller, cut from thin brass two holders shaped like F (Fig. 364). Cut a hole a little larger than 3/8 inch through the center.
Fasten one of these braces to the lower end of the rudder, just above the curve, and the other brace at a point between the upper and lower frame of the front planes.
The launching handle is a piece of round wood 1 1/2 or 2 inches in diameter and 3 inches long. Bore a hole through the center from end to end. This hole should be about 7/16 or 1/2 inch in diameter. Enough play should be given to let the shaft revolve very freely. After the hole is bored, take a small scroll saw and cut lengthways along the handle, starting from a point about 1/2 inch from the end, make a sort of long, oval cut, coming back to the starting place, as indicated at G (Fig. 364). One end should be rounded so that it will not hurt the hand when in use. Around the other end loop a piece of strong, stiff wire; make the ends long enough, so that when the shaft is inserted into the handle the ends of the wire come under the main planes. By looking at Fig. 365 one can clearly see how the handle and wire are used when ready to launch the aeroplane.
To complete the aeroplane, take the propeller off the shaft and inserting the shaft through the shaft braces at the rudder and front planes, then fasten the propeller on the shaft at the front.
To manipulate this little aeroplane, hold it by the handle, and see that the wire rests are underneath the machine, then take a piece of strong cord about a yard long and, by turning the propellers in a reverse direction, wind up the cord on the shaft; the cord will all be contained inside the handle (if the handle is cut as described). Pull the cord steadily and hard, and the propeller will revolve with great speed, and when a sufficient momentum is gathered the machine will glide away into the air.
It will take quite a few trials before flights of any length can be obtained, but with patience and a little experimenting as to the best positions to hold the aeroplane, one will be surprised at the results he can obtain with this little flyer.
Continue to:
My Books

