How To Make A Cigar Box Monorail
Description
This section is from the book "The Boy's Book Of Mechanical Models", by William Bushnell Stout. Also available from Amazon: The Boy's Book Of Mechanical Models.
How To Make A Cigar Box Monorail
SOME years ago a man in England invented a new kind of railway, one which runs on only one track, which is called the Gyroscope Railway.
What is a gyroscope? As near as I can explain it to you, it is a top constructed so that it can turn in any direction; that is what the ones you buy on the streets are. Generally the word is used as a scientific term to repre-sent a rotating wheel fixed to illustrate the laws of rotary motion. You see, if a wheel is turning fast, it is hard to move it out of its path, for it wants to stay always in the same place. If you hold a bicycle wheel by its axle and start it whirling, you can let go on one side, and the wheel will hold itself up while it is turning.
This is the scheme the Englishman uses to keep his car from upsetting. He has two wheels revolving in opposite directions, and as these will stay in the same plane all the time,--so long as they turn fast enough,-by a proper mechanism, they keep the car upright as long as they spin.
Now it is no easy task to make a gyroscope, and the ones in the toy shops are not heavy enough to balance more than their own weight; thus to make a railway, you would need to have two gyroscopes and would require some arrangement whereby each would rotate just as fast as the other. However, I can tell you how to make a car that will run on a single suspended track, and it will look like the gyroscope car.
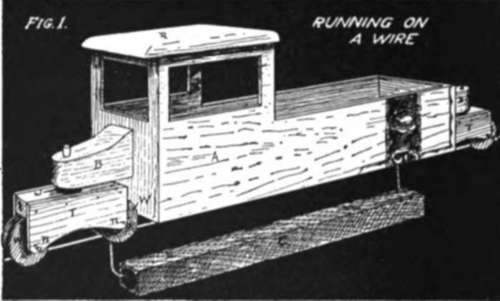
The drawing Figure 1 shows the car running on a stretched wire as a track. The drawing Figure 2 is a front view, showing a track fastened to the wall and the way the counterweight hangs.

The car body is made of a cigar box, and Figure 4 shows how the box is cut. The piece f is cut out entirely and thrown away, and the squares e are cut out to make the windows. There's a window in the front too the same height as these and nearly as wide as the box. This picture shows the side of the box set on edge. You can use a big square box if you like.
This done, cut out a roof piece R big enough to stick out around the edge a quarter of an inch or so and rounded off on top. The separate drawing Figure 3 shows how to make the trucks. These are very simple and consist only of a piece of wood t a little over half an inch wide and a couple of inches long, cut from a piece of half-inch wood. Pieces T of thin wood or tin run down from the sides of this piece and between these the wheels are mounted to turn. Figure 5 shows how the wheels are made: Take four common spools, all the same size, and treat each one of them as in the drawing. First, with a bit just the size of the middle part of the spool bore a hole in one end, being careful to center the bit right; when the bit comes through, you will have one edge of the spool in a ring around the bit, as at B. Here too you see the shank of the spool that's left whittled down so that it will slip through the hole in this "doughnut" you have cut off. The third stage will be that of C, and all you have to do is to cut off the edge sticking beyond. Then put a wooden axle tightly through the hole in the spool center and drive a brad in the center of each end. These wooden axles a should be just long enough to fit between the pieces T as in Figure 2.

At each end of the car body a piece of inch wood is now fastened, shaped as shown at B in Figure 5, and fastened with screws S.
A nail or screw through a hole in B goes down into the center of the top piece t of the truck, and the truck is mounted. Be sure it turns free and that the wheels don't hit the box.
The counterweight that hangs below C, Figure j, is made by boring a hole three-quarters of an inch in diameter through a block of wood as long as the car body. Then string the wire D, Figure 2 through and, resting one end of the block in sand, fill the hole with lead, burying the middle part of the wire in it.
When cool, the wood may be split off entirely or planed down square, as in the drawing, Figure 2.
The wires sticking out of the ends are bent and fastened to the car, as shown, so that the weight will hang directly below the center of the car. By putting the support at one side quite a distance and then bending the wires in down below, you can make a track hang on brackets, as shown, so that your car lines can run around the sides of your shop with turns at the corners made of tin. The track b, Figure 2, may be made of laths.
Continue to:
My Books

