How To Make A Cigar Box Dump Car
Description
This section is from the book "The Boy's Book Of Mechanical Models", by William Bushnell Stout. Also available from Amazon: The Boy's Book Of Mechanical Models.
How To Make A Cigar Box Dump Car
Ever own a railroad? I did once. It ran the whole length of our cellar and would carry freight in great shape. It wasn't a passenger line, and there was no real locomotive, but it provided lots of fun nevertheless.
The cars were copied from some I had seen used in filling in a cut along the railroad track near home, - dump cars pulled by mules, - and they dumped the load just as well as the big ones they were modeled after, only the load wasn't so big, of course, and they weren't pulled by a mule.
How were they made? I'll tell you in just a minute; only remember that it isn't necessary, when you make any of these things, to make them exactly as described. I give you the scheme and the principle to work on, show you how the scheme works, and tell you what kind of wheels I used, but if you happen to have some big spools, from some mattress factory, for instance, you couldn't use a cigar box for the body. You'd want a cracker box or something larger.
Invent your own way of making the toys to fit the materials you have. If you can't get spools for the wheels, cut sections from an old curtain pole and put on circles of tin to make the flanges, so that the car won't run off the track; but, anyway, invent an article to fit your materials and the tools you have to work with.
I'll tell you the simplest way I know, and the most common things to make the toy of; then you can go ahead and do better if your tools and materials will permit.
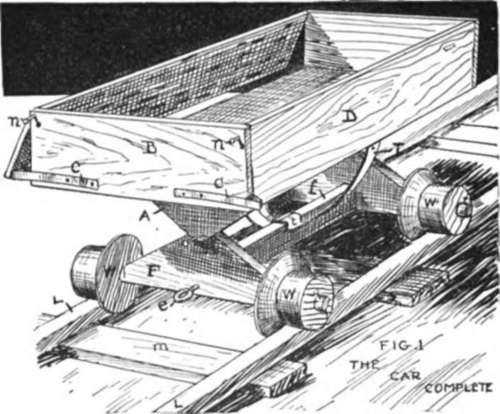
To make a dump car like Figure I, - and you can make a string of them if you desire,- get an empty cigar box, a couple of large spools, some tin, and some thin wood from the side of a cracker box, or the like, - wood about a quarter of an inch thick.
After soaking the paper off the box, knock it apart and remove the sides D.
Nail the ends B on securely, and then fasten the sides D in place again, only pivoting them on one small brad n at each end, so they'll turn between them to open out, as shown in the drawing of the car complete. The side on the further part of the car is shown swung open.
With an old pair of scissors or some tin shears cut a couple of strips several inches long and a quarter of an inch wide from an old oyster or tomato can.
Bend these up like C in Figure 5 to form a catch and tack them to the end of the box with small brads so that the catch part c will hold the door or side D shut. These are shown at C in Figure I. The brads that fasten them to the box should be back toward the inner end of the tin, so as to allow plenty of "spring," for we have to pull these back when the car dumps, so that the door D can open.
But now let's get at the truck.
First cut your two spools, which should be the same size, in half, taking care to cut them straight.
This will supply you with four wheels with flanges, and all you need to do is to turn the flange in to make them into good car wheels.
Each pair is mounted on a wooden axle cut like F in the drawings. The middle part, you see, is like a "V" turned upside down, only wider and with the high part in the center.
At the two bottom corners round axle parts r stick out, cut to fit the holes in the spools loosely and to stick clear through the spool halves. These axles should not be longer in all than the cigar box is wide.
Outside of the spools, pins p, Figure 4, are stuck through the axle to keep the wheels from coming off.
When you have two of these ready, connect them with a stick f several inches shorter than the cigar box, as shown in Figures 1, 2, and 3.
Next make two other triangular-shaped pieces like F, only with no axles on the corners. These are shown at A in the drawings. They should be made of the same sized wood as the pieces F and about the same shape, and just the length of the box, as shown in Figure 3.
Fasten the pieces A to the bottom of the cigar box with brads and far enough apart so that the pieces F of the truck frame, that the wheels are fastened to, fit just between, as in the drawing.
Now you can bore a hole through the piece A near the bottom of the V, and drive a brad or shingle nail through it into the piece F at the top of its V. Or you can make a hole through both and run a wire through the entire length of the car, as in Figure 2. If you drive the brad or nail in, hold a weight behind F while you do it to keep it steady.
Your car now begins to look like something, only the box tips all ways and won't stay up. We can easily fix that, however.
View from side- Fig..2.
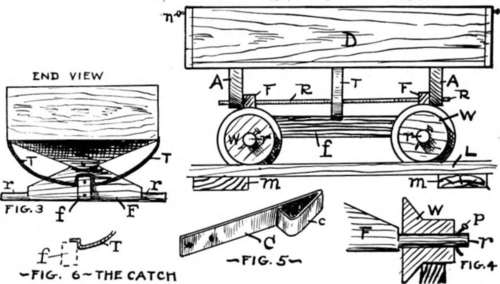
Cut two strips of stout tin T and fasten them to the under side of the car in the middle and near the outer edge on each side.
Bend them down in a curve and with a little square bend in the end as in Figure 6, to catch on the piece f in the middle of the truck under the car. You'll have to cut them to proper length, of course.
When both of these are in place, as in Figures 1 and 3, the car is held upright for its load..
If you push up on one tin T, though ever so little, the catch at the bottom is lifted off f and the car top can tip and dump the load.
And here is where you can get busy and invent something yourself, for there are a dozen different ways to hold the box upright.
The track can be of laths or tin strips on edge and with little wooden ties m across, depending on what you have to make it with.
If you know how to cast in lead, you can make yourself some fine wheels by casting them in an old blacking box with the edge turned up for the flange and a wire through the middle for the axle.
Continue to:
My Books

