How To Make A Mechanical Duck
Description
This section is from the book "The Boy's Book Of Mechanical Models", by William Bushnell Stout. Also available from Amazon: The Boy's Book Of Mechanical Models.
How To Make A Mechanical Duck
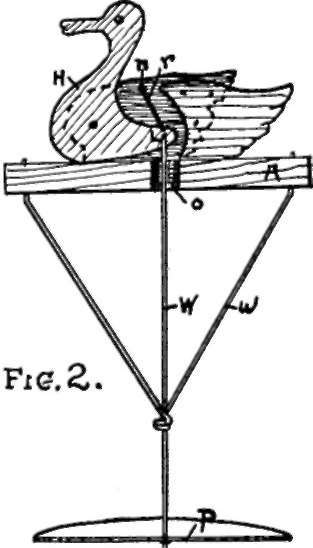
THIS is shown in perspective in Figure 1, and in section in Figure 2. You will better understand the principle from Figure 2. Here are shown the wooden pieces which make up the body part of the duck fastened to a wooden float A, with wing pieces on either side of the tailpiece. The neckpiece H, with the head, is pivoted between the wing pieces on a nail p, Figure 1, and has a lever I running out to the center of the duck to a point opposite a hole 0 in the center of the float A.
A wire runs through a nole in this lever I and down through the hole 0 into the water, terminating in a flat tin plate P either soldered onto the wire or held in place between two corks tightly slipped over the wire. A wire frame w arranged as shown acts as a guide for the wire W.
When you set this toy in the waves, the float A bobs up and down with the wave motion, while the plate P is resisted in its up-and-down motion by the water and alternately pulls or pushes as the float above rises or falls with the wave. A rubber band r at the top fastened between the lever L, and a nail n counteracts the weight of the plate P.
In making this toy, cut the float A out of inch wood, eight or ten inches in diameter.
On a piece of paper make a side view of the duck, with the invisible parts of each piece shown dotted. This you may then trace, one piece at a time, onto the wood, from which you will cut the pieces.

Cut two of the wing pieces, marking out the pattern on cigar-box wood. Cut the tailpiece from half-inch wood. The head-and-lever piece is cut of cigar-box wood and pivoted in place on the nail p, which should fit loosely in holes in the wing pieces but drive tight through the headpiece H. A little paper washer or two should be slipped between the wing pieces and the headpiece H to keep them from rubbing together.
Bore a half-inch hole through the center of the float A.
Next nail the wing piece to the tailpiece, after which fasten this unit to the baseboard A just so the hole 0 is in the right position to receive the wire W when the headpiece is in place. Next, bend up the guide wire w with the loop at the bottom and stick the upper ends tightly through nail holes in either side of the float. Fasten the head in place after first looping the wire loosely through the hole at the end of the lever L. Slip the wire down in place through the loop in the guide wire, place the head in position, and then drive the nail p into place. Cut the disk below of tin about 6 inches in diameter, and let the wire W be at least a foot and a half long. As stated before, if you cannot solder, you may hold the plate P between two corks on the wire W.
Paint the toy all over so that it will not get water-soaked, being careful not to get paint in the moving joints.
Now if you will set the toy on the water on a windy day, you will have a lot of fun watching the duck bob its head about with each oncoming wave.
Continue to:
My Books

