How To Make A Model Grain Elevator
Description
This section is from the book "The Boy's Book Of Mechanical Models", by William Bushnell Stout. Also available from Amazon: The Boy's Book Of Mechanical Models.
How To Make A Model Grain Elevator
YOU boys who are making toys that operate along the same lines as their larger prototypes will no doubt be interested in this plan of a model grain elevator. Some day you may own a large one, and then your knowledge of the construction of these simple but faithful models will perhaps serve you to good purpose.
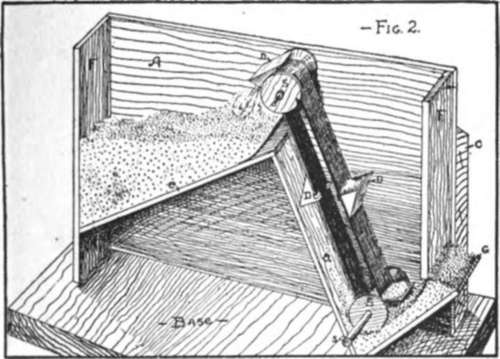
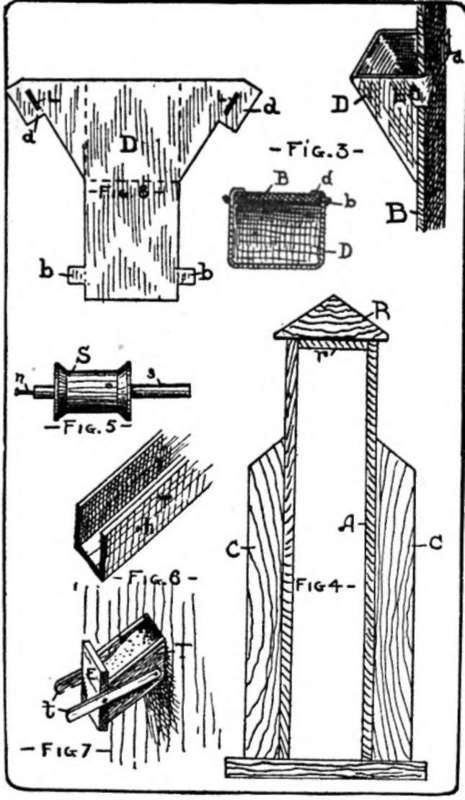
Figure i shows the model complete. Figure 2 gives a view of the toy with a side removed. Figure 3 shows details of the belt conveyor and buckets. Annexed to Figure $ are some of the other details of the making. How the toy works is shown in Figure 2, where you can see the parts better.
First, grain - or its play substitute, sawdust - is put into the hopper G, Figure 2, below at one end of the elevator. When you turn the crank 77, Figure 1, outside the building, the belt B, Figure 3, between the two spool pulleys travels along. This belt has tin buckets D fastened to it, so that when these come down they scoop up some of the "grain," carry it up, and dump it as the bucket goes over the pulley at the top.

In dumping, the "grain" drops into the top bin, filling it up ready to be drawn out of a spout T, Figure 6, into your waiting "wagons" at the other side.
For material select a cigar box, or for a large model pieces of thin wood from the sides of a cracker box or the like, some inch pieces for the heavier parts, and for the base a couple of good-sized spools of the same size, some tape for the belt, and some tin for the buckets. We will make a big model.
Cut end pieces F of thin wood, as wide as the spools are long or a trifle wider. They can be any convenient height to suit your elevator, but a foot high is not too much. Fit sides to these also of thin wood, and nail one side on as in Figure 2, making as good a job of it as you can.
Plane off a roof piece B, as shown in Figure 1, slanting it off from the center line and letting it overhang a quarter of an inch all the way around. Nail this in place carefully. Next fit in the pieces a and e, arranging them as shown in Figure 2 to leave plenty of room for the spools S S in their proper places.
Cut a piece out of F at the right-hand end and fit in a slanting board G for the hopper. You can fit a tin or cardboard at either side of this if you wish to keep the "grain" from spilling out sideways when you pour it into the hopper.
Fit the spools onto tight wooden axles, as in Figure 5, the lower one with the axle sticking out several inches at one end and the other end cut off nearly flush with the spool end. Drive pins or brads n into the ends of these wooden axles for spindles. These will fit through bradawl holes in the wooden sides of the building, the nails turning in the holes. Be careful to get the axles of the spools parallel to each other so the belt will not tend to run off.
Fit the spools in a location allowing room enough for the buckets without their hitting at top or bottom or against the slanting board a as they pass and dump above. Now to fix the belt and the tin buckets.
The belt is a strip of ordinary tape such as your mother uses in her sewing. The buckets are of tin bent up and attached to the belt as in the separate drawing, Figure 3. In the first place the pattern shown at the left is cut out.
This is made with the central part as wide as the tape belt. Its length is a little over twice as long as the width of this central part. The top part has a little triangular piece on either side, and a little flap d is left at the outer edge of this.
On the other end of the pattern are two little flaps b and when this much is done - and you had better cut the first pattern out of paper till you make one that suits you - fold the tin piece on the dotted lines.
Where the flaps b come on the flaps d, when the lower part folds up so they meet, punch little slots I for the flaps b to stick through.
This can be done with a hammer and small screwdriver.
Set the bucket as it is cut and folded, against the tape belt and bend the flaps d back around the belt, hammering them so they hold the bucket to the belt tightly without slipping. This fastening is shown in the sketch marked Figure 3.
Stretch the belt tight on the pulleys, sewing the joint, and then put on the other side of the building. To make the elevator more realistic, two one-inch pieces, C C, Figure 1, are fastened outside the main part of the building, extending up to within a few inches of the roof, where they are cut off slanting, as shown.
One of these is cut short to allow room for the crank pulley P, shown in Figure I. This is a round disk of wood fastened to the spool shaft tightly and having a wooden crank H with which to turn the shaft. If you wish, you can groove the pulley P and run the elevator by your steam-engine or by water power. The whole arrangement is fastened to a baseboard to complete it.
If you have taken care to mount the spools parallel so the belt will run right, the elevator is now ready for business so far as lifting the grain to the bin is concerned.
To drain this bin when full, a trough, 7, like Figures 6 and 7, is fixed slanting out to the end of the elevator, this being built of three pieces of cigar-box wood.
At the end of this trough a gate E is fixed, held by side pieces t pivoted on nail b. By lifting on the handle connecting these side pieces the gate E is lifted, and the grain flows out of the elevator bin. Drop the handle, and the gate shuts.
Continue to:
My Books

