How To Make Model Elevators
Description
This section is from the book "The Boy's Book Of Mechanical Models", by William Bushnell Stout. Also available from Amazon: The Boy's Book Of Mechanical Models.
How To Make Model Elevators
THERE are all kinds of elevators, some for passengers, some for freight, and some for grain, but the next one I'm going to tell you about is for freight, and light freight at that. You might even call it a mail elevator, for we boys used the one we fixed up to carry notes up to the attic window from the ground outside, - so you see it is for light loads.
What you need to start in with are a few sticks of thin wood, a cigar box, and two empty tape spools. The line is of wire and string, or string alone, if you can't get the wire.
The first thing is to cut up the cigar box as you see at A in the drawings, Figures i and 2.
That is, merely cut the narrow sides of the box down thin to within a few inches of the end, first nailing on the bottom and cover of the box and sawing across where they end.
Of course, before you cut the box, you should mark where you're going to cut, and then the two sides will surely be alike when you are done.
This cutting leaves, as you see, a small box at the bottom formed by what used to be one end of the cigar box, with two arms a sticking up, each arm an inch wide and about two-thirds the full length of the box.
Now take two tape spools, Figure 2, and with a three-cornered file or with your knife cut grooves around the rim. Through the hole in the center drive some tight wooden axles b and cut them off so that they are almost, but not quite, an inch long and stick out equally on either side.
Some tape spools have a very small hole in the middle. In this case you can take a quarter-inch bit and enlarge the hole if the wooden axle be too light to drive a needle n into without splitting it.
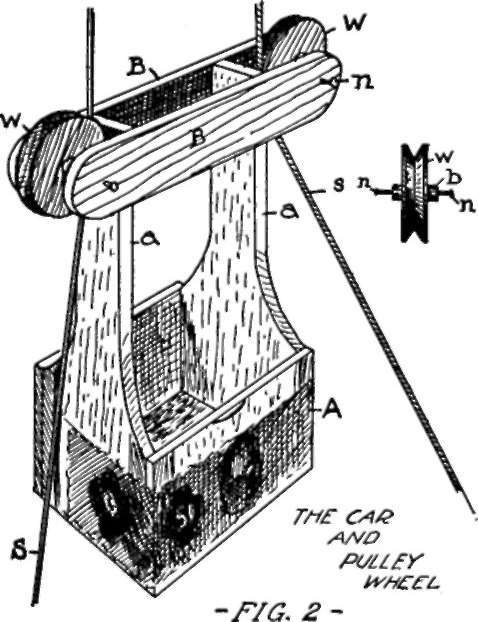
These finished, cut two pieces B from the odd pieces of cigar box or of other thin wood, - both alike, rounded at the ends, three quarters of an inch wide, and long enough to stick out an inch beyond the pieces a when put in the position shown in Figure 2.
The wheels are mounted, you see, by driving needles or small brads n through holes in the pieces B into the ends of the wooden axles shown at b in the little sketch of the wheel alone.
Make the holes in the pieces B first, taking care to get them opposite, and have them large enough so that the needles or brads will turn easily. Also start the needles or brads into the axle ends before you mount the wheels in the frame, just driving them in a little way and then pulling them out, so that when you come to feel around through the bearing for the exact center of the axle, the needle will easily find the hole that has already been made.
After the wheels are in place, and the needle driven home, you'll have some wheels that turn very easily and freely.
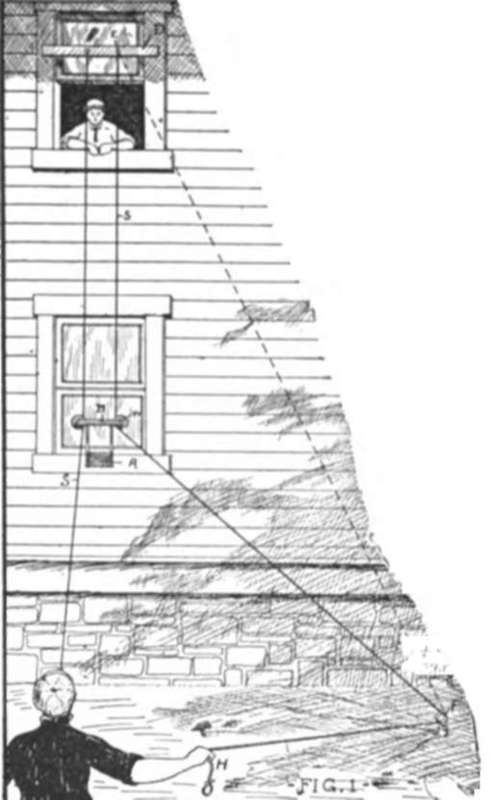
This finishes the car, and we'll start to work on the line, which is the easiest part to make. In the drawings I have shown the line running to a second-story window.
Instead of fastening the top of the line to a board D fastened crosswise, as it is in the drawing, you may fasten the top of the line to screw eyes screwed into the top of the window frame, which will save a little work - only then the elevator won't always stop at exactly the right place.
The screw eyes E at the top should be just as far apart as the distance inside the pulley wheels W on the car, that is, a little wider than the cigar box.
The line S on the left is stovepipe wire and is stretched very tight. At the bottom it is fastened to a large stake, not directly under the left-hand screw eye, but off a little to the left and out from the house.
The line from the right-hand screw eye is a piece of stout cord which runs off to the right and around the pulley in the top of a stake F some distance away.
Before you string the lines tight, pass them through between the wheels and the pieces a of the car, so when the car runs, they'll run on the inside of the wheels.
The stake that the pulley is fastened to should be, as I said, a little to the right, but the distance depends on what you'll use your line for. A third of the height of the line is a good distance, but if you want the elevator to go up faster, make it a little less. It won't carry so much weight, though. If you want to carry heavier loads, make it a little more than a third.
After the right-hand string runs over the top of the pulley on the stake, it runs back toward the first stake at the left and ends in a stick or ring for a handle.
This is how the elevator works: Take the loose string with the ring H in the right hand like the boy in the picture Figure 1.
Suppose the car to be at the bottom. If you pull on the string, it will tend to stretch tight between the pulley below and the screw eye above, as in the dotted line. It can't take that position, though, because the car is in the way, and before it can, the car must move up to the top.
This is just what it does, as you'll see when you try it; and when you pull the string, up goes the car, with a speed depending on how hard and quick you pull. Go easy at first till you learn how, or you'll send the car bump into the top stick D and spill your load or even break the car. A little practice will make you an expert.
This first elevator is probably the simplest that can be made and is good for distances up to the first story. It is not suitable for much of a height, however, and if you want to make one that will work up the side of the wall to the attic window, follow the directions on the crank elevator. This is almost as simple to make as the first type, is more like a real elevator than the first one described, and will lift quite a load. The elevator part can be made of a cigar box, as in Figure 8, so things cannot fall out.
Continue to:
My Books

