How To Make A Crank Elevator
Description
This section is from the book "The Boy's Book Of Mechanical Models", by William Bushnell Stout. Also available from Amazon: The Boy's Book Of Mechanical Models.
How To Make A Crank Elevator
First take some laths, or if you can't get them, cut some sticks about an inch and a half wide from the side of a cracker box or some such thin wood.
Cut two of these sticks a little longer than your elevator car is to be wide,-a little wider than a cigar box, if you are going to use that for the car.
Arrange these two sticks edgewise on two others, as at A in Figures j and 4, leaving space enough between them for two spools G to fit easily.
These pieces A are fastened to the under strips D with brads, and the strips D have their other ends nailed to the under side of the window casing, as you see at the top of Figure 3.
One piece D is near the end of A at the left; the other is a distance off equal to a little less than the width of the box you use for the car, so that after it is nailed in place, strings or wires I may be let down for guides on either side of the car, running from nails n driven into D.
Before you nail the upper frame to the window casing, fix the two spools of equal length - the ones you have made to fit between the pieces A at G - as in Figure 4, cutting a small groove for the string around its middle, as in Figure 5.
Mount one spool at the right end of the pieces A and the other so that the string from it will hang down midway between the pieces.
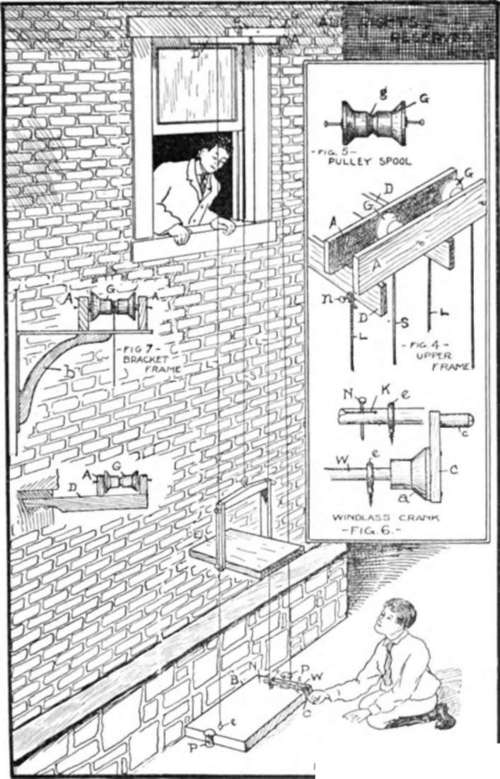
figure: 3 working order.
D. These are mounted in place by plugging up the central spool hole with a piece of wood that just fits, in its length, between the pieces A. Where the spools are to be mounted, bradawl holes are made through A on either side, and brads or needles driven through these holes, in which they should fit loosely into the ends of the spool plugs. This is shown in Figures $ and 7, and you can see how mounting the spools in this way will make them turn very easily.
Mount your frame in the window top as shown in Figure 3, fasten a piece of board to the ground directly below with two screw eyes in it at e for your guide strings to fasten to, - the board is held down by the stakes P, - and we are ready to make the elevator car.
This may be made of a piece of flat board with a supporting frame over it, or you can use a cigar box E, as I have said, which will be better, for then things can't roll off.
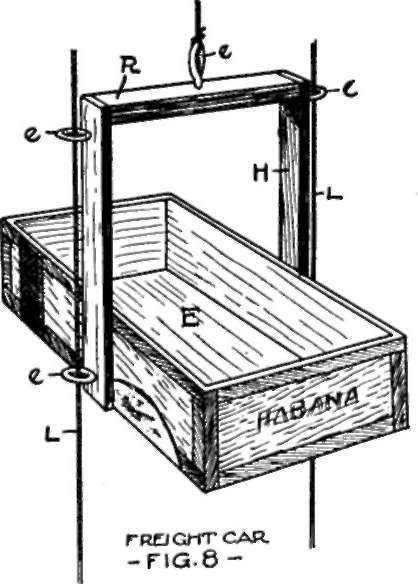
Make the frame as in Figure 8 of thin wood. Two side pieces run up for several inches from the centers of the sides and are connected crosswise at the top by a heavier stick R.
In the center of R on top is a screw eye e for the strings to fasten to. On each side are two screw eyes e that the guide strings will run through, as you see at L.
We are now ready to string the guide wires.
Drive stout brads n into the pieces D on the outside and between the pieces A, Figure 4, that is, just halfway between them. From these run the strings down through the screw eyes e on the sides of the car and down to the screw eye in the baseboard on the ground at P. These strings should, of course, be tight, and you can see how they will keep the car from whirling or twisting when it is coming down.
Just to the right of where the right-hand screw eye on the base B comes you will note a wooden shaft W, with a crank on one end, which the boy is turning. This is the hoisting windlass, which lifts the load, and it is shown in detail in Figure 6.
Here W is the stick which fits tightly into half a spool at a. You can make it doubly fast with glue.
The crank is made of a short stick with the piece c on its end, which is only a piece of spool with the flanges cut off and with a screw through the center hole. You may make it of just a nail, if you want to, driven into C at c.
The stick W fits through two screw eyes e as bearings, these being screwed into the base B at the proper places.
The other end of the stick W has a saw cut K in it, as in the upper Figure 6, and just opposite the end of the stick where it is mounted in the screw eyes is a brad N nailed into B.
Thus, when you want W to be held in any position, you can shove the shaft over till the nail is in the cut K, when the stick can't turn. When you want to turn it again, though,- as when, for instance, you want to let the car down, - all you have to do is to pull the crank toward you till N is out of the cut K.
A string is now run from the screw eye on the crossbar of the elevator car, up around the spools, and down to the stick W, where it is wound around several times and fastened. When the elevator car is at the bottom, this string will be wound around a few times so it won't slip on W.
Now, when we turn the crank, W turns, and the string winds up, thus pulling the car E up. When we wish it to stop, then we stop turning the crank, and by slipping the stick W back until N is in the cut K, the car will be held at that position until we are ready to pull it up higher or let it down again.
If you want to make the frame at the top stronger, you can use common shelf brackets b, Figure 7, instead of the pieces D, fastening them in place with screws.
This elevator will furnish a lot of fun, and all that is required to make the car go up and down is the turning of a crank.
Continue to:
My Books

