Curls, Bends And Buckles. Curls
Description
This section is from the book "Workshop Receipts For Manufacturers And Scientific Amateurs. Supplement Aluminium To Wireless", by The Chemical Publishing Co.. Also available from Amazon: Workshop Receipts For Manufacturers And Scientific Amateurs.
Curls, Bends And Buckles. Curls
It is of frequent occurrence that a saw will encounter an obstruction of such a nature that it will be bent and in a manner to stretch the metal on one side.
This will give the saw a " curl." This can usually be taken out by finding the centre of the curl or curve and curl it in the opposite direction. In this force enough should be used to stretch the metal on the inside of the curve as much as it was stretched on the outside or enough to have the saw remain straight.
Bends
A bend is a shorter stretching of the metal, and leaves the saw in more of an obtuse angle than a curve. A bend can usually be taken out by hammering, but care must be taken or the last condition of the saw will be worse than the first.
Buckles
A buckle is a bend in which the saw blade is bent or twisted in both directions. A skilful workman can take a buckle out of a saw, but even he is likely to find that getting a new saw is the cheaper thing to do.
Clean And Bright
Saws should be kept always clean and bright. If they get rusty they may be cleaned with kerosene oil and very fine emery paper. To keep them bright coat them with a thin film of vaseline, making the vaseline as thin as possible by rubbing it well with a woollen rag. It will not then gum. Any oil having no acid will do for the purpose. Some soaps will also be found very good for removing the rust and giving a polish to the surface.
Causes of Saws " Running."- A saw is said to " run " when it shows a tendency to" run away " from the mark that should be followed in cutting. There are three causes, due to faults in the saw, for this tendency :- li) A twist in the saw that throws it to one side of the mark. This should be treated as mentioned under the heading of Curls, Bends and Buckles.
(ii) Bad or poor filing, which leaves teeth longer on one side of the saw than on the other.
(iii) Uneven setting- the teeth being set more on one side than on the other.
It should of course be recognised that an unskilled workman using a perfect saw may not be able to keep to the mark, and this question should always be considered before a saw or its maker be blamed.
A description of the Taintor Positive Saw Set may be useful and interesting. It consists of a frame to which are attached two movable handles, an anvil and a plunger; a spring opens the handles away from each other, see Fig. 191.
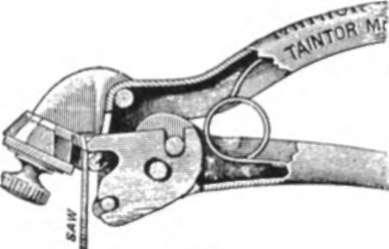
Fig. 191.
In use the upper handle moves first and clamps the saw against the side (lower part) of the anvil (Fig. 192), thus preventing its slipping on a saw having even the finest teeth. The lower handle then moves carrying the plunger,
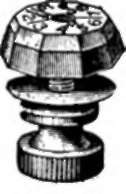
Fig. 192.
Fig. 193, first adjusting it to the thickness of the saw.
Additional pressure then tips the plunger and forces the teeth to conform to the face and side of the anvil. In this there is no loss of time, and the operator may not realise that both handles have moved.

Fig. 193.
The plunger moves in nearly the same circle as the tooth being set, and so does not distort it.
The anvil is a block of steel having ten sides and faces. The faces are of three different lengths and in the operation of setting, as the teeth of the saw come just to the top of the anvil the bending will take place at a point equal to the length of the face from the points of the teeth. These faces are placed in three different divisions of the anvil. Those designed for fine teeth have F stamped over them on the lop of the anvil. Those designed for medium sized teeth have M and those for coarse teeth have C.
These faces will be found sufficient for all ordinary work, but as some work requires very fine adjustment a washer of sufficient thickness is furnished, which, when placed between the anvil and frame, raises the anvil one-half the difference between the lengths of two faces, making the setting less on each face. This gives twenty adjustments.
The faces of the anvil are numbered so that any setting may be returned to, but these numbers have no reference to the number of the saw, or number of teeth to the inch.
Directions For Use
To set fine saws, 10 to 16 points, use face No. 1. If this sets too much put the washer under the anvil and use face No. 3. If not enough use face No. 2 without the washer. This will give a short bend near the point like the set of most new saws.
To set medium saws for ordinary work in soft woods, use face No. 4. No. 3 will set less, No. 5 more and No. 6 still more. If it is desired to bend the tooth farther from the point use faces in division C. To set rip saws for fine work use face No. 7. For coarse work face No. 8. No. 9 will give more set than No
Never use the face that reaches below the root of the tooth.
The anvil should be screwed tightly down with the face selected for use accurately in line with the clamping jaw. In use bring the handles together with sufficient force to press the tooth hard against the face of the anvil, but not hard enough to crush it or draw it out of shape.
If a new plunger is required, drive out the pin that holds the lower handle. The plunger will then come out with the handle. Put the new plunger in place of the one removed, file the burr off the pin, drive it back to its place and rivet it lightly.
The pin should be driven from the right-hand side of the saw set, and with a punch small enough to go in the cup of the pin.
Fig. 191 shows this saw set in use, and the claims for it include such points as follows : Gauge cannot slip ; parts interchangeable ; has but one gauge to set; will not slip on the teeth ; it is made entirely of steel ; setting absolutely uniform ; it is light, strong and durable ; any setting mav be returned to ; teeth will not spring back after being set ; will not curl, break, cut. crease or otherwise mar the teeth ; is self-adjusting except the turning of the anvil to change the setting. See Vol. IV, page 50.
Saw Blades. Use Of Broken Hark - Saw Blades
If the saw blade has one end broken off, then soften that end for, say iin. in length, and drill another hole to match the hole in the other and unbroken end. If a few teeth are broken out in one or two places, then prolonged use of the blade in that condition will simply cause more to break out. To prevent this, grind the blade edgewise at the damaged place easing off the grinding at both ends, and grind enough at the centre to get a fair surface that will not catch in the work.
Continue to:
My Books

