Taking The Pictures
Description
This section is from the book "Time Out for Living", by Ernest DeAlton Partridge and Catherine Mooney. Also available from Amazon: Time Out for Living.
Taking The Pictures
There is much to learn about the proper way to take moving pictures. If the pictures are not properly taken, they will not give good reproductions on the screen. One learns many of the tricks by experience, but there are a few suggestions that can help the greenest beginner. Several of these suggestions are presented here.
1. Hold the camera steady at all times. This is a good rule to follow on all occasions. A wobbly camera will produce jumpy and unpleasant pictures on the screen. Whenever possible, the camera should be on a tripod. When a tripod is not available, it is well to plant the feet firmly and hold the camera against the face with both hands. This will eliminate much unsteadiness.
2. Do not try to follow objects moving rapidly in front of the camera. There will be a temptation to do this, but the result will not be happy. It is much better to have such objects approach or leave the camera from an angle rather than pass directly in front.
3. Make sure the exposure is correct. Most cameras are fitted with a device which regulates the amount of light that can come through the lens. If the exposure is not exactly correct, the pictures will not be satisfactory. If too much light passes through the lens, the pictures will be too bright and lack detail. If not enough light comes upon the film, it will make a picture which is too dark on the screen. Study in this respect the literature prepared by the company that makes the camera.

These scenes are from a movie made by some high-school boys.
The movie camera differs from the ordinary still camera in that the shutter speed is usually fixed. (On the more expensive movie cameras there are several shutter speeds.) Therefore, the regulation of light must be in the lens opening only. With a still camera, you can regulate the exposure from one or more seconds up to as fast as 1/500 of a second, depending upon the camera. The ordinary movie camera takes pictures usually at 1/40 of a second.
Many good exposure tables are available for the photographer. For good results, these should be followed very carefully. The tables usually show at what opening the lens should be set according to the month of the year, the time of day, and the kind of day. You see, there are many tricks in being a good photographer.
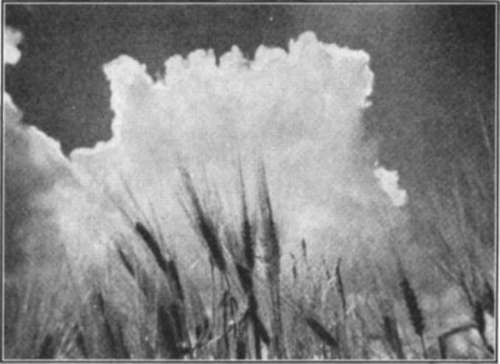
Pictures of clouds are made more effective by framing them through grain or tall grass.
4. Plan your scenes. Do not shoot the camera at everything you see. If you do, you waste film and do not get good continuity. Make certain that your scenes are balanced. It takes experience to learn about balance, but some of the suggestions below will help you acquire it.
5. Keep the picture centered on one idea, if possible. Do not try to cover too many movements or people in one shot, if you are looking for detail.
6. Moving the camera to cover large scenes is called "panning" (from panorama). Usually panning is not pleasing on the screen and should be avoided. If one shot cannot cover the scene, it is much better to take several different shots rather than to move the camera.
7. Different angles (ways of looking at the same object) usually add interest. To get a scene from different angles, take a distant shot and then a close-up of the same subject.
8. Do not have too many areas of light and shade in the same picture. Extreme contrasts are not pleasing on the screen unless they are very skillfully taken.
9. Try to balance the picture in the finder of the camera - right against left and top against bottom. The skyline or horizon should not be in the center of the picture, but either two-thirds up or two-thirds down.
10. When using black-and-white film, it is well to keep the source of light to one side, not directly behind. With color film, it is well to have the light spread evenly over the subject. If it is daylight, the sun should be directly behind the photographer.
11. Each shot should be at least eight seconds in length. Most of them will be longer, depending upon the action being taken. In showing a scenic picture, eight seconds is the minimum. Learn to count silently while taking the picture. Count "one thousand and one, one thousand and two," or "one-and, two-and, three-and," and in this way measure off the seconds. It is usually well to take a little more of the picture than will be needed in the final version, since it is much easier to cut a little from a scene than to add to it.
Taking the picture is one of the most interesting steps in the whole process. After taking several good shots, one can hardly wait for the film to be developed. By keeping a record of each scene that is taken, the exposure, the amount of light, and the kind of film used, one soon learns to judge his pictures correctly and is insured against wasting good film thereafter. Those who are expert in taking movies make every foot count because they can judge scenes for their value and get the right exposure.
Continue to:
My Books

