Lesson XIX. Etching And Altering Draperies And Figures. Part 3
Description
This section is from the book "Complete Self-Instructing Library Of Practical Photography", by J. B. Schriever. Also available from Amazon: Complete Self-Instructing Library Of Practical Photography.
Lesson XIX. Etching And Altering Draperies And Figures. Part 3
452. Altering Drapery And Adding On Regular Waist
Altering Drapery And Adding On Regular Waist. In Fig. 1, of Illustration No. 29, is shown a portion of a portrait of a lady posed in an evening gown. We demonstrate in this illustration the altering of the drapery and the adding of a regular waist. To accomplish such results a drawing should first be made on tissue-paper, of the kind of waist to be added. A suitable design or pattern may be obtained from any of the fashion journals or magazines. If skillful with the pencil, a pattern of one's own design may be constructed, yet much more accurate results will be obtained if some suitable printed pattern is followed.
453. In order to accurately outline the design to suit the subject, place a piece of transparent tissue-paper on the glass side of the negative, and fasten the edges of the tissue to the negative with gum stickers, so that it will be immovable; then with a pencil sketch your design on the tissue, following the pattern you have selected. With this accomplished turn over the negative, film side toward you; then, with the etcher, very lightly trace the outline of the design on the film of the negative, as shown in Fig. 2. Now, remove the tissue-paper pattern, and with the etching knife begin to blend and construct the shadow portions of the drapery, carefully following the original design.
454. You will observe in Fig. 2 that the locket is not well placed, being very much to one side. To locate it properly a new locket must be etched on, as is shown in Fig. 3. Allow the old one to remain until you come to the final finishing, when it is eliminated with a soft BB lead. It is advisable to outline the locket on the film first with the pencil, which will give you an idea of the design before using the etcher. With this completed and without working

Fig. 1

Fig. 2
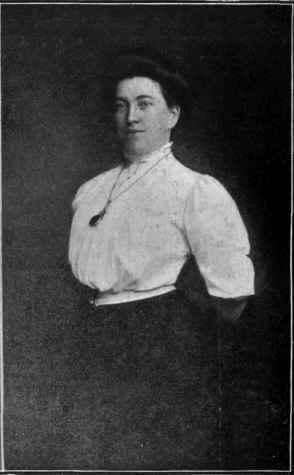
Illustration No. 28 Reducing Size of Stout Subjects See Paragraph 449.

Illustration No. 29. Adding Drapery to Subject in Decollete.
See Paragraph 452.
in any high-lights, we have reached the third stage. (See Fig. 3.)
455. The final touches must now be placed on your work. Contrasted portions must be softened and flat portions strengthened, and the figure or design of the lace, etc., built on. To accomplish this, the film on the shoulders is shaved down with the etching blade, reducing the highlights to a more mellow and soft tone, after which the pattern of the lace and folds of the drapery are built on with a soft BB pencil. At the same time the first locket is also erased with the pencil, the straps of braid are strengthened, and the edges dotted on, the whole effect worked up so as to give all the appearance of a perfectly natural portrait made when the subject was dressed with a waist and high collar, or whatever the design may be which you have chosen. (See Fig. 4.)
456. You will observe by comparing Fig. 4 with that of Fig. 1, that the gown appears perfectly natural and entirely devoid of any mechanical work.
Continue to:
My Books

