Clay Modelling And Pottery. Part 6
Description
This section is from the book "Arts And Crafts In The Elementary School", by Joan Dean. Also available from Amazon: Arts And Crafts In The Elementary School.
Clay Modelling And Pottery. Part 6
There are numbers of ways of decorating pottery. Some of them are suitable only for work which is to be fired, but others can be used on any work. Just as we encourage children to explore all the possible textures they can make with paint, so we can encourage them to explore and discover ways of decorating pottery. We should also encourage them to consider what is suitable decoration for pottery. Real knowledge of the relationship between a pot and its decoration only comes with long experience of the craft, but we shall have done much if we encourage them to look critically at decorated ware, and if we help them to gain real pleasure from looking at the work of such potters as Bernard Leach. Probably the only rule one can apply to the Tightness of pottery decoration is that it should belong to the shape of the pot, just as a picture should belong to its frame. Attempts to paint pictures on pottery are not generally successful. We should also remember that hand-made pottery is by nature sturdy and robust in appearance. Fine and delicate decoration is not only difficult to achieve; it does not belong to the material in which the work has been carried out.
The following methods of decorating pottery can be used whether the work is to be fired or not:
1. Applied ornament. A pot can be decorated by sticking small pieces of clay to it with slip. These can be left as spots, or modelled with a tool. It is also possible to shape a piece of clay first, and then stick it to the pot.
2. Engraved ornament. Decoration can be carried out by engraving a design with a knife or lino-cutting tool. This should be done when the pot is partly dry and in a "cheese-like" state. If the pot is afterwards fired and glazed, the glaze will remain more thickly in the engraved lines. Such lines must be made firmly and be of reasonable depth.
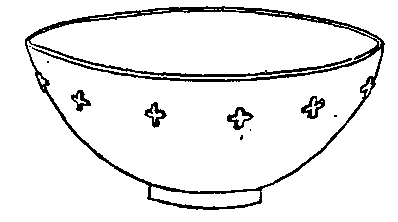
Applied ornament
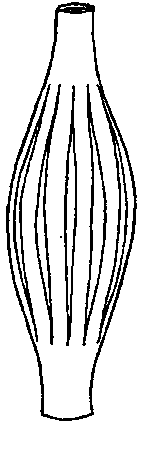
Engraved ornament
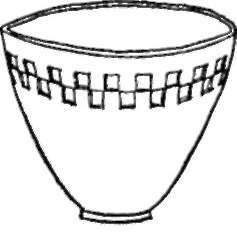
Stamped ornament.
3. Stamped ornament. Decoration can be stamped into the surface of a pot while it is still wet enough to take an impression. The stamping can be done with almost anything that will make an impressionthe end of a pencil, the handle of a pair of scissors, shells or nuts, leaves, blocks of potato, wood, lino or plaster specially carved for the purpose. If you have a kiln, it is fun to make and fire some stamps for this purpose. It is a good idea to let each child make a personal stamp, preferably with an initial, for marking his own work. These will need to be in "mirror writing" if they are to produce an impress that is the right way round.
Stamps For Marking Pottery
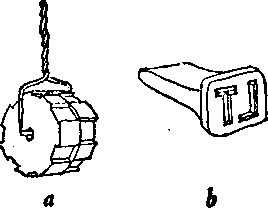
(a) A wheel for stamping decoration. This could he made with clay and fired. The wire handle should he inserted after firing.
(b) A stamp with initials
The following decorations can also be carried out on pottery whether it is to be fired or not, but the decoration is not seen at its best without firing. These are all methods of decoration which involve the use of slip. Slip for this purpose can be made in various ways, but the following is probably the best method. Dry a quantity of clay completely. Now break it up until it is a fine powderyou will find this easier to do if you break it into small pieces while it is still wet. Add sufficient water to bring it to the consistency of thick cream and mix it well. Brush this through a coarse sieve several times until there are no lumps left in it. It is now ready to use. It will have a tendency to settle, however, and will need stirring from time to time. It can be used for the following kinds of decoration:
1. Slip painting. Slip can be coloured with underglaze paint or with oxides and used to paint a pattern on to a pot. Decoration of this kind should be bold and vigorous, and no fine lines should be attempted.
2. Sgraffito. This is an Italian word, meaning "scratched". The pot is coated with coloured slip, and a design scratched away to reveal the colour of the pot underneath. One of the problems of this method is that of finding the best time to apply the slip, for if the pot is too dry the water in the slip will cause it to crack. If slip is being used on slab or moulded pots, it is best to roll out the slabs of clay, lay them on a piece of board, and pour some slip on to the centre of the slab. Tilt the board so that the slip runs in each direction, giving the slab of clay a thin coating all over. Leave this until the shine is off the slip, usually a period of several hours. At this point it is still possible to cut and mould the clay.
3. Feather combing and marbling. A slab of clay is rolled out and coated with slip as suggested above. Slip of another colour is trailed across it, possibly in repeating lines, using a slip trailer. With a feather or bristle, draw lines through the slip in the other direction. This will drag the slip from the trailed lines in certain places, and form an attractive design. Many variations can be invented. If slip is dropped on to the slab in spots, for example, and the end of the board dropped down two or three times, a marbled surface will result. The snag about all these methods for school use, however, is that the slip must be left for several hours to dry out, before the slab of clay can be moulded into a dish or a pot, and the clay must then be kept in the right condition for use until the next lesson. This requires a lot of careful organizing.
Continue to:
My Books

