Farmyard
Description
This section is from the book "How To Build Games And Toys", by B. W. Pelton. Also available from Amazon: How To Build Games And Toys.
Farmyard
Whether city or country bred, girls and boys from four years on up enjoy playing fanner. Given a bam, an assortment of animals and fowl, and sufficient movable fence sections, small fry of all ages will contentedly arrange and rearrange their farmyards for hours at a time.
The barn illustrated in A of Figure 4.13 is 11/2 ft. long, 1 ft. wide, and 14 in. high, with a removable roof for complete control of livestock during the various seasons, and to permit compact storage when playtime is over. Like the doll house it is butt jointed from f-in. plywood, but the floor of f-in. material fits inside the ends and one (west) wall, extending out in. beyond the east wall containing the sliding door. Thus, the dimensions of the floor section are 17 1/4 in. long by 1213/16 in. wide, and the east or sliding door wall which rests on this extension of the floor, is only 75/8 in. high. As shown in detail B, the floor is extended out in this manner in order to provide a supporting surface for the bottom edge of the sliding door. The latter is cut from 1/4-in. material 1/2 in. wider and 1/4 in. higher than the door opening shown in D. A piece of 1/4-in. quarter round molding is nailed to the floor extension as indicated in detail B, leaving a 5/16-in. groove for the bottom of the sliding door. Filler strips in. wide at either end limit the slide of the door to one side of the opening, so that hog pens or chicken houses can be set up against the other side, if desired. The top of the door slides in a groove made up from a separator strip 1/4 in. thick and 5/16 in. wide, over which a thin piece of veneer or cardboard is glued or bradded to confine the top edge of the door. Obviously, this upper groove and guide cannot be fastened in position until the door is standing upright in its lower groove. To prevent undue binding, two round-headed glass or brass pins are snipped short and forced into the lower edge of the door near each end, as shown in sectional diagram B. The upper guides can then be glued into position to allow a scant 1/8 in. of space over the upper door edge. A flat screen staple serves as the handle, and the crossed cleats can only be indicated by paint. Be sure that the upper and lower edges of the door are sanded smooth before it is fitted into its permanent position.
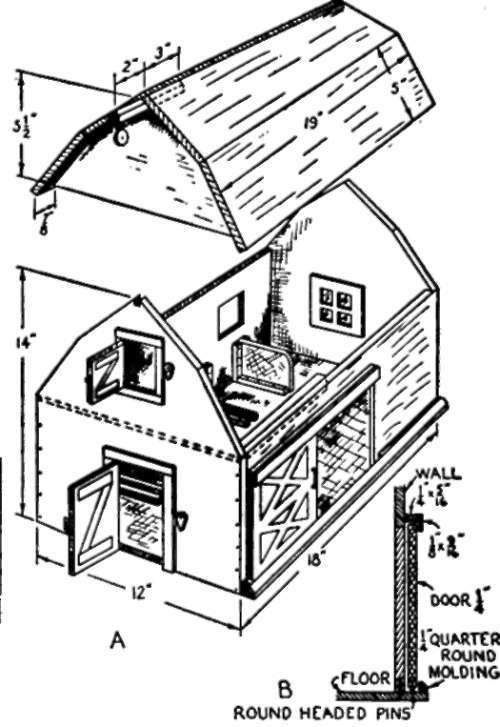
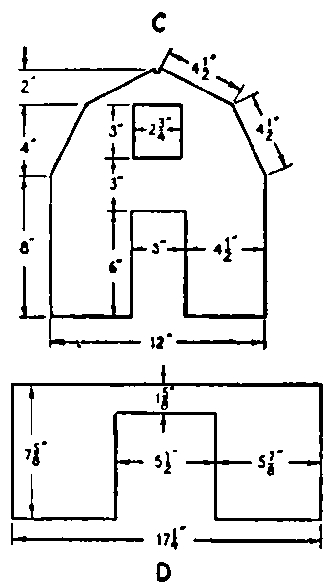
Fig. 4.13. Barn.
The dimensions of the front wall are shown in C (Figure 4.13). If the door and window openings are carefully cut out, the waste pieces can be mounted on small hinges to serve as doors. The inside "Z" cleats are added refinements cut from cardboard, as is the white window and door trim glued to the outside after the flat red bam paint is applied. The pivoted latches cut from thin wood scraps will require washers of the same material as the door and window casing.
The rear end is identical in contour and may have a central window or a pair of smaller ones cut so that their upper edges are about 6 in. from the floor. Oversized rectangles of cellophane, celluloid, or undeveloped film can be glued over the openings to represent glass, covered on the outside, preferably, by a white cardboard frame with cutout muntins similar to the one shown in the inside of the drawing in A (Figure 4.13). The dimensions of the east wall are shown in D; as previously explained, the opposite wall is $ in. higher, and may have from two to four small windows cut about 2 in. down from the eaves. The dotted lines in the front and east walls of the drawing indicate 1/4-in. cleats to support the removable haymow floor, 11 1/4 in. by 6 or 8 in. If preferred, the short floor can be permanently attached to the removable roof section.
As indicated in the drawing, the roof consists of four sections 19 in. long, screwed or glued to two gables 51/2 in. high, which are set in a full 7/8 in. from the edges in order to fit inside the end walls and allow a 1/2-in. overhang. The two lower roof sections are cut 5 in. wide to allow for an overhang, and one of the upper sections is 47/8 in. wide to allow for the butt joint along the ridge.
The boom for the block and tackle above the hayloft door is a f-in. strip about 5 in. long extending out from the eaves for 2 in. If an awning pulley of small enough size is available, it can be fastened to a screweye for hoisting bales of hay and bags of feed. Otherwise it is easy to whittle a pair of thin scraps for a block, pivoting a section of wooden lead pencil between them to serve as a pulley. The removable stalls are 3-in. lengths of cigar box wood or 1/4-in. plywood 2 in. high, set between 1/4-in. square cleats so that the stalls will be an average of 3 in. apart.
For a young dairyman or breeder of pedigreed stock a side wall may be omitted, leaving a completely accessible open "working area" similar to the rear of the doll house, with or without a removable roof. The floor can be stained dark, but the interior walls may be "whitewashed" with flat white paint; the roof may be painted the green of composition shingles, the gray of weathered wood, or a red or aluminim to represent metal roofing.
Accessories
Fence sections are made up from wood strips 1/4 in. thick and 1/2 in. wide cut to the dimensions shown in A of Figure 4.14. The horizontal rails are bradded between pairs of uprights which will stand on either end. By cutting out a number of rails and posts at one time an assembly line can be set up to produce enough units to provide for ambitious farming projects. Painting will be simplified if the strips are dipped into white paint and laid on wire to dry prior to assembly.
One of the most imposing yet easiest to construct of farm outbuildings is the silo, which can be made from a 14-in. or 16-in. section of cardboard mailing tube with a diameter of at least 3 in. A strip of wood about 3/4 in. square, glued lengthwise to the tube, makes a realistic elevator. As indicated in B, the cone shaped roof is formed from a cardboard disk, and a section of wood, beveled or whittled to fit inside the bottom, will insure stability. Paint the silo to match the barn.
Chicken houses can be of almost any size, depending upon their importance in the farm economy. The one illustrated in C can stand alone or be backed up against a side or end of the barn. It can be glued together from cardboard, or be made up from cigar box wood or waste from the plywood barn. The window opening is backed with celluloid or exposed X-ray film across which muntins have been drawn in white paint or ink. The farmer's door in the side is drawn in ink, but the hens' exit in front is bored out. For a more or less permanent location, a piece of screenwire about 2 in. wide can be bent to form a rectangular chicken yard in front of the house.
When short pieces of hay or dried grass are available, a winter "feeder" such as is pictured in D is easy to make up from thin wood. A similar arrangement with one open side can be built against the inside wall of the barn, above the stalls.
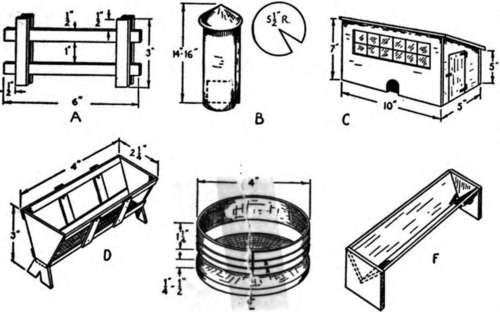
Fig. 4.14. Farm accessories.
An outdoor stock tank is a "must" on many farms and is easy to assemble from a circular wooden base, around which a long piece of thin veneer is bradded and glued, as in E. Use plenty of waterproof glue, with an extra application inside around the cracks, because small farmers invariably supply their stock with wet water. Thin copper reinforcing wires around the outer circumference can be twisted tightly to add rigidity and realism.
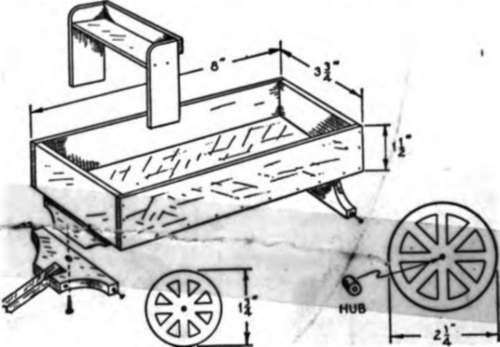
Fig. 4.15. Farm wagon.
The twisted ends, however, must be snipped short and well embedded in the wood with pliers, to protect tender fingers.
Detail F of Figure 4.14 shows a simple wooden trough for wet or fine dry feed. No dimensions are given since its size will be determined by the type of its customers. For pigs, a small, windowless house can be improvised from a cardboard box or a block of wood having an opening in one end which is large enough to accommodate a maternal sow. Any type roof will suffice so long as it will shed rain or snow.
Continue to:
My Books

