Bar Connections
Description
This section is from the book "Do It Yourself With Aluminum. 125 Projects For The Home Craftsman", by G. W. Birdsall. Also available from Amazon: Do It Yourself With Aluminum.
Bar Connections
End-To-End Bar Joints .... Lap Type
Lap joints are suitable for joining 1/4" x 1" bar stock. In Fig. 4-26, the bar is halved in thickness. In Fig. 4-27, the bar is halved widthwise on opposite ends. In both, when assembled and countersunk riveted, the joint will be practically invisible. A 3/4" to 1" overlap is recommended. After cutting and fitting joint (Fig. 4-27), clamp the two members together in position and drill two holes edgewise to fit two finishing nails which are used as rivets. Cut heads off the nails, and cut them about 11/16" long- Drive into place, and upset both ends. File off excess metal, and hammer flush. Done carefully, the complete joint will be practically invisible.

End-To-End Joints In Bar
The simplest design is a plain butt joint with a splice plate riveted or bolted to the back side. To make the rivets invisible, countersink the bar on the outside surface and drive rivets flush. To assure matching holes, use a C-clamp to hold one bar and splice plate in position while drilling the first hole. Then rivet. Next drill second hole in these two parts, and rivet.
Now clamp splice plate to second bar, drill first hole, and rivet. Then remove clamp, drill and rivet second hole. Use the same procedure if bolting the connections.
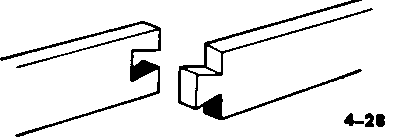
For a dovetail joint (Fig. 4-28), use coping or hack saw or jigsaw to cut one element. File to finish the joint surfaces accurately. Then use a sharp nail or scriber to mark out matching element from this first part. Cut matching element slightly oversize, and file to exact fit.

After making the dovetail joint and assembling it, lock it by drilling a small hole edgewise through the joint and driving in a small pin (nail). If joint edges do not match perfectly, close them by peening lightly. Follow with file, sandpaper, and steel wool to make adjoining surfaces match.
X-Joints In Bar
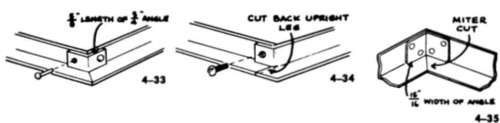
For a neat lapped joint in 1/4" x 1" bar, use either the flat joint (Fig. 4-29) or the edge joint (Fig. 4-30). Notch each bar to prevent endwise movement of either piece. For most accurate work, saw the slots slightly undersize and then file to exact fit. These same joints work with 1/8" x 3/4" bar also.
Bolting Bar To Bar
To make aluminum boltheads "invisible" when joining two bars face to face, countersink the upper surface to a depth equal to about one-third the thickness of bolthead. After bolt is pulled up tightly, peen the head into the countersunk opening, file off excess metal, and polish with fine emery cloth.
On many occasions, just filing off top of heads down even with the bottom of the screwdriver slot will greatly improve the finished appearance of the joint.
Many times the excess bolt length will break off easily with a pair of pliers, avoiding tedious sawing. Whenever cutting bolts to shorter lengths, thread nut onto bolt first and saw to length. Backing off nut then recuts any damaged threads and partially removes burrs.
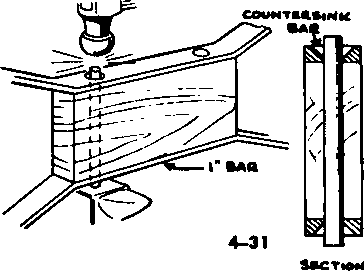
Bar-Spacer-Bar
To attach 1" bars to both sides of a wood spacer block (as in the coffee table of Fig. 11-6), alternately peen the 3/8" rod into recesses countersunk in both bars as shown in Fig. 4-31. Make joint invisible by filing off excess metal and polishing with fine emery cloth.
Edging With Bar
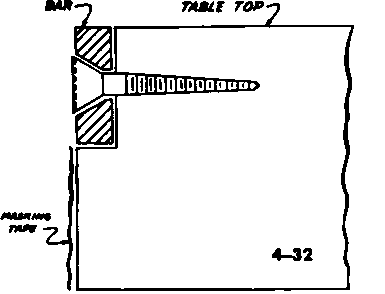
Often it is desirable to inset the edge of a table with an aluminum bar. Figure 4-32 shows how to do this with flathead aluminum wood screws in such a manner as to permit the fastening to become invisible (1/4" x 1" bar).
The trick is to countersink the outer surface of the bar just the right amount, enough so that when the screw is pulled up tightly in the hole, the bottom of the screwdriver slot in the screwhead will lie just above the surface of the bar.
Then file off the extruding portion of the head perfectly smooth and even with the bar. To avoid any minute cracks around the periphery of the screw, use a small ball peen hammer to work the metal in the edge of the screw out to fill the countersunk portion of the bar completely .... after filing has progressed almost even with the bar surface. Then finish filing.
When insetting bar in an outer rail, as in making the table of Fig. 8-1, use masking tape to cover the adjacent portions of the rail while filing to prevent marring these surfaces.
Finish the filing with a fine file, and then rub with fine emery cloth or steel wool to give the screwhead and bar surfaces a matching appearance.
Continue to:
My Books

