Oval. To Describe A Pattern For A Tapering Oval Article, To Be In Four Sections
Description
This section is from the book "A Practical Workshop Companion For Tin, Sheet Iron, And Copper Plate Workers", by Leroy J. Blinn. Also available from Amazon: A Practical Workshop Companion For Tin, Sheet Iron, And Copper Plate Workers.
Oval. To Describe A Pattern For A Tapering Oval Article, To Be In Four Sections
Describe the bottom, the length and breadth required as in fig. 6, describe the sides as in fig. 6 and 7.
Describe the right angle ABC, fig. 6; make BF the altitude, draw the line DF at right angle to BC; make DF equal to AB in fig. 5; make AB equal to DF and the taper required on a side, draw a line cutting the points A and D, and the line BC.
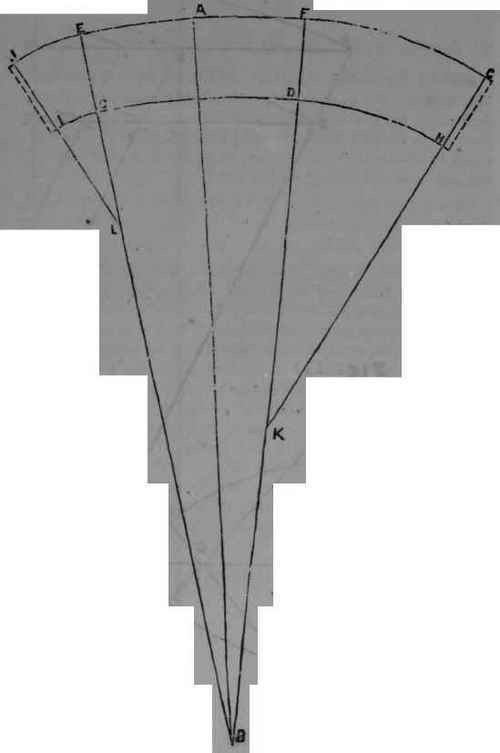
On any right line, as AB in fig. 7, with the radii CD and CA, describe the arcs EF and CD, set off EF equal to EBF in fig. 5; draw the lines CE and DF, cutting the centre at B.
Edges to be allowed.
Fig. 6, make EF equal to CD in fig. 5; make GB equal to EF, and the taper required on a side, draw a line cutting the points G and E, and the line BC.
On any right line, as AB in fig. 7, with the radii HE and HG, describe the arcs IK and GH; set off IK equal to FDG in fig. 5, draw the lines GI and HK, cutting the centre at L.
Edges to be allowed.
Fig. 6. The taper must be equal on all sides.
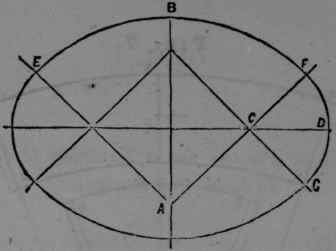
Fig. 6.

Fig. 7.
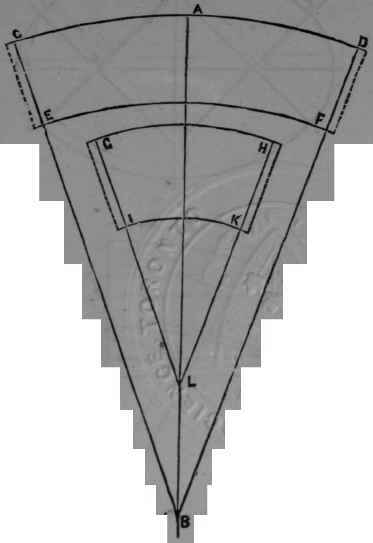
Fig. 8.

Fig. 9.
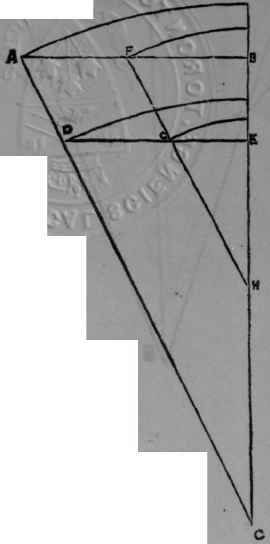
Fig. lO.
Oval. To describe a Pattern for a Tapering Oval article, to be in two Sections
Describe the bottom, the length and breadth required as in fig. 8, then describe the body as in fig. 9 and 10.
Describe the right angle ABC, fig. 9; make BE the altitude, draw the line DE at right angle to BC; make DE equal to AB in fig. 8; make AB equal to DE and the taper required on a side, draw a line cutting the points A and D, and the line BC.
On any right line, as AB in fig. 10, with the radius CD and CA, describe the arcs EF and CD, set off EF equal to FBE in fig. 8; draw the lines CE and DF, cutting the centre at B.
Fig. 9, make GE equal to CD in fig. 8; make FB equal to GE, and the taper required on a side, draw a line cutting the points F and G, and the line BC, with the radius HG, and in fig. 10, E and F as centres, cut the lines CB and DB, as at L and M, with L and M as centres describe the arcs FK and EH; also, the arcs DI and CG; set off FK and EH, equal to ED in fig. 8; draw the lines IK and GH, cutting the centres at M and L.
Edges to be allowed.
The taper must be equal on all sides.
Oval. To Describe A Pattern For A Tapering Oval Article, To Be In Two Sections
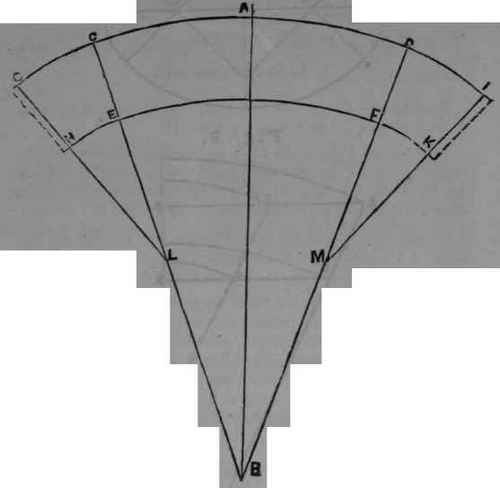
Describe the bottom, the length and breadth required as in fig. 11, then describe the body as in figs. 12 and 13; describe the right angle ABC, fig. 12; make BE the altitude, draw the line DE at right angle to BC; make DE equal to FC in fig. 11; make AB equal to DE and the taper required on a side, draw a line cutting the points A and D, and the line BC.
On any right line, as AB in fig. 18, with the radius CD and CA, describe the arcs CD and EF, set off CD equal to CD in fig. 11; draw the lines EC and FD, cutting the centre at B.
Fig. 12, make FE equal to AC in fig. 11; make GB equal to FE, and the taper required on a side, draw a line cutting the points G and F, and the line BC, with the radius JF, and in fig. 13, D as a centre, cut the line FB, as at K, with K as a centre describe the arc DH; also, the arc FG; set off DH equal to BC in fig. 11; draw the line GH, cutting the centre at K. Fig. 12, make HE equal to GE in fig. 11; make IB equal to HE, and the taper required on a 6ide, draw a line cutting the points I and H, and the line BC with the radius KH, and in fig. 13, C as a centre, cut the line EB, as at L, with L as a centre, describe the arc IC; also, the arc JE; set off IC equal to DE, in fig. 11; draw the line JI, cut-ting the centre at L.
Edges to be allowed.
Fig. 11. The taper must be equal on all sides.
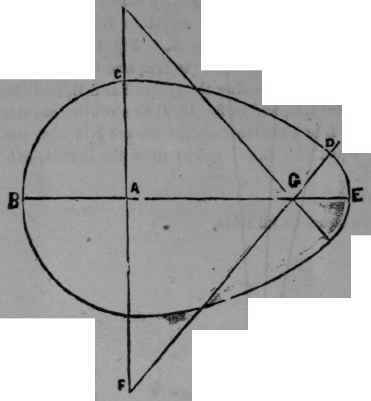
Fig. 12.
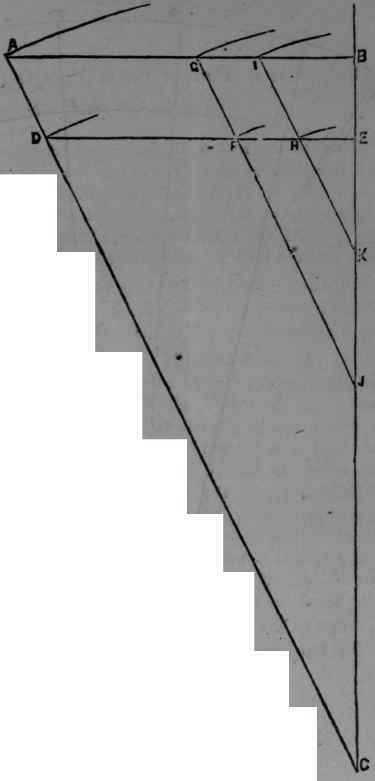
Fig. 13.
Continue to:
My Books

