XI. The Gusset
Description
This section is from the "Home And School Sewing" book, by Frances Patton. Also available from Amazon: Home And School Sewing.
XI. The Gusset
A gusset is a small piece of material inserted in a garment for the purpose of strengthening or enlarging some opening where there is likely to be more or less strain.
On flannel garments where a gusset would be too bulky a strengthening tape is frequently used.
It is next to impossible to tear the bias folded edge of the gusset.
The beauty of the gusset depends on the exactness with which it is put in and the care taken in finishing it.

ILL. 30. - Steps in Preparing the Gusset. 1. Material Out of Which the Gusset is to be Made. 2. Folded Once. 3. Folded Twice to be Cut on Upper
Fold. 4. Shape when Opened. 5. Ready to Place in Vent.
Materials. - The materials required for this lesson are: A practice piece in which a vent has been made ready for a gusset; a piece of muslin one and a half inches square, out of which the gusset is to be made; "between" needles; cotton; scissors; tape measure; a piece of paper or cloth ten inches square and having right and wrong sides, so that the process of folding the gusset may be learned easily.
1. Fold the square of paper on its diameter. Describe and draw the shape (an oblong or rectangle).
2. Fold it again; it will now form a square one-fourth the original size.
3. Fold one of these squares on its diagonal.
4. Open out and cut across this diagonal. Make a drawing of it as it now appears (a pentagon).
5. Take the piece of muslin intended for the gusset, which should be one and a half inches square, and repeat the steps taken on the paper. See Illustration No. 30.
6. Turn down the corner of the gusset as in the patch. See page 108.
7. Turn down the sides of the gusset one-eighth of an inch and baste this turn with even basting.
8. Place the apex of the gusset (A) in the angle formed by the vent or seam (wrong side of the gusset to the wrong side of the seam).
9. Begin at (A) by inserting the needle through both the gusset and the angle of the vent; leave a long end of thread; overseam very neatly as far as (B). Fasten securely and run the needle in and out of the muslin to keep it temporarily secure.

ILL. 31. - Wrong Side of Gusset when Completed.

ILL. 32 - Right Side of Gusset when Completed.
10. Thread a new needle with the long thread left at (A) and overseam to (C). Flatten out the overseaming stitches and, fasten the needle as before.
11. Turn the gusset down on the wrong side of the garment and baste it around with the thread left at (B).
12. Then hem it with the thread left at (C) ; in this way avoiding the starting of a new thread during the process. See Illustration No. 31.
13. The bias fold of the gusset may be stitched close to the edge to strengthen it and give it a finish. See Illustration No. 32.
Mistakes Likely to Occur in Making the Gusset.
1. Badly prepared vent into which the gusset is to be inserted.
2. Gusset carelessly inserted on the right side.
3. Sides sewed unequally as regards length.
4. General appearance not flat when finished.
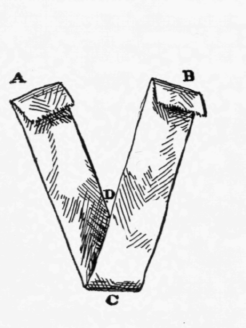
Note. - In preparing the vent for the gusset, be extremely careful to roll the hem towards the V part of the vent.
Strengthening Tapes.
A strengthening tape is used as a substitute for a gusset, at the end of seams and vents especially in flannel garments.
Materials. - The materials required are: A practice piece with a vent or seam same as for a gusset; a piece of
ILL. 33. - Strengthening Tape Ready to Sew on a Garment.

ILL. 34.- Strengthening Tape Sewed to a Garment.
tape half an inch wide and two and a half inches long; tape measure.
1. Turn down a narrow fold on each end of the tape.
2. Make one turn on the right and one on the wrong side of the tape. See (A) and (B) on Illustration No. 33.
3. Fold the tape in the middle like (C) on Illustration No. 34.
4. Hold the wrong side of the garment towards you.
5. Place the wrong side of the tape at (D) to the vent or seam.
6. Pin the tape in position.
1. Hem from (A) to (C) to (B) down on the garment.
8. Then hem from (B) to (D) back to (A) without breaking the thread. Buttonhole stitches are sometimes used instead of hemming around the V part of the vent.
Continue to:
My Books

