Chapter VII. Indoor Work
Description
This section is from the book "How To Make Common Things. For Boys", by John A. Bower. Also available from Amazon: How to Make Common Things.
Chapter VII. Indoor Work
In this chapter we propose to give a few directions for making smaller objects, including models. Such work is better adapted for winter evenings, when you can sit indoors and work, and at the same time not be shut out of the family circle; but while you are working, can even appreciate some one reading an interesting tale which you would likely find yourself well able to follow.
In the first place, we will introduce another kind of joint which you may find particularly useful in making up small boxes. As to the kind of wood for small work, you must select that according to the objects you intend to make. You will find cigar-boxes very useful. You can take them to pieces, rub them down, and smooth them, and they will be easy working and take a good polish afterwards.
Now for the joint we spoke of. It is a tongued and grooved joint, as shown in Fig. 68. Here the end pieces are rebated as shown at a, and the front and back pieces grooved as at 6. When such joints are made and well set, the glue hard and dry the corners may be rounded off as shown in the figure.
Now as we have, in small work especially, frequently to talk about glueing, let us see how it is best done. You all know that joints and sections are glued together to strengthen them and hold them piece to piece. This is best accomplished by putting on a layer of glue of the least possible thickness, and when the joints have the glue neatly smeared on them, and the parts to be joined squeezed hard together in a screw-press or vice, - if the work admits of it, - all the glue squeezed out should be carefully wiped away. Glue should be put on quite hot, and in cold weather the joint to which it is applied should be warmed, if it can be done without warping the stuff. It is said that the best kind of glue-brush can be made from a piece of rattan cane deprived of its outer crust, then dipped into boiling water and well hammered out to separate the fibres; it is certainly durable and cheap, and its stiffness enables you to apply the glue very effectively.
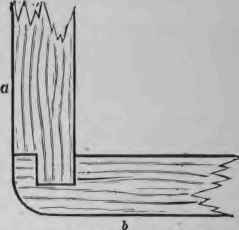
Fig. 68. - Tongucd and grooved joint for small work.
In making models in thin wood, either in deal or in the cedar wood of the cigar-boxes we have mentioned, you must first draw out your model to size, then you must cut out the various parts of it in thick brown paper or cardboard, and from this trace the pattern on the wood to be cut.

Fig. 69. - Wheelbarrow.
Let us take one instance. Suppose you want to make a model of a wheelbarrow for a toy or an ornament. Sketch it first as in Fig. 69, then cut a piece of paper the size and shape of the edges, either with or without handles, which we will call piece 1.
Then these must be joined to the back and front. You must be careful that these pieces are cut so that they exactly fit Then a piece for the bottom of the barrow, then the two pieces for the feet, which should be thicker at the bottom than at the top, where they are to clasp the sides tightly, so that the body of the barrow rests in the projection of the lower piece. Then you have the wheel and axle. Take care to cut the wheel quite round, and a square hole in its centre through which the axle is to pass; bevel off the edges of the axle with a spokeshave (Fig. 70) so that it may look light and yet be strong enough to be in character with the rest of the structure.
Fig. 70. - Spokeshare.
In cutting thin wood, which we have supposed here not to be more than 1/8 or 1/10 inch in thickness, you must be very careful not to split it; it must therefore be cut with a fine sharp saw or with a penknife. If you cut the sides with a saw, hold the two pieces together in a vice screwed on to the end of your bench or table, then you can cut the two together. You will then be sure of them being the same size.
The vice will be a great help to you in addition to the bench-screw we mentioned on page 42, because you get a secure grip with it in positions where a bench-screw is not practicable. In Fig. 71 we show such a vice. When you have to put into it soft wood such as you will require for use in model-making, yon must put two slips of lead,slips of wood, or layers of pasteboard between the chaps of the vice, or when you screw up the wood tightly the roughened faces of the jaws will leave an impression on the wood. If you wish to increase your tools still further, get a wooden vice with jaws 6 inches wide; this is very useful for holding light work when firmness is required.
Now to go back to the wheelbarrow. You have all the pieces ready to put together; try them, and satisfy yourself that they will fit well. Carefully prepare some thin glue, and put on to each part, and put it together. Fix it in your bench-screw in such a manner that it does not shift till it is quite dry. Then put on the legs and the wheel. The wheel had better be fixed with two stout brass pins for the axle. You can ornament the model in any way to suit your taste by a few brass tacks, or you can polish or varnish the woodwork. We need not go through in detail any other such model, for you proceed in a similar way in producing any of them. They require care and neatness, and you will soon be pleased with the results of your application. You will gain quickness in your work, and a more masterly manner in handling your tools.
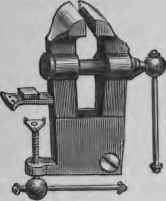
Fig. 71- - Bench-vice.
A glance at the windows of a good toy-shop will suggest many things that you can make in the model line. There is the "mail cart," which is so frequently used now instead of the perambulator. You can make a model of it. The body of the cart will give you a good exercise in light work, where you have open work instead of plain sides. Cut staves of an even size of 1/8 inch stuff, put them together neatly with glue or brass pins, fix them to the bottom, put in cross-pieces on which to support the seats, which will also answer the purpose of strengthening your cart. As to the wheels, you can either buy a pair of a suitable size, make them of one solid piece as in the barrow-wheel, or patiently work at a hub and spokes, cutting out the sections neatly, first laying down on paper the sizes of each, and cutting your wood according to pattern. A strip of thin iron will form the tyre of the wheel, or if india-rubber be preferred, take an ordinary elastic ring of the proper size.
You have now in these directions got the key to the construction of many amusing and interesting toys. There is nothing children like better than a cart, or something they can load up and drag about from place to place. You can fit up a small cart or waggon for the little loads your small brothers and sisters like to make up "for fun," or you can make a conveyance on two or four wheels, large enough and strong enough to carry any of them about the garden, or along the smooth pavement of the street.
We will not say you can make anything that, would carry them comfortably along the rough road, for that would require the use of springs - this is beyond us at the present. An ordinary strong box screwed on to an iron axle, to which a pair of perambulator wheels may be fitted, will make a very respectable cart, which may be painted or varnished, padded or cushioned, according to taste or requirements. To this you can fix a pair of strong shafts of plain or shaped wood; tough wood should be used, for if of plain deal they are liable to split or snap with a sudden twist.
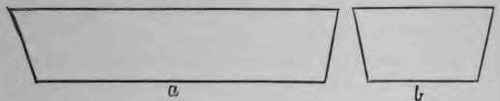
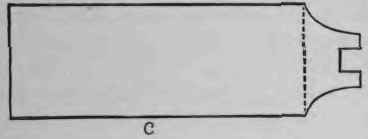
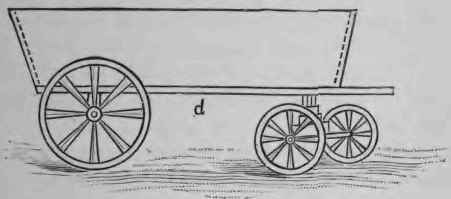
Fig. 72. - Parts of model waggon.
A small waggon can be made out of a box or you can cut some pieces of wood to the size you require. Shape them much in the same way as directed for the wheel-barrow, nail them together with small brads, and then join to a bottom-piece. Then cut four wheels, which can either be put on the ends of wooden axles, or a screw may pass through the centre of each, and they can be fastened directly to the body of the waggon.
To make it still more elaborate, as in Fig. 72, you can make the front axle movable about a centre, and with smaller wheels, so that when the vehicle is turned round, these wheels run under it. The level between the larger and smaller wheels is here compensated for by the front axle being made thicker than the fixed one at the back. It may be fixed to the waggon by a screw, the smooth part of which forms the shaft on which the axle is to turn, the screw part being fixed into the bottom of the vehicle. A handle may be fixed for drawing it along, or a pin may be put into the V-shaped piece in front for that purpose. This will be a strong serviceable toy of which many youngsters would be very glad.
Many other strong and durable toys made on the same principles will suggest themselves to our readers.
A doll's house is a good thing to set up. The outside is made in the ordinary box fashion; the furniture for the inside requires some ingenuity and care, but there is nothing difficult in making the small articles of furniture like tables, chairs, couches, beds, and cupboards. You can select your model from the penny toys of chairs, tables, and such articles which are quite suitable for this purpose.
All these items can be made in the wood from cigar-boxes, as we mentioned, or in deal about the same thickness. Most of the parts can be cut with a penknife, and put together with carefully made glue.
Continue to:
My Books

