How To Make Models. Part 2
Description
This section is from the book "How To Make Common Things. For Boys", by John A. Bower. Also available from Amazon: How to Make Common Things.
How To Make Models. Part 2
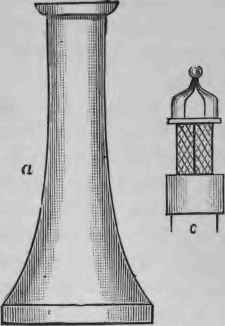

Fig. 96 - Model of Lighthouse. a. Turned block for shaft; b. shaft mounted on rock; c. lantern of Lighthouse.
Now you want to construct an imitation rock on which to stand the lighthouse. Glue a rough block of wood to the bottom of the tower, making this as thick as you intend the height of the rock. Then mix some plaster of Paris and sand into a thick paste. Let it stand to get rather stiff, then take a knife and put the cement round the lower part of the wood. Let it stand up in rough block-like pieces, but smoothe it down near to the edge of the shaft, so that it appears as if the shaft is mortised into the rock, as it actually is in the real structure, as in Fig. 96,b..
The whole when dry can be coloured to give it the appearance true to the actual building; or it can be covered with fine sand, as we mentioned earlier in the chapter. The windows and doors can be coloured in imitation of those in the building. This makes a very effective model if properly built,and we think you can manage that from a descriptive drawing if you follow out our directions. We made a model of Smeaton's Lighthouse some twenty years ago, on the plan we have described, and it is now in as good a condition as ever. We also made a second model, putting round it the bands of red and white paint, which distinguished the old lighthouse for a good many years before it was taken down. This model we gave to a Fishermen's Institute, and it formed the first of an excellent set of models which has now grown into quite a museum. Many have this year had an excellent opportunity of seeing a good model of the Eddystone Lighthouse at the Naval Exhibition. Towers, monuments, pillars, and objects of interest of this kind can be made up in the same manner as we have described for the lighthouse. A model of a lighthouse takes a good time to finish properly, but it will repay the labour; it is "something attempted, something done," that will give pleasure to others as well as to yourself.
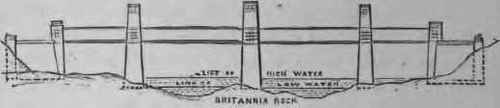
Fig. 97. - Elevation of Bridge.
Models of some of our great bridges are interesting for study and building. The Forth Bridge is too elaborate for any description in a book like this; but we think we can give sufficient directions for you to manage the Menal Tubular Bridge.
Get a drawing of this bridge. You of course know that it was built by Robert Stephenson, and was considered one of the wonders of the age; but it has since been eclipsed by the bridge over the St. Lawrence, also built by Stephenson; and to head the list of wonders in bridge-building is the Forth Bridge; and perhaps in the not very remote future, there will be the Channel Bridge, spanning the Straits of Dover.
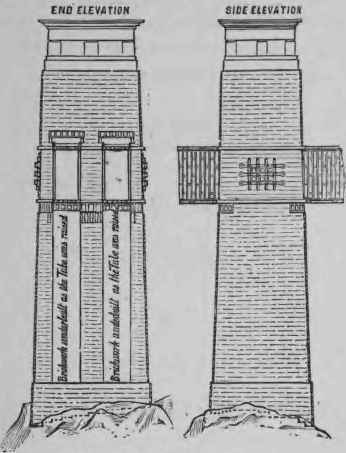
FIG 96. - Britania Tower.
It would be too intricate to get all the engineering details into your model of the Menai Bridge; but you will be fully repaid by making a model, giving with some degree of exactness, the general appearance of the bridge. Look at its general outline. You see it consists of a pair of iron tubes, through which the trains run, supported by three enormous towers, and at each end by a land abutment. You can get a full description of the bridge in books on engineering, and in separate treatises for 6d. or 1s. each. The whole length of the bridge from end to end is 1832 feet 8 inches; the height of the central, called the Britannia, Tower, is 214 feet above the rock in the mid-channel of the Straits; and the land towers, which are after the same pattern as the central, are 202 feet 3 inches, and the tubes for the train-way are 103 feet 9 inches above average high-water mark, or about 125 feet from the bottom of the central tower.

Fig. 98 a. - Land Tower.
Suppose you decide on making your model 40 inches long. This will represent 1/50 of an inch to the foot. In taking therefore your working dimensious from a book, take the number of feet as inches, and divide by 50. This will give you the height of central tower from the surface of rock, as the dimensions of the drawing we give, which we have worked out to scale. The exact length of your model will then be 36 ½ inches for the bridge, and the height of the central tower 4½ inches, if the base of the model represents low-water mark.
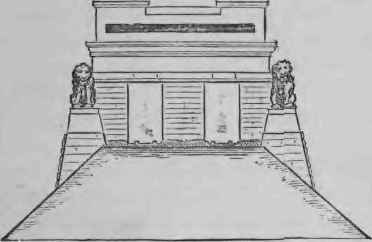
Fig. 98 b. - Abutment Tower.
It will be best to use cardboard for this model. Draw out the sides of the central tower exactly the size and shape of those we give in Fig 98 a, which shows the side and part of the tube projecting on either side. By the measures appended to this, cut the two ends of the tower, which contain the openings through which the tubes are to pass. Before glueing the parts of the tower, mark it out and slightly tint it to represent blocks of stone, as in the lower part of drawing. Also give the architectural character to the tops of the towers as shown in Fig. 97. Then proceed with two end towers, the dimensions of which we give in Fig. 98 a, for both ends and sides. Fit them after blocking them out, and colouring as directed for the central tower. Then take in hand the abutment ends, each of which, you notice, is ornamented with a lion. These you must cut out in cardboard. The dimensions for the abutments are given in Fig. 98 b. Now the next thing to construct is the tubes, which you must make of strips of cardboard; the pieces for the depth being 6/10 of an inch wide, and for the width 3/10 of an inch. You will require four lengths of tube for the central spans of 9½ inches long; that will allow for the portion of tube to be built into each of the towers, and also four lengths of tube for the end spans. In putting these strips together in the form of rectangular tubes, keep the sides parallel, and remember what they have to represent. They are the tubes in which the rails are laid for the trains to pass through them; one set being for the up line, and one set for the down hue. The outsides of these can be coloured to give them the appearance of iron - a light slate colour, for instance. Having completed all the parts in detail, you must now put them together. First get a piece of board 4 inches wide, and about.
Continue to:
My Books

