How To Make Models. Part 3
Description
This section is from the book "How To Make Common Things. For Boys", by John A. Bower. Also available from Amazon: How to Make Common Things.
How To Make Models. Part 3
We propose, therefore, to take such light metal work that can be done without brazing, drilling, or riveting - and which can be done as much as possible with your carpentering tools. The first class of work we propose shall be made of light strips of iron, which can be bent into various curves and scroll forms, to be turned into brackets, candlesticks, screens, lamp-suspenders, and flower-baskets. For this purpose you require some strips of sheet-iron. The thickness selected must be regulated by the purpose for which you require it. You can get it of a thickness of a thin or stout ribbon, and width from 1/8 inch to ½ inch. For suspended objects the thinner iron can be used, for these strips are immensely strong; for standing objects, where rigidity is wanted, you must use the thicker kind, and sometimes a rod of iron twisted up with it for the sake of support. Then you require some skill as a designer. Draw a few samples of simple objects to begin with, such as a scroll, a candlestick, a suspended flower-basket, a bracket, a frame for a matchbox, or for any other object you have a wish to produce. Get a look at some work done in the same material; that will help you to multiply designs, as well as to see how the work is put together.
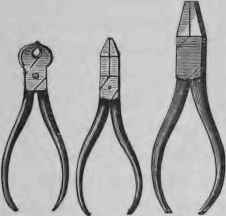
Fig. 107. - Cutting Pliers.
For this work you need cutting pliers, bending pliers, and nipping pliers specially adapted to binding parts of your work together with the iron ribbon. Reference to Fig. 107, which give you the usual forms of cutting pliers, will help you in the selection of these tools. The first is a strong pair with "square noses," as the gripping ends are called. This is for your first and heavier work. The second is for cutting only - better adapted for trimming the ends of your strips after you have cut them off. The third is for lighter work, either bending or cutting. As we mentioned, it is not positively necessary that you should have all three pairs, but do so if possible. In Fig. 108 we give you the form of the round-nosed pliers, which you will find of the greatest service in bending your iron strips into curves, especially the smaller curves. The third form of tool, which we give in Fig. 109, is especially for nipping the parts together. The noses of these pliers are flat at the ends, and enable you to grip the parts together with considerable force. This you will find especially necessary when putting together the various parts with the flat ribbon, to which we shall have occasion presently to refer.
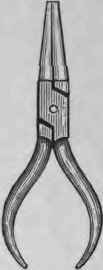
Fig. 108. - Round-nosed Pliers.
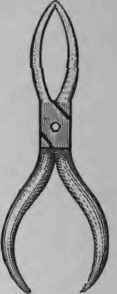
Fig. 109.
With these tools at hand, and a vice such as we recommended for carpentry and picture-frame making, and an iron block for an anvil, you can with advantage start on your work. Before making any object you must get accustomed to turn various lengths into scrolls and elegant forms. This is best attained by drawing a scroll on a slip of paper, such as is shown in Fig. 110. Then with your round-ended pliers, run your strip of iron ribbon into the shape of the scroll designed. Take care to avoid any sharp bends. It is advisable to make your drawing of the same size as that required for the object; you then have an opportunity of applying the iron scroll to the drawing, and it thus acts as both a guide and a corrective. When you are able to turn out some respectable scrolls, you will find yourselves able to combine them into the objects we have named, some of which we will describe, with the method of putting together. This work will give you a very wide field in which to exercise your ingenuity. The variety of patterns seems almost endless. You may get some ideas from fretwork designs.
Suppose you wish to make a bracket. That seems as easy and straightforward a piece of work as you can possibly have. Cut off your iron, bend it into a good shape by first drawing your scroll on a piece of paper and bending your iron to it - the drawing acting as your gauge. Now turn up a second scroll just like the first. These are to be made into a pair of skeleton brackets of the form shown in Fig. 111. Here a piece of stouter iron band than you have used for your scrolls is beat into a right angle. You want two of these, one for each scroll. To do this you must cut off the two strips of iron. Scratch each piece across the centre, and place this scratched line on the edge of your anvil, then hammer it into a bend. Do this gradually. To be sure that you get the right angle, gauge each piece to a right angle drawn on paper, or to your drawing square. Now the pieces you have cut must be joined together at the parts marked in Fig. 111.

Fig. 110. - Simple Scroll.
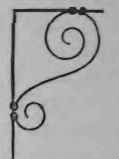
Fig. 111. - Single iron bracket.
There are two methods of putting together your iron work. You see that every portion must be put together quite flat, and so tight that it is not possible for any of the parts to get easily "wriggled" out of their places. In fact it must be put together so that the whole is nearly as rigid as if it were a single piece.
One method is by binding together the parts with very thin iron wire, so carefully, with the threads as close together and as tight as if you were binding the handle of a cricket bat. The fine wire such as is sold for twisting up "flower button-holes" will do. It is easily worked, and can be readily fastened off.
The second plan is to make a clasp of the same metal as that in which you are working. This you can do by cutting off a piece long enough to clasp once round the pieces to be held together, and only once round - none to overlap.
You will be able to make the clasp by the help of your hammer and the pliers in Fig. 109. Get the clasp to fit so well that there is no looseness or slipping to be feared.
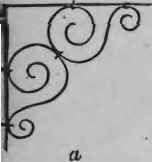
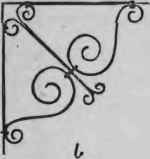
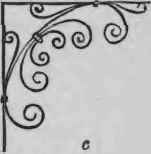
Fig. 112. - Light iron brackets.
Select one of these plans, and put together your brackets as shown in Fig. 111.
You can nest try the more elaborate brackets in Fig. 112, a, b, c. In Fig. 113, a and b, a central stay, which is ornamental and gives extra strength to the pieces employed, consists of a piece which has been twisted in the centre or towards one end. This process is easily accomplished by screwing one end tightly in the vice, gripping the opposite end in your fiat-nosed pliers, and then gently but firmly twisting it. You will find the thin iron strap yield readily to such pressure as you will be able to apply by this method.
These brackets are exceedingly useful for supporting shelves. They are strong, easily fixed, and are ornamental, according to the art and design put into them.
Having succeeded thus far you may aim at making something requiring a different method of working, as well as a new channel for your ingenuity.
Suppose you decide on making a candlestick - a pair, perhaps, if you succeed well. Draw your design first, if it is to be like that given in Fig. 114. Cut three strips of iron ribbon; they are to he of the same length; bend each into a scroll of the form of a, Fig. 114. They must be the same in size and shape. Then get an earthen end to hold the candle. This must be supported on two rings; one at the upper end immediately under the rim, and one at the lower end. To these rings the bent portions must be bound by the upper ends, to the rings. Place them so these uprightsstand at equal distances from each other, held by two other rings at convenient distances down the stem.

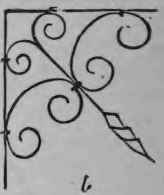
Fig. 113. - Light iron ornamental brackets.
We repeat that the binding and twisting must be done with the pliers, so that there is no tendency for them to undo and loosen the work. The candlesticks just described can have a triangular foot of thin polished wood, if you like to give that amount of labour to them; it will not make them heavier, but it will make them stronger. Wires drawn over the branches of the scroll through the wood will bold each part well and safely, and give stability to the whole.
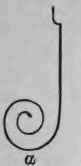
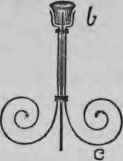
Fig. 114. - Design for Candlestick. a. Each part for the uprights; b. the earthen socket; c. the complete candlestick.
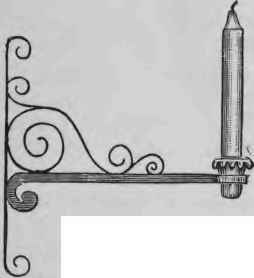
Fig. 115.
In Fig. 114, and several others that follow, where most of the designs stand on three feet, or consist of three branches, the third side is presented edgewise, so as not to obstruct a fair view of the other two, so that our readers will be able to easily catch the design.
An ornamental bracket for the support of a candle may be made somewhat of the fashion given in Fig. 115. In this figure the horizontal support is made of rather stouter iron. The exact design you can decide on for yourselves.
Continue to:
My Books

