Colonial Footstool
Description
This section is from the book "Things To Make In Your Home Workshop", by Arthur Wakeling. Also available from Amazon: Things to Make in Your Home Workshop.
Colonial Footstool
The first project, a footstool of Colonial design (Figs. 1, 2, and 3), allows a variety of machine operations to be learned. Obviously, any similar small piece of furniture will involve the same methods.
Mexican mahogany is an excellent material to use for the visible parts, although other woods such as birch or maple may be substituted and stained to imitate mahogany, if desired.
Step No. 1 - Getting Out the Stock for the Rails. On the circular saw cut the four rails (two side and two end pieces) to the approximate sizes to make it easier to handle them on the planer. Pine or whitewood will serve for them if they are to be covered with upholstery. Plane one surface smooth and true and mark it with an X on all pieces to indicate the working face. Hold this face against the planer fence and joint (plane) one edge smooth and true. This edge on each piece should be marked with an X in order to identify it as the working edge.

Fig. 1. - A Colonial footstool of especially graceful design yet simple construction.
A few suggestions may well be offered parenthetically in regard to jointers (Fig. 6). The 4-in. jointer is about as small as is practical and works very well on all general work. The best type jointers are made with three knives or cutters, which are securely fastened in a cylindrical head. The cutters must face the operator, since the machine revolves towards him. There need be no fear about working at this machine as jointers are carefully guarded; however, a few safety rules must be observed in order to avoid the likelihood of any accidents.

Fig. 2. - Original pencil sketch of the footstool. which was made as a preliminary to illustrating the various steps in machining the parts. For details, see the drawings in Fig. 3.
Before starting any machine, try all adjustments to make sure that no parts are loose. Revolve the machine by hand to see that the knives swing clear of the throat. All three knives must be set exactly the same distance out so as to make a smooth cut, free from ridges.

Fig. 3. - Dimensioned views which show the shape of the leg and spindles and the exact location of the dowels.
Never run any wood over the jointer smaller than ½ by 1 by 10 in. For all thin pieces use a block set on top of your work to push the material across the cutters. Never rest the hand or a finger on the extreme rear end of the wood.

Fig. 4. - How to hold the rails (sidepieces) when cutting them to exact length on the circular saw.
When stock is pushed across the jointer, the pressure is placed on the part of the planer furthest away from the operator. It is good practice to skip over the throat portion of the machine With the hands, moving forward as you go along. Do not take too coarse a cut; it is better to make several finer ones, as it will lessen the chance of the wood's getting away from you. When making any adjustments, always be sure to turn the power off.
To return to the operations in making the footstool, continue as follows after the working face and the working edge of each piece has been planed:
On the circular saw hold the working edge against the fence and rip all pieces to the width of 2 1/16 in. (1/16 in. being allowed for planing). In like manner cut the four pieces (if necessary) to the thickness of 15/16 in. (1/16 in. extra for planing). Now cut one end of each piece square (Fig. 4). Adjust the guard to get each pair of pieces exactly the same length, and cut the other end of each. Plane the remaining surfaces and edges smooth and true on the planer (Fig. 6).
Step No. 2 - Legs. Draw and cut out an accurate cardboard pattern. Use it to mark the wood. To avoid splitting, bore 3/8-in. holes for the handles or cross spindles before sawing the curves. On the jig saw (Fig. 5) cut the design out carefully, keeping just outside the lines. Be sure to make "safety" cuts in the waste stock where necessary to avoid having to back out the saw at acute corner curves and perhaps cause the blade to break.
Step No. 3 - Spindles. The stock should be 1 1/8 by 1 1/8 in.; this allows 1/8 in. for truing up on the lathe. Locate the center of each end by drawing diagonal lines. Bore small holes to receive the points of the lathe centers. Rough the corners off with a gouge and then turn to the largest diameter. Next cut down a short distance to give the exact length from shoulder to shoulder - 8 in. Turn the spindle to the design (Fig. 8) and sandpaper it in the lathe. Turn the dowels at the ends to exactly % in. in diameter and 11/8 in long, and as you cut the work free, round up the ends with a small skew chisel.
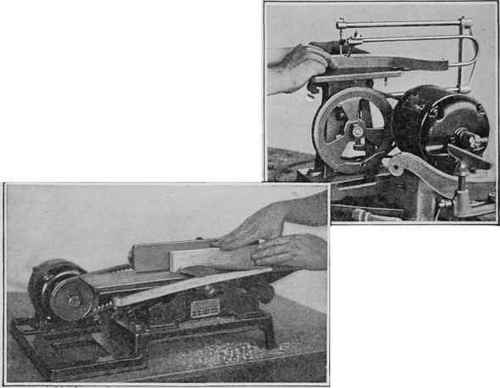
Fig. 5 (above). - Cutting one of the footstool legs on the jig saw. Note the rod and adjustable foot which holds down the stock on the table. Fig. 6 (at left). - One face of each piece is planed; then this face is held against the fence or guide of the planer and one edge is jointed (made true) as shown. The position of the hands is important. A swinging guard presses against the wood.
Step No. 4 - Sandpapering. On the disk sander true up and smooth all flat surfaces and convex curves. For concave curves use a drum sander, if available (Fig. 7); otherwise turn a cylinder to 3 in. in diameter and fasten a sheet of No. l½ sandpaper to it.
Step No. 5 - Joints. Locate accurately all centers for the dowel holes - two in each end of each of the four rails and corresponding holes in the legs. By means of the lathe and a chuck, bore all the holes. If you use a short auger dowel bit, which is advisable, first file off the threads on the point (leave the point itself) to prevent the bit from pulling too fast.
Step No. 6 - Assembling. Make a trial fitting of all parts between clamps but without glue. Mark the joints of mating members No. 1 and No. 1, No. 2 and No. 2, and so on. Two separate gluing operations are necessary. First glue the long rails and legs together. Place a scrap of wood under the clamp to avoid bruising the legs. Put plenty of glue into the holes and on the dowel pins; then clamp the work together lightly. Use only a liquid glue of the best quality or a tested brand of flake hide glue. Sight across the legs for any twist. Allow at least five hours for the glue to dry.
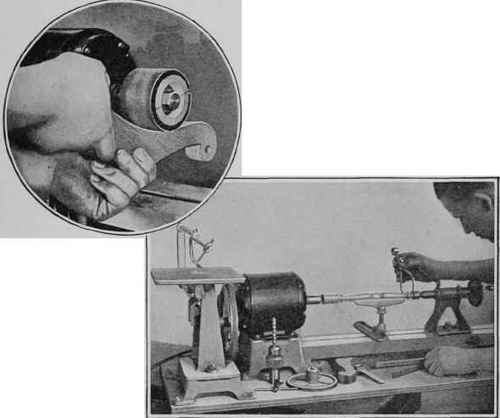
Fig. 7 (above). - Cleaning up the convex curves of the legs on a drum sander. If this type of sander is not available, a sanding cylinder can be turned from wood for use in the lathe. The edges of the sandpaper should be wedged into a longitudinal groove by means of a small strip of wood. Fig. 8 (at right). - The spindles or handles in the lathe. Calipers are used to make measurements.
Next assemble the project completely, being sure that all four legs rest on a true surface, that the frame is square, and that the tops of all rails are in line. It is a good idea to have some fine sawdust on hand when gluing to sprinkle over the glue that oozes out; this will absorb it sufficiently to allow it to be peeled off like gum immediately afterwards with a chisel. When the glue has set, glue the corner blocks in place.
Step No. 7 - Cleaning Up. Remove all excess glue with a sharp chisel, cutting, wherever possible, across the grain. Sandpaper thoroughly all parts with No. ½, 0, and 00 paper, rubbing with the grain. Round the corners slightly.
Step No. 8 - Finishing. There are many ways of finishing mahogany. One of my favorite methods is as follows: Buy a high grade mahogany water stain powder and dissolve according to directions, or obtain a prepared wood stain or dye of first-class quality. Use liberally and let it dry. Brush on very thin white shellac and sandpaper when dry with No. 00 paper. Apply two coats of paste wood filler, following the directions on the can. Allow at least two full days for the filler to harden. Apply three thin coats of white shellac, rubbing each coat when dry with No. 00 sandpaper, and the last coat with crude oil (or light machine oil) and fine pumice stone powder. If you have a spraying outfit, spray clear lacquer on instead of shellac.
Continue to:
My Books

