Chapter 13. The Jaw. Continued
Description
This section is from the book "Reichian Therapy. The Technique, for Home Use", by Jack Willis. Also available as a hardcopy from Amazon.com.
Chapter 13. The Jaw. Continued
Jaw Left
Move your jaw as far as possible to the left. Keep trying to move it further. Don't clench your teeth, the mouth should be open enough that you can inset two fingers between your teeth. If there is a problem with your jaw joint, don't do the exercise. Hold this position for about three minutes.

Figure 82
The left photograph in Figure 82 shows proper execution of the jaw left exercise with the mouth open to the extent that the model can inset two fingers into his mouth while it is still pushed to the left. What is not apparent in the photographs is that this model still needs a lot of work in being fully able to move his jaw to the left.
Jaw Right
Move your jaw as far as possible to the right. Keep trying to move it further. Don't clench your teeth, the mouth should be open enough that you can inset two fingers between your teeth. If there is a problem with your jaw joint, don't do the exercise. Hold this position for about three minutes.
Note in Figure 83 on the next page the our model's mouth is not properly open.

Figure 83
Jaw Back
This is the most difficult of the set. The jaw is pulled back toward the ears. You may want a helper here. I discuss using a helper in Chapter 22. As with all the exercises, the idea is to break the muscle tension pattern. You are not trying to strain the jaw joint. If this exercise produces pain in your jaw joint (not in the muscles, but in the joint) then simply skip it.

Figure 84
What is not shown in Figure 84 is that the standard of performance for the jaw back exercise is that you should be able to put a finger against your lower lip pointing upward and it should be completely behind the upper teeth.
Jaw Out
Push your jaw out (that is, protrude it) as far as possible and hold it. Don't clench your teeth. Keep your breathing going properly.
Keep trying to push your jaw further out. As always, if you have a problem with your jaw joint, don't do the exercise. Try to hold this position for about five minutes.
Neither of the models shown in Figure 85 provides a good photograph of what jaw out looks like because neither model was able to accomplish this exercise; they both need work on their jaw holding or "armor."
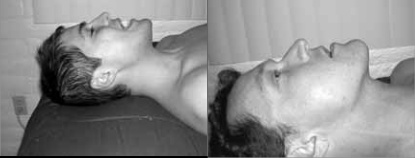
Figure 85
Mouth Open
Open you mouth as wide as possible and hold it. Keep trying to open it further. This exercise is often the most painful (in the muscles). That is OK. Just keep working at it. Keep your breathing going properly. There is a strong tendency to let the mouth relax (and close a bit). Resist that tendency. If you are doing this exercise properly you will find a small muscle standing out at the side of your neck. See the arrow in the left panel of Figure 86 below. You can feel for this muscle while you do the exercise. Feeling for this muscle is a good way to provide feedback as to whether you are making the maximum effort to open your mouth.
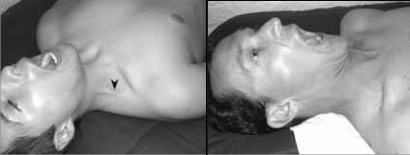
Figure 86
Clench Teeth
This exercise requires a folded towel. A hand towel is OK but a bath towel is better. Fold a towel in four. Insert a corner of the towel into you mouth and bite as hard as you can on the towel. The sound changes to a growl sound. It is not quite the same growl as in Part One on page 111 since with the teeth clenched it is not really possible to have the same open throated sound as in the true growl sound.
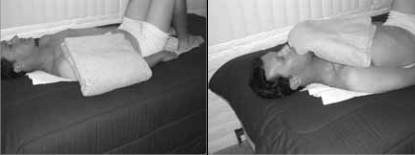
Figure 87
You can also toss your head while doing this. The towel-in-the-mouth growl sound may be heard on the "sounds of Reichian therapy" audio that accompanies this book. The growl sound in this exercise is more like that of a growling dog.
You may have heard of "biting anger." This exercise is designed to bring that out. Thus while doing this exercise you can think of someone or something you hate and would like to destroy.
Pressure
As with the forehead where the worker can use pressure on himself (see the discussion related to Figure 74 on page 188), the worker can also use pressure on himself for the jaw muscles. As I mentioned when discussing the forehead muscle pressure, the idea is to use enough pressure for enough time to make the muscles mildly sore to the touch. Keep doing this day after day to maintain that level of mild soreness. While there is a series of muscles related to the jaw movement, we will talk about only two of them. These are the two muscles that are easily felt at the side of the mouth area (the masseter and the buccinator).
First, how can you tell if you have excess tension. Well, one way will be obvious at this point: you can not do the jaw exercises that well. Either you can not get the movement, or can not hold it for long, or it is quite painful. Another way is noticeable tension.
'Noticeable' tension comes in two easy to recognize forms. One is grinding your teeth at night. If you do that, you have excess jaw tension. Here is the other way. As you read this sentence take notice of your jaw position and do not let it move, even to answer a question. Now, if your jaw is relaxed you should -- without any jaw movement from the previous sentence -- be able to stick your first finger into your mouth without hitting your teeth. If you have to move your jaw to allow the finger insertion or if you finger is blocked by your teeth, then you have excess jaw tension.
Figure 142 on page 327 is a photograph of a helper putting pressure on the jaw muscles. As the worker, you will use your thumb for the pressure. You can, of course, put pressure on both sides of the jaw at the same time but I think you will find that it is easier on yourself if you do one side at a time.
It is not worth an anatomy lesson to distinguish between the buccinator muscle and the masseter muscle. They are both located at the side of the jaw with the masseter being bigger and thicker, while the buccinator is more toward the surface and nearer to the mouth.

It is necessary at this point to once again say that we are not seeking pain. This therapy is not an endurance contest, it is not a chance to show how much you can endure or withstand, it is not an excuse for self-punishment. You should use moderate pressure and only as strong as will allow you to hold the pressure for perhaps five minutes at any one point. If the pressure you start with becomes too strong after a short time, simply lighten up but stay at that spot.
As a rule of thumb (puns are fun occasionally) you are going to apply pressure to three places on each side of the jaw. That translates to about 1/2 hour of time for the pressure. Each day thereafter you are going to test each spot to see if it is sore. If it is, leave it to the next day. If it is not, apply pressure there; again moderate for about five minutes. The pressure can be done at any time (except while driving): part of a morning routine, at your desk, at lunch, while reading or watching television in the evening. Just try to keep those muscles sore for enough weeks that your dreams have time to work on the issue and you now pass the jaw tension tests (no grinding at night, finger goes in easily).
Now, as to the direction of the pressure. When your thumb is in the middle of your cheek, the direction of your pressure should be up. As your thumb moves backward toward the jaw joint, the direction of pressure becomes progressively more side to side. Try this. Right now, place a thumb in the middle of your jaw pointing straight up. Your thumb should be placed so that the knuckle of the thumb is at the corner of your mouth. Now, without moving your thumb, move your arm out so that it is at right angles to your body. That is exactly the motion that you will be making as you move from the middle of the jaw to the top or back of the jaw. That is the motion to change from an upward thrust to a side-to-side thrust. You don't in fact have to do this motion with your arm; just rotating your hand will do the same thing. The issue is the direction of thrust, not how you get that direction.
Continue to:
My Books

