Chapter 15. The Neck
Description
This section is from the book "Reichian Therapy. The Technique, for Home Use", by Jack Willis. Also available as a hardcopy from Amazon.com.
Chapter 15. The Neck
Head to chest
Head over bed
Mussolini jaw
The neck is difficult to work on without a helper to work with you. However, it should not under any circumstances be slighted. Think about it this way: your brain takes care of all the thinking issues while your body takes care of all the emotive issues. This is over-simplified, but it serves to make the point.
Between your brain which creates affect and your body which expresses emotion and your brain which recognizes feelings, is the choke point of the neck. Of course the neck does not really choke off feeling, but the way the body works the neck tends to serve that function. In a simple way to think about it, the neck splits your thinking from your feelings. It is rare to find someone who has problems with emotion and where the neck is not tense.
The exercises below will do as much as can be done by yourself to free up the neck. If you have any neck problems in your spine, you should check with your doctor to see which of these exercises you can do.
Footnote 28. Author's admission: neither Reich nor Lowen placed much emphasis on the neck. For about 20 years I, too, paid little attention to the neck. It was a major error on my part. Work on the neck turns out to be crucial to successful body-work therapy.
Head To Chest
Lying in the working position, on the inhale raise your head to your chest. On the exhale let it drop back. There are several items of performance in this exercise for it to work properly.
First, the breathing should proceed normally. There is a strong tendency in this exercise to tense the abdominal muscles. Try not to do this. The normal belly-chest breathing should proceed just as though you were not moving your head. After you get the head movement down pat, as discussed and illustrated below, then you should come back to check on whether you are tensing the abdominal muscles. To do that simply place one hand flat on your abdomen while you are doing the head lift. If you are tensing your abdomen you will be able to feel it.
Next point, when the head is dropped back there is a tendency to lower the head rather than letting it fall back. Let your head fall. Do not gradually move it back.
Finally, the most important issue. When the head comes to the chest THE MOVEMENT IS NOT SIMPLY TILTING YOUR CHIN TO YOUR CHEST! The head comes out and down, not just down. An easy way to tell that you are doing it correctly is as follows. First just bring your chin to your chest. Place a finger on your chest just below the point where you chin and chest meet (Figure 94).

Figure 94
Now, leaving your finger there, if you properly bring your head out and around to your chest, your finger will be covered by your chin (Figure 95).
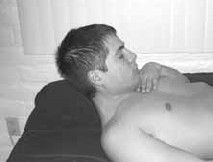
Figure 95
Get accustomed to that motion so you can do it without the finger there (though it does not hurt to test periodically to see that you are still doing it correctly).
Here are two photos of what the "head out and around" looks like while the head moves.

Figure 96
This exercise is not measured by the time doing it. This exercise fairly quickly tires the neck muscles and that is the time to stop.
Performance note: this exercise DOES NOT involve rolling the shoulders. It is done solely with the head. Figure 97 shows the exercise being done wrongly. In Figure 97 the shoulders are rolled up.

Figure 97
Head Off Bed, Head To Chest
This is a more advanced exercise and puts more strain on the spine. Again, if you have any spinal problems in your neck, it would be advisable to check with your doctor before you do this exercise. Master the head to chest exercise before you move on to this more advanced exercise.
This exercise can produce dizziness and nausea. In general it is not a good idea to do this exercises within three hours of eating.
Here you move toward to head of the bed so that your head hangs fully over the bed. Do be stingy on this. There is a tendency to move only half way so that the end of the bed is impacting the neck. You should move toward the head of the bed so that only your shoulders are still on the bed. In Figure 98, the left photograph shows the body not far enough to the head end of the bed, the right photograph shows correct placement.

Figure 98
Let your head hang down. On the inhale bring your head out and around (don't just tuck the chin). On the exhale let your head drop back. Again guard against tensing the abdominal muscles when you bring your head up. Note that this is a drop of the head not a lowering. While the motion of the head is slow to the chest during the inhale, it is a relaxing and letting drop at the start of the exhale. Also, do not throw your head back, just let it drop.
Neither dizziness nor nausea is any danger signal in terms of this exercise. Obviously if it is too unpleasant or too strong you should stop the exercise, but otherwise continue until your neck muscles are exhausted.

Figure 99
In Part One of this book of the I spoke about hanging the head over the bed as a way to work on the issue of using the accessory muscles of respiration. The discussion is in Chapter seven, starting on page 140. There you were hanging the head over the bed and letting it hang there while you worked to get chest expansion. Here you are bringing the head up during the inhale.
Mussolini Jaw
The Mussolini jaw exercises is an advance on the head to chest exercise. When you have mastered the proper movement in the head to chest exercise, then you can move onto the Mussolini jaw exercise. That is not to say that one replaces the other. They both have their individual uses. The head to chest exercise has priority only for learning purposes, not for effect purposes. This exercise might tempt you. It is certainly OK to try it a few times, but just for the experience of it, don't start doing this exercise until you have thoroughly mastered the head to chest exercise.
Footnote 29. The name for this exercise, Mussolini Jaw, was used by Dr. Regardie. The name is retained.
1. This exercise is only done after mastering the head to chest exercise.
Since this exercise also involves growling and shouting, you should at least have practiced on those two breathing techniques before you get to this exercise.
2. You should have already mastered, or at least be reasonably good at, the growl and the shout.
Mussolini jaw is somewhat more difficult to explain, so bear with me. Note that this exercise is different from all the rest in that it is done one time, then there is a rest period, then it is done again, then rest, etc. The length of the rest is half a dozen to a dozen breaths. It is common that when this exercise is first used (and that is, to repeat, after the head to chest exercise is mastered) that it does not produce much. You do it, let's say, for six executions and there does not seem to be any effect. That's fine. Even though there is no effect, the work you have done is sufficient for the given session. This exercise should not be overdone.
3. IMPORTANT: the exercise is done only one time.
Then just breathe normally for a half a dozen or a dozen breaths; then do the exercise again.
One note of caution. The idea of learning to deal with anger is to be able to use it productively. It is not the goal to walk around angry all the time. It is a not uncommon experience of Reichian therapists that they get someone who has been in Bioenergetic therapy and the person is so indoctrinated to be angry that he is untreatable. Moderation and learning are the keys.
In time, especially as you do all the other work, this exercise will start to have its effects.
The exercise starts with extending the jaw. The jaw is extended for the whole of the single execution of the exercise. As discussed previously in the jaw out exercise on page 213, don't let your jaw relax; keep pushing it out. Also, as discussed, don't clench your teeth. The mouth should be open at least to the extent that you can stick your thumb between your top and bottom teeth while the jaw is extended (Figure 100).
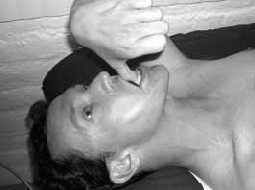
Figure 100
Next, the movement of the head is identical to the head to chest exercise: out and around, not just tucking the chin (page 228).
Third, as always, the breathing should continue: belly then chest, and the abdomen should not be tensed while lifting the head.
Finally, aside from the chin out, the major difference between this exercise and the head to chest exercise comes in the exhale. During the exhale you will be doing several things. Here is the list and then I will describe each of the components.
1. This exercise is only done after mastering the head to chest exercise.
2. You should have already mastered, or at least be reasonably good at, the growl and the shout.
3. IMPORTANT: the exercise is done only one time.
Then just breathe normally for a half a dozen or a dozen breaths; then do the exercise again.
4. Start the exercise by extending (protruding) the jaw (as you did in the jaw out exercise)
5. The jaw is extended for the whole exercise, the inhale and the exhale.
6. The inhale is normal, but during the exhale all the following happens:
a. your growl during the whole exhale
b. the head is brought out and around to the chest
c. as the head comes to the chest, the arms are brought up and back with the elbows bent
d. you end the exhale with:
1. a shout
2. whip the arms back and hit the bed with as much force as you can
3. throw the head back
7. Then breathe normally (only one execution at a time)
1. growl till the end of the exhale
It takes most students a long time of practice to learn to growl. Keep trying. If you get good at growling, it will feel to you as though the growl were coming from your chest rather than your voice box.
The growl starts at the beginning of the exhale and continues to the end (when it becomes a shout). It is not a bad idea to spend the necessary time, in preparation for the Mussolini jaw, just growling on the exhale. This practice is to learn to open the throat and keep it open so that the sound is correct. Growl exhale is also an exercise in Part One of this book.
Another problem arises from the last part of the exhale which is a shout. This, again, is something you can practice all by itself (that is practice just the growl and just the shout without bothering with the jaw and the head). The usual problem is that the student can not tell when the exhale is almost done and there is just enough air left to do the shout.
The exhale, after the growl, should end with a shout. After the shout all the air should have been exhaled. Some students do not leave enough breath for the shout. Then the shout becomes kind of a little grunt rather than a shout. Other students do the shout too early and then they continue the exhale after the shout.
2. lift the arms over the head during the exhale
As the head comes to the chest (with the growl), the arms are raised over the head. You might think of it as a spring. As the head comes up and around it adds tension to the arms that are raising. Note that the arms are bent as they come back over the head. In the next section of this book, on the shoulders, I will describe another exercise that brings the arms up but there the arms are straight.
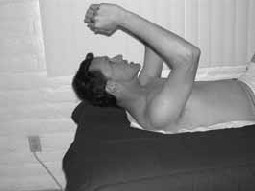
Figure 101
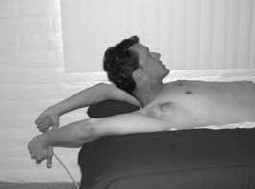
Figure 102
In Figure 102 the arms have been brought all the way back. Note that this model could not, in this exercise, get his head all the way to his chest. Further the photo shows the model with his hands open rather than closed into a fist. Both are errors.
3. end the exercise with a shout and striking the bed
It should take almost the whole exhale to bring the head to the chest and the arms up. All the while you are growling, hopefully from the chest.
A common mistake in this exercise is to jerk the head to the chest, taking only a small part of the exhale. The movement of the arms and the head are slow and coordinated. That is during the whole exhale the head is moved slowly to the chest and the arms are moved slowly all the way up. Keep in mind the idea of the spring. The head movement is adding strength (that is, anger) to the arms.
The head gets to the chest near the end of the exhale. There is, however, still some air left. Don't take so long to bring the head to the chest and the arms up that there is no air or virtually no air left.
At the end of the exhale you shout to finish the exhale and the arms are brought forcefully around to hit the bed. You should have a closed fist. Treat the strike as though you were going to break the bed. That is, the strike has all your available power (and anger) in the strike.
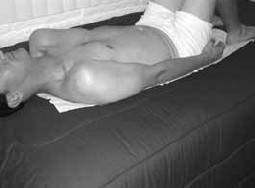
Figure 103
In the photograph above, again the model has his hands open instead of closed into a fist in order to strike the bed forcefully.
4. end the exercise by throwing the head back
Here the head is thrown back (against the bed) as part of the aggressive shout and hitting. As always, after the end of the exhale and the movements the inhale is started immediately (see the rhythmic breathing in Part One of the book).
All three things: the shout, the strike, and the throwing of the head are a single action. That is, they are all done at the same time. The idea is to let the beginning of the exhale build the anger and the end of the exhale to let the anger loose.
This is the way you learn to have anger, express the anger, and let the anger go.
Many people are afraid of anger. They fear it will overwhelm them if they let it be felt and expressed. This is equivalent to someone who is afraid of swimming because he feels that he will drown if he tries to swim. The analogy to swimming is apt. If someone does not know how to swim or float, then he will drown. But once he learns to swim or float, the fear of drowning is gone. So, too, with anger. It someone does not know how to experience anger, deal with it, and let it go then he may become overwhelmed. But once he has learned to handle anger, it is no longer a threat.
Recap
jaw out for the whole exercise
normal inhale
on exhale: bring the head up and around to the chest while the arms are brought back ready to hit. Finish the exhale by shouting, whipping the arms around to violently strike the bed, throw the head back. Rest for 6 to 12 breaths.
Continue to:
My Books

