


How To Build A Low Brick Wall
Description
This section is from the book "Make It And Make It Pay!", by Catherine Roberts. Also available from Amazon: Make It And Make It Pay.
How To Build A Low Brick Wall
There are times when the addition of a low brick wall to a garden gives just the accent and point of interest that nothing else can. Building a wall is more difficult than laying a walk or a terrace but not so complicated as to keep the average person from making a successful job of it.
All walls need a foundation. It may surprise you to know that the depth of the foundation does not increase as the height of the wall increases. A twelve foot wall needs no deeper foundation than does a two foot one. The actual weight of the wall itself serves to anchor it to the ground. The foundation beneath that wall aids and abets that weight but — which is more important — the foundation serves to prevent the wall from being heaved out of place by alternate freezing and thawing during the winter.
The most beautiful brick wall in America is the eighteenth century Serpentine Wall, designed by Thomas Jefferson, at the University of Virginia. This wall is but one brick thick and something over four feet in height. It flows along in graceful, well-defined curves and has withstood the ravages of time and weather for almost two hundred years. Duplicating it is quite possible but requires a high degree of skill in handling the materials as well as extremely accurate figuring in laying it out. Since the wall itself has little weight, its foundation must lie well below the frost line. In the northern part of the country that would mean digging down some four feet! So let's begin with something simpler.
Suppose you want to build a low wall around an herb or rose garden. By making it six bricks high, the wall will rise about fifteen inches. This is a pleasant height to look at and an easy one to work with. The thickness of the wall should be calculated on a multiple of four. That is; the wall may be two bricks thick (about 8") or four bricks thick (about 16"), etc. Since this wall is to be decorative rather than used to support anything, make it two bricks thick. The top, or sixth, row will have each brick laid crosswise to finish it off. The sketch on page 33 will help you visualize it.
It will take twenty-four bricks to make two running feet of a wall that is six bricks high and two bricks thick. A thousand bricks will make a wall about thirty-five to forty feet long, depending upon how many bricks were damaged or broken in unloading. Do not discard the broken bricks. Many of them can be used, after trimming off the rough edges, for turning corners in the wall. The sketch on page 33 shows how half bricks are used to fill in the corners.
LOW BRICK WALLS ARE NOT DIFFICULT

Stake, cord and dig foundation trench.
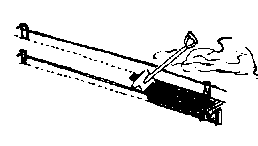
Dump concrete in, level with ground. Lay first row of bricks.
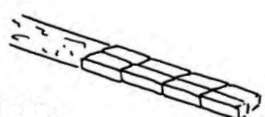
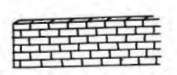
Above: common bond used for simple wall. Top of wall is finished as shown at the right.
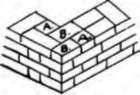
a. half brick b. 3/4 "

The area to be walled is first measured and marked with stakes and cord. Lay a line of bricks along the ground inside the cord to make sure that the foundation will be the right length. Be sure to leave quarter inch spaces between the bricks. Adjust corner and end stakes where necessary, then remove the bricks. A ditch, six inches deep and eight inches wide, is dug along the inside of the guide line. The ditch is filled with a 1 - 2 - 3 cement mix flush with the ground. The sides of the ditch act as forms to hold the concrete. Do not pour the concrete into the entire length of the ditch. It will harden too much before you get around to laying the first course of bricks. Pour and level off a section about three or four feet long and then immediately lay the first line of bricks. Then pour the next length, and so on for the entire foundation.
If possible, the entire foundation, including the first course of bricks, should be laid in one working period. This produces a stronger piece of work. If, however, work must be stopped before the first course is completed, be sure and cover the unfinished end with wet burlap or straw. Keep it wet until the next pouring may be started.
Bricks, for this type of wall, look best when laid in the simplest fashion. The center of each brick is laid directly over the seam between the two lower bricks. This is called "common bond" and is by far the easiest to do. The first row or course always starts and ends with a full brick. The second, fourth, etc., rows start and end with half bricks. These are obtained by cutting a full size brick with a brick hammer. The surface is scored with the flat blade of the hammer just as an iceman draws a line across a cake of ice before cutting it. Then, with the blunt end of the hammer, give the brick a sharp crack. It should break off evenly. Sometimes it does and sometimes not. Practice will develop skill and in the meantime a little chipping along the rough edge will smooth it out sufficiently to use.
Continue to:


My Books

