Chapter XI. Rain-Water Pipes
Description
This section is from the book "Plumbing Practice", by J. Wright Clarke. Also available from Amazon: Modern plumbing practice.
Chapter XI. Rain-Water Pipes
A great many architects are in favour of lead rain-water pipes, as when well fixed they last so much longer and do not split in the same manner by the effect of frost as iron ones. Iron ones also have their sockets or hubs frequently burst by oxidation; any water running down the outside of the pipe, enters the sockets and causes the inside to rust; this rust or oxidation swells with such force as to cause the iron socket to break. Sometimes a piece falls off and leaves a hole through which rain-water can escape and soak into the walls of the house, and very often where these walls are of porous stone or of brick, the decorations on the interior face are destroyed. Where wooden skirtings are used they become rotten, and any fittings or shelves in the vicinity have their contents brought into a mouldy, and very often decayed condition. Another advantage of leaden rain-water pipes is, that if a length should become injured in any way, it can be easily taken out, or repaired in its place, while an iron one cannot be repaired or a new length properly fixed without taking down some of the other pipes, unless it happens to be the bottom length. Iron pipes periodically want painting to protect them from oxidation, but this is never done on the inside - where it wants it most, nor yet on the back side, as the painter cannot get his brush behind. Lead pipes do not require any painting to protect them, and have a certain amount of value attached to them when old and past repair. There are thousands of stacks of leaden rain-water pipes fixed in London, mostly to houses that have been built a great many years, and when some of these houses undergo repairing, the best architects generally leave the old leaden pipes which are in fair condition, and perhaps take out one length at the bottom and fix iron, as this part often gets battered about and damaged by being knocked with brooms or passing objects. A great many new houses or buildings of a high-class description have leaden stack pipes ; those lower in the scale have iron ones; and those very cheaply built mostly have zinc of about No. 9 gauge.
A great many of these old leaden rain-water pipes are fixed with iron wall-hooks in such a way that the fastenings cannot be seen. The lengths of these pipes are about 6 feet long, and the joints are the end of the upper pipe socketed into that below; consequently, there is no solder used in any way excepting to the seam when the pipe was made.
This fixing, Figure 103, is mostly applied when the pipe is in an angle of the building, and when there is not an angle convenient, a chase is left in the brickwork for the pipe to fit into, so as to be flush with the face. By doing this, more fixings, in the way of wall-hooks, could be driven in than if it were fixed on the face of the wall, in which case the whole weight of the length of pipes would have to be sustained on one hook, whereas, in an angle, two could be used, and when fixed in a chase, it is possible to get three in. These pipes sometimes have astragals or ornaments at the joints. A piece is cut out of the front, leaving a tag on the back side for fixing, as illustrated.
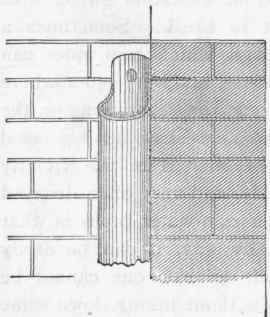
Figure 103. Elevation.
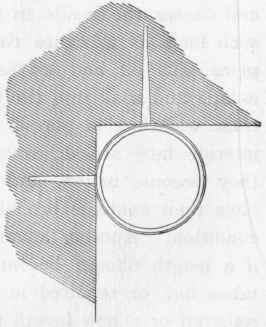
Plan enlarged.
Another way of fixing leaden rain-water pipes was, and is, to solder tacks on the sides of the top or socket end. Then saw a piece of 1/2-inch or 3/4-inch lead pipe longitudinally, and fold it around the larger pipe, and solder them together with fine solder and copper-bit; or sometimes these astragals are cast solid and put on. The plumber will often himself design a small neat moulding, and make the flask for casting these astragals. He generally proceeds first to paste a section of his design, drawn on paper, on a small piece of sheet zinc, which he then cuts so that the edge represents the required shape, as shown in Figure 104; this is then nailed upon a piece of thin board, cut to the same shape, but a little larger, and with another small, narrow piece of board nailed or screwed on at right angles. The plumber then gets a smooth piece of board about 18 inches long and 7 inches wide, and on one edge nails a strip of wood for his mould to run against. The next thing is to mix some plaster of Paris and water to the proper consistency and lay it on the board, which should be previously wetted, and then, before the plaster sets, to pass the prepared zinc mould over it, so as to remove all, excepting a portion which will be found to be the required shape, as shown in sketch, Figure 105.
This should then be placed in a dry situation for the plaster to set and any moisture to evaporate. When thoroughly dry, block the ends with a piece of well-soiled lead backed up with sand. The sides will have been formed with plaster, the zinc mould being cut so as to allow for this. When all is ready, pour melted lead on as quickly as possible, until it overflows the sides; care should be taken to level the plaster mould so that the lead may be the same thickness at each end. When the lead is set it can be taken off and the plaster will be left adhering to the board. The outer edges of this half flask should be made perfectly straight and smooth, and three or four conical-shaped holes made in the faces, outside the moulded sinking. This sinking should then be filled flush with plaster, or fine loamy sand, slightly moistened; when this is done and the lead covered with a coating of thin soil, place a band of well-soiled sheet-lead around the edges, well back it up with wet sand, and then pour on melted lead to a depth of not less than 1 inch. In all cases the lead requires to be poured on quickly, or the flask will be flaky, and before it has been used many times will become so rough that what is cast in it will require trimming and cleaning up before it can be used.

Figure 104.
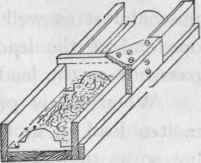
Figure 105.
If these lead astragals or mouldings are made to a large size they should be cast hollow on the back. To do this, the first half of the flask should have the moulded sinking filled with plaster, and before it sets a portion should be removed by a piece of zinc cut to the required shape and fastened upon a small piece of wood, in the same manner as described before. Its shape will be as sketch, Figure 106. When the plaster is perfectly dry, prepare and cast the other half of the flask, as before described. Separate the two pieces of lead, remove the plaster, well soil the lead, fit them together, and fasten with clamps or hand-screws. If these are not at hand have some small pieces of board, notched to fit loosely on the edges of the lead flask, and wood wedges cut. These will answer the purpose almost as well as the screw clamps. Cut a pouring-hole in one end of the lead flask, allowing space enough for the air to pass out as the lead is poured in.
When all is prepared, stand the flask on its end and pour molten lead in at the other end, taking care not to have it too hot so as to melt the flask. Some men prefer to have pouring-holes at the edges of the flask, but endways is best, and the casting better and not so flaky. These mouldings are simply bent around the pipe and soldered with copper-bit or blow-pipe lamp and fine solder.
If only a few astragals are needed, a carpenter can make a pattern of wood with which to make a print in moistened loam or fine sand, and then pour melted lead into it. By this means it is difficult to make the casting true, as it requires trimming and filing to make it an equal thickness its whole length. Sometimes a lead socket with ears and astragals is cast all in one piece and soldered to the pipe afterward. Figure 107 is an example of one for square pipe, but this is a trouble to cast, as the flask has to be in six pieces or it cannot be drawn away from the casting. The easiest way for an ordinary plumber to make it, is to cast a length and then niche and solder it together, and cast the two ears with a band all in one piece, to pass behind the pipe and solder on afterward. This makes it very much stronger, but as the weight of the pipe will sometimes cause the ears to bend, it is a good plan to cut off about three inches of the pipe on the front and two sides, and then flange over the piece left on the back and turn it into the wall and fasten with lead wedges and Portland cement.
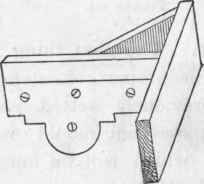
Figure 106.
It very often occurs when a cast-iron rain-water pipe is fixed to a building, that a bend is required to a different length to any iron ones kept in stock, and as a special-made bend would be expensive, it being necessary to make pattern and core-box for it, it generally falls to the plumber to make one out of lead pipe. After making the bend, the plumber generally folds a piece of sheet-lead around the socket of one of the iron pipes and works it into the mouldings, so that when this dummy socket is made and soldered on the lead bend, it matches the iron in shape, and when the whole is painted, the difference in appearance is so slight as not to be noticeable. The ears can be made by cutting out a piece of wood with which to make a print in sand, and then run melted lead into it. These ears should be very strongly soldered to the bend, as when iron pipes are fixed so that the spigot end is tight on the bottom of the socket or hub, any expansion that takes place will force the bend downward, and perhaps break it away from its fixings.
Figure 107.
Continue to:
My Books

