Chapter XII. Lining Sinks And Cisterns
Description
This section is from the book "Plumbing Practice", by J. Wright Clarke. Also available from Amazon: Modern plumbing practice.
Chapter XII. Lining Sinks And Cisterns
Ordinary-sized cisterns are generally lined with six-pound lead sides and seven-pound bottoms, but for best work and large cisterns, seven and eight-pound is very often used. Small-sized cisterns are usually lined with lead of the same substance throughout, and in one piece, with the angle pieces cut out. The plumber generally opens out his piece of lead and carefully takes out the creases with a leaden flapper, so as not to bruise or indent it; he then marks out the part for the bottom, and then the sides and ends, allowing in all cases for the thickness of lead, so that it will not fit too tight in the wooden case or shell. At each angle is left about 1/2 or 3/4-inch on the side that will form the under-cloak, as shown by dotted lines, A, A, Figure 108, and corners are left on, as at B, B, so that when the lead is turned over the top edge of the cistern they shall meet in a mitre.
The lead is now soiled about 3 or 4 inches wide around the parts to be soldered, and when dry they are shaved either with a gauge -hook or an ordinary shave-hook and straightedge, the part at C being shaved with the hook-compasses. Great care should be taken, when shaving the straight parts, not to dig in the point of the hook so as to unnecessarily reduce the substance of the lead, and neither should the shaving be too wide, in which case the lead would not have the parts which are thinned by the hook strengthened by the solder. Some men think that by shaving wide angles it makes them appear to be stronger, whereas the reverse is the case, as it is very rarely that the solder is left full up to the edge of the shaving, as was explained in one of the chapters on " Joints."
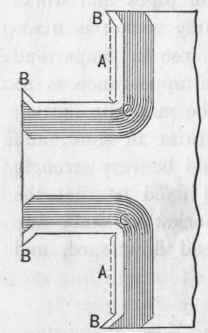
Figure 108.
Figure 109 shows a section across the soldered angle of a cistern, showing the shaved parts filled up with solder right up to the edge, and Figure no the common way and the evils complained of at the parts marked E, E.
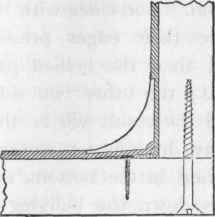
Figure 109.
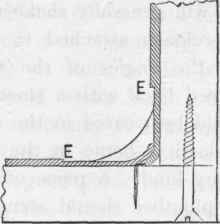
Figure ho.
Supposing the piece of lead to be prepared, soiled, and shaved, as described; the piece to form the undercloak at the angles should have its outer edge rasped down to a feather-edge, so that the overcloak part may lie quite smooth over it. If this was not done it would be very difficult to wipe the angle nice and true and leave the solder of a proper substance at the edges.. These undercloak pieces should have a sharp-pointed hook run where the edge is to be folded, so that they will fold up without any dressing or knocking about to dirty the shaving or scratch-the soiling, which would necessitate its being done over again. The sides should next be folded upward and the angles around the bottom "set in" with the edge of a dresser, but not too sharp, and only sufficient to crease the lead in straight lines. These angles should then be dressed well on the outside; if this is properly done the lead will not have become reduced in substance, whereas an indifferent tradesman would have set in these angles so sharp with his dresser as to nearly cut the lead through.
The bottom should now be bellied or hollowed from the underside; the flat of the hand is quite sufficient for this, and the use of tools should be avoided as far as possible. The sides should be bellied inward in the same manner. The result of thisbellying is to make the lead, when turned up, rather smaller than the wood case it is going into, so that it will drop into its position without any dressing; if the lead should be rather tight, by lifting up one end of the cistern a few inches off the floor or bench and allowing it to drop, and then the other end in a similar way, the lead will generally shake down to the bottom. The sides with the undercloaks attached to them should have their edges pressed into the angles of the wooden case, and then the bellied part pressed back with a smooth piece of board; the other two sides should be treated in the same manner, and the result will be that the lead is home in the angles without any dressing or working of any kind. A piece of board should be laid in the bottom, and the plumber should stand upon it to press down the bellying of that part and so force the angles of the lead back into their proper position tight up to the woodwork. An iron punch or a blunt chisel can be used with advantage about every 3 or 4 inches in the angles of the parts to be soldered, so as to punch in a series of little spurs to prevent the angle opening by the expansion of the lead when the solder is poured on. About 2 or 3 inches from the top end of these soldered angles, a copper nail with a tinned head should be driven in, but only one to each angle, so as to fasten down the lead and keep it from rising off the bottom when the top edge is worked over on the woodwork. Some men will run a knife or the point of a shave-hook on the back side of the lead, and on a level with h top edge of the wood cistern, so that the lead will fold over and leave a straight and sharp arris without much dressing, and although when this is done the work looks smart and free from tool marks, still it should be condemned, as it will not be so well able to support the sides of the cistern, which, to a certain extent, are suspended from the top. It is a common practice to have the top edge of the cistern dished or hollowed at the angles, so that the lead can be dressed into it, and then where it meets in a niche it can be soldered " flush." The cistern should now be placed on its side or end, ready for wiping, so that the undercloak piece stands upright, for if this lies flat, it sometimes happens that if the lead does not fit tightly in the angle, solder will get underneath and so get wasted, in addition to making the surface of the lead so uneven that the wiping looks irregular and patchy, for a plumber can no more wipe an angle straight if the sides are not flat than a plasterer could run a straight cornice or moulding if his running rules were not straight.
Continue to:
My Books

