Chapter VIII. Lead Laying [Continued)
Description
This section is from the book "Principles And Practice Of Plumbing", by S. Stevens Hellyer. Also available from Amazon: Principles and practice of plumbing.
Chapter VIII. Lead Laying [Continued)
Cesspools and their Sockets, and Overflows.
PERHAPS no piece of work varies so much in size and shape as a roof-cesspool. Many a young plumber, and old plumber too, for that matter, has found to his chagrin that when the many-sided cesspool has been made, and he comes to put it into its place, it is too large or too small, or that he has canted or splayed the wrong side, or that some sides are too deep and others too shallow. And so materials and labour are wasted, or the cesspool is bungled into its place to tell its own tale to every beholder.
2. When a many-sided cesspool has to be bossed up out of one piece of lead, and the sides are all various in shape and height, it may tax the skill of a good plumber to make it so that it shall fit in every part exactly; but when the angles are allowed to be soldered, as they mostly are, it only requires care in setting out to make a cesspool to fit almost any position.
3. Great accuracy is required in taking the dimensions and in setting out the cesspool on the piece of lead of which it is to be made. As it is desirable to have as little soldering as possible, the several ways of cutting out the corners should be computed, to see which way will give the least angle-soldering. Great care should be taken to see that the plan of the cesspool - the bottom - is correctly lined out on the piece of lead with a chalk-line before lining or marking in the sides, as no two angles may agree and every one of them may be more or less out of square.
4. Supposing the dotted lines a b, c d, and e f, in fig. 15, to show the bottom of a cesspool, and that the end 1 has to stand up square, with a return of 1 1/2 in. for the rebate of the gutter; that the side 2 stands up vertically 12 in., and then turns back upon the roof 6 in.; and that the side 3, with its return or extended length for the end, a b, c d, stands up 18 in. next a vertical wall, the diagram, fig. 15, shows the best way of cutting out the lead and preparing it for turning up and soldering. The cleats - the parts hatched in the diagram - are simply for the purpose of holding the lead in its place during the angle-soldering; and in order that they may be broken off very readily when the soldering is done, an arrow-shaped groove should be cut with the point of the shavehook along the dotted line next the cleat, and this groove should be well soiled.
5. In fig. 15 the angles of the bottom are all shown square; but whether obtuse or acute, it is easy to mark an exact plan of the bottom of the cesspool on the piece of lead from which the cesspool is to be cut out, by the aid of a bevel; and, in fact, any form of angle, vertical or horizontal, can readily be taken with this instrument and marked upon the lead.
In taking the dimensions of the place that the lead cesspool is to fit into, always allow, in measuring the length and width, etc., of the bottom, for the two thicknesses of the lead of the sides; this is sometimes forgotten, and when the cesspool is made, like some pompous personage, it is found too big for its place.
6. As there is no difficulty in reducing the end of a lead socket-pipe to fit into the socket (from which its name is derived) of a cast-iron rain-water pipe - Chapter XXVI (Rain-Water And Rain-Water-Pipes). - and especially as it is generally difficult to give a socket-pipe much fall, it is better that it should be of a larger size than the rain-water pipe, for in great storms, where the cesspool is shallow and the socket-pipe small, the water is delivered into the former quicker than it can be taken away by the latter.
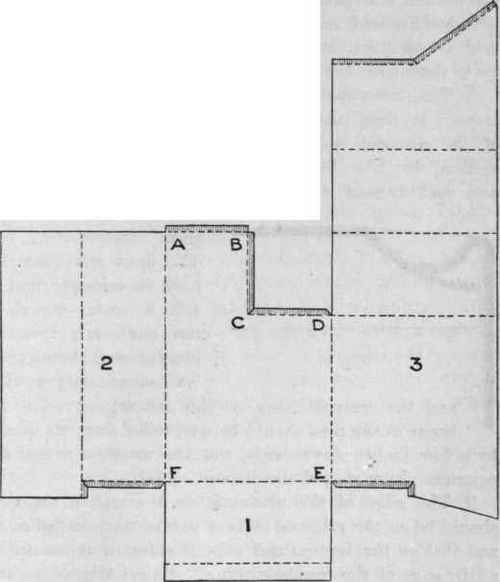
Fig. 15. Cesspool set out ready for Soiling and Shaving.
7. When the socket-pipe goes out of the bottom of a cesspool there is no difficulty in making the soldered joint. Nor with good arrangement and care should there be any great difficulty in soldering it to any part of the cesspool; - on the face of one of the sides, or bird's-mouth (half on the bottom and half on the side); or partly on the bottom and partly on each of two sides. But when a plumber has had an experience of wiping such joints on cold frosty days, he will know that there is no time to go to sleep over the making of them.
8. The countersinking for the jointing should be about 3/4 in. deep, and l 1/4 in. wide at the top, and the lead of the cesspool well dressed down into it, as shown in section, fig. 16. The end of the pipe should be rounded over and dressed down tightly into the countersinking, and not tafted back at right angles, i.e., flat. The joint will then not only be stronger, but it will be easier wiped, as the cloth can then be pressed well down upon both edges (the pipe edge and the cesspool edge) at the one wiping. The interior of the pipe should be well soiled from its mouth to a few inches downwards, and the margins round the countersinking should also be well soiled.
9. The edge of the shaving on the end of the pipe should be on the ridge or highest part of the rounded edge, and that on the bottom and side, or sides, of the cesspool, at the edge of the countersinking. To get true edges and an equal width of soldering, shave the edges with the shaving half of a pair of compasses. The mouth of the pipe should be well plugged with some dry wood shavings wrapped over with paper to prevent the solder running down the pipe.
10. To make the joint, splash or pour on the metal very rapidly, and get a good body of solder all over and round about the connection; and, with the aid of a properly heated iron, wipe the upper part (the part in the vertical face), first rubbing the iron well over the outer edge, as the solder cools quicker on the upper part and outer edge than on the bottom and inner edge. When the joint is wiped, never forget to break up the surplus solder into pieces whilst it is hot, for easy removal.
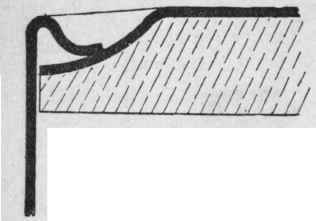
Fig. 16.

Fig. 17.
11. An overflow-pipe or spout1 should be fixed to every cesspool where practicable, especially to mansions and churches in the country, where the socket-pipes are liable to get stopped up with leaves, etc. Even if there were no necessity to fix such pipes, it would be a pity in many instances to do away with them; for a gargoyle gives an architect a happy way of relieving the nakedness of flat surfaces and unbroken cornices, as well as affording a means of protecting the walls and rooms of the house from damage by an overflow of rain-water from the cesspool.
1 It is difficult to see the wisdom of calling rain-water pipes spouts, for though they are generally conspicuous enough, they are silent conductors, and nobody ever sees what is passing through them.
To get the best results from such spouts in case of stoppage of the socket-pipe, and to avoid a great reduction in the depth of the cesspool, the mouth of the overflow-pipe should be considerably enlarged, and its lower part flattened, as shown at O p, fig. 17. Of course it is important to fix the overflow-pipe so that the lower part of its mouth shall stand well below the lowest gutter which empties into the cesspool. This is not always done by men, who forget the purpose for which the overflow is fixed.
Continue to:
My Books

