


Chapter XII. Lead Laying {Continued). Rolls And Bays
Description
This section is from the book "Principles And Practice Of Plumbing", by S. Stevens Hellyer. Also available from Amazon: Principles and practice of plumbing.
Chapter XII. Lead Laying {Continued). Rolls And Bays
Wood-Rolls - Bossed Ends - Intersections - Seam-Rolls - Copper Tacks and Lead Bays.
FOR flats and lead coverings to roofs with slight falls, wood-rolls are better than seam-rolls, as the former not only resist foot traffic better, but are easier to dress up again when damaged, and they are also cheaper.
2. For lead coverings to roofs with a high pitch, as cathedrals and churches, etc., where the weight of the lead ever tends to drag the bays downwards, seam-rolls are stronger and more durable than wood-rolls, and they have also a much better appearance.
3. With wood-rolls there is nothing to support the lead overcloak except its clip round the roll, which on the southern side of a roof is ever being loosened by the heat of the sun. But with seam-rolls the overcloak is welted to the undercloak, and there is not only this clip of the edges, but there is also the friction of the two faces of the turned roll, the grip of the overcloak upon the undercloak over the entire roll, and which will never be entirely relinquished, no matter how hot the sun may be upon the leads. Then the side of the overcloak is further held in position by being welted and bound together with the undercloak by copper tacks. A well-tacked and a well-turned seam-roll will last for centuries.
4. For keeping out the rain, a seam-roll need not be so large as a wood-roll when covered. A seam-roll 1 1/2 in. diameter is large enough for most roofs; l 1/4 in. is better for small roofs and domes.
5. A wood-roll should be deeper than it is wide, as shown in section, fig. 24, to give room for the lead of the overcloak to key well under it. If a wood-roll on a flat, when covered, measures about 1 3/4 in. across, and stands about 2 in. high, it will look bold and answer very well.
6. The undercloak should be turned up round the roll and terminated just under the shoulder on the opposite side, i.e., about 1 1/4 in. or 1 1/2 in. beyond the middle of the top of the roll, and its edge feathered off with a rasp or shavehook, and nailed with strong copper nails (or iron clouts) about 9 in. apart. In some cases it is insisted upon that the undercloak shall be continued down to the bottom of the roll, and it must be conceded that this gives more friction of the two faces, for holding up the overcloak side of the bay. But many plumbers are content simply to turn up the undercloak to reach about one-third round the roll, instead of about two-thirds or three-fourths. .
7. The overcloak should be drawn tightly round the roll and well keyed under it, and a lay-down should be left upon the flat 1 in. or l 1/4 in. wide (depending somewhat upon the size of the roll), as shown at a, fig. 24.
In turning the overcloak round the roll keep the lead free from bruises and tool-marks. Press the stand-up round with your hands, and then with a round roll of wood and big hammer drive the lead in under the roll as far as it will go. Then with the edge of the wood dresser complete the angle, keying in the overcloak tightly. If this is properly done there will be no need to use the dresser upon the upper part of the roll.
8. Bossed Ends. - The expert finds no difficulty in working down the end of a roll, either the butt end or the open end, though some men never become adepts at it.
9. To boss down the end of the overcloak of a 1 1/2 in. or 2 in. roll ought not to be a work of more than five minutes, though many men are content if they accomplish it in a quarter of an hour, and some men take half-an-hour.
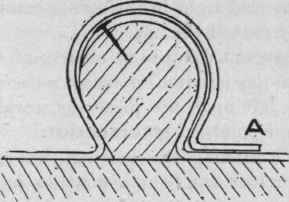
Fig. 24.
Instead of bossing down a lot of surplus lead to cover a disc 1 3/4 in. diameter with a bossing-stick, or tapping it down with a very little mallet over a dummy held up under the lead, open out the end of the lead roll with your hands, and work the lead round the roll-end with the large end of the small mallet, working the surplus lead off to the lay-down side of the roll. A quick succession of blows, like the rat, tat, tat, tat of a doctor's knock upon a door, and the thing is done. Then finish off the end with a box-wood dresser and mallet, and turn to the more difficult work of bossing down the other end of the roll, the end next the wall.
10. To boss and dress the overcloak round the end of a roll where it butts against a wall. Before laying the bay, boss and prepare the end to fit about half way round the roll, leaving all the surplus lead you can for working into the other half in situ. Pouch up the overcloak, for the corner to slide in over the roll, a few inches away from the end, when putting the bay into its place. The roll having been turned and completed, the overcloak of the butt end will then be ready for completion. Press and work down with your hands a good supply of lead from the stand-up, and any further lead required can be worked up in waves from the lay-down in the flat. With care and a little skill the lead right in the corner can be left just as thick as in any part of the bay.
11. The important thing to be observed for working the overcloak over the junction of many rolls, is to see that enough lead is left upon the piece for working up under the rolls at their points of intersection.
12. Before beginning the bossing, where practicable, lift up the overcloak and bang it down as hard as possible a time or two, for it to take the shape of the rolls. Pouch up the lead between the rolls, and work the pouches up into the intersections, using a mallet and also a chase-wedge for the purpose. It is also advantageous to keep the overcloak a little way up from the rolls, just at the intersections, as towards the completion of the bossing it will afford some spare lead for working round to the under part of the roll, where it is likely to be much wanted. The end of the lead over the top of each roll can be cut down as far as the line for the trimming, and a circular hole made to prevent it splitting farther. This will give greater freedom to the lead for working it down upon the flat, and for working it up under the rolls.
Continue to:


My Books

