


Lead Laying {Continued). Rolls And Bays. Continued
Description
This section is from the book "Principles And Practice Of Plumbing", by S. Stevens Hellyer. Also available from Amazon: Principles and practice of plumbing.
Lead Laying {Continued). Rolls And Bays. Continued
13. The edge of the lay-down should be trimmed to run parallel with the roll. A slovenly trimmed edge is a disgrace to the plumber. One of the legs of a pair of compasses stuck into a narrow wood guide, about 2 1/2 in. or 3 in. long, as shown in fig. 25, and the point of the other half of the compasses for scribing upon the lead, will give a good line to cut to. The wood guide is drawn down in the angle of the finished roll, and the trimming-line is scribed upon the lay-down of the overcloak, the pair of compasses being held at right angles with the roll.
14. The side of the lead bay which is to form the under-cloak of a seam-roll should be turned up about 3f in. (dependent, of course, upon the size the roll is to be), and should be made perfectly true in the entire length of its edge and horizontal angle. To get rid of any irregularity in the edge of the stand-up, run a lead-plane over it, J, Plate I.
15. Copper tacks for securing the lead in its place should be fixed against the stand-up, with their bottom ends turned round and screwed into the boarding, into which they should be countersunk, as shown at c T, fig. 26. The tack is shown secured to the boarding directly under the turned roll in figs. 26 and 27, but in practice this cannot always be managed. The top ends should be well notched down into the edge of the stand-up of the overcloak, and turned round upon the opposite face for a depth of about 1/2 in., to well clip the lead, as shown by the thick line in fig. 26. The tacks should be cut out of about 22 oz. copper, i.e., about 1/32 in. thick, and should be about 3 in. wide. The number of the tacks in a roll, i.e., their distance apart, must depend upon the weight they have to carry, and upon the pitch of the roof. In sharp pitches there should be a tack about every 18 in., with three stout copper screws to each. For a slight slope a tack every 2 ft., or every 2 ft. 6 in., with the same number of screws, three to a tack, gives good security.
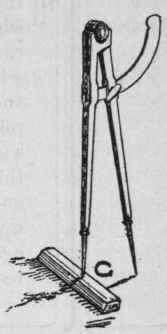
Fig. 25.
16. Having secured the stand-up of the undercloak, turn up the stand-up for the overcloak in the bay next to it, and see that it stands about l 1/4 in. higher than the undercloak. Bring the two stand-ups together and welt them. In turning the edge of the overcloak over upon the edge of the undercloak, to form the welt, care must be taken to leave a space of about 1/4 in. between the edge of the undercloak and the place of the folding, for when the roll is formed the overcloak will describe a larger circle than the undercloak. Where this is not provided for, the horizontal angle of the overcloaking bay will be drawn up from the boarding, and to get it down again the lead on that side of the roll will be much weakened.
17. The roll can be turned with the use simply of a mallet and a box-wood dresser, but it is very helpful to turn the welted edge round upon a piece or length of wood-roll; and the roll is also useful to drive against the lower part of the stand-up, to give it a rounded form. One or two sharp blows of the big hammer or mallet upon the wood-roll suffices for this. Instead of turning the roll and finishing it off bit by bit. it is better to turn the entire length over together gradually. And the less it is dressed and knocked about the quicker it will be finished, and the better will be its appearance.
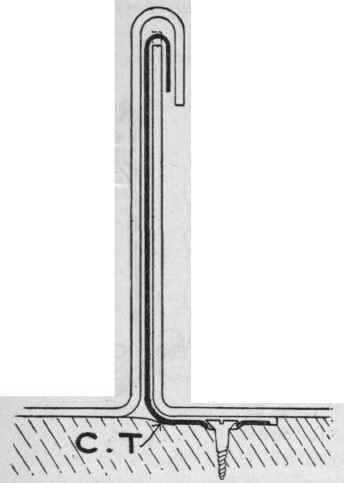
Fig. 26. - Section of an Unturned Seam-Roll.
18. For domes and ogee-shaped roofs. Having symmetrically divided out the bays, and marked the exact positions of the rolls upon the roof, line out on a piece of lead the bay best to start with, and turn up its two sides, the undercloak and the overcloak. Then, without attempting to shape the bay to the form of the roof, take the piece of lead up to its place, and whilst your mate holds one end firmly over its position, lift up the other end and bang it down as hard as you can, keeping your hands upon the stand-ups when banging it down; then let your mate treat his end in the same way. Keep banging down the ends in this way alternately, until the bay falls into its proper place, and the stand-ups stretch or contract as required. Square up the undercloak, and prepare the next bay in a similar way.

Fig. 27. - Section of a Seam-Roll.
Bring the two bays together, welt the edges, and turn the roll, and so on till the dome or roof is covered.
19. To keep a seam-roll of uniform size right throughout its length, when one part is dressed into a concave and another over a convex, the stand-up of the former should be a little wider than that of the latter. It is important to remember this, especially where a seam-roll has to be formed in a great hollow, or in an angle, as in turning the roll round into such recesses the stand-up contracts very much.
20. Seam-rolls on high-pitched roofs should not be more than 20 in. apart, or 2 ft. apart, so that sheets 7 ft. wide, or sheets 8 ft. wide, may be cut into three bays. And this will give great durability to the leadwork, as the tacks will be better able to support the lead in such narrow widths, and good freedom will be given for expansion and contraction.
Where it is important that the rolls should be kept even closer together than about 20 in., though such circumstances can scarcely occur, the bays can be cut across the sheet to any width required, and the width of the sheet, 7 ft. (or 8 ft.), made the length of the piece.
21. Lead Bays. - Apart from the support afforded by the rolls, and by the secret tacks of a seam-roll, each piece of lead on a flat with a great fall, each piece on the side of a sloping roof, and more especially each piece on a roof with a high pitch, should have a good means of keeping itself in position.
Where a portion of the top edge cannot be turned down into a notch cut in the boarding and nailed, a secret lead tack can generally be soldered to the underside of the lead, and the end of this tack pushed and wedged into an opening made in the roof-boarding for the purpose. Such tacks should be kept well up towards the top end of the piece of lead, for the bay to be suspended from it rather than rest upon it, as in the latter case the lead would in time buckle or sag down upon it, and show a fold or cord-crease on the surface of the bay.
Continue to:


My Books

