How to Make Allendale Sideboard
Description
This section is from the book "Box Furniture", by Louise Brigham. Also available from Amazon: Box Furniture.
How to Make Allendale Sideboard

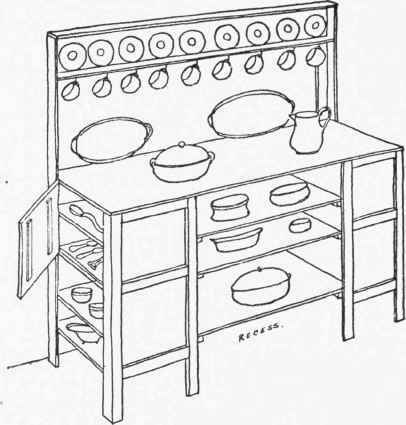
Made as shown, by the Allendale boys in the Bradley Republic. A relay of four boys took turns in the "box factory" morning and afternoon. Their beaming faces when the work was completed showed the keen interest of all in creating "our sideboard," as the boys expressed it in a letter to me.
It consists of four boxes supported in pairs, with a recess containing shelves between. The recess is closed across the back. The rear legs carry up and support a cup-and-saucer rack. The space between the rack and the sideboard top is open. The compartments at each end are made alike.
The First Process in the Construction of the Allendale Sideboard.
Requirements
Cupboards. 4 Canned-fruit Boxes (about 13 in. wide, 12 1/2 in. deep, 18 in. long).
Recess Shelves. 3 Pieces 1/2 in. thick, the width equal to the outside length of the box, 24 in. long.
Inside Shelves. 2 Pieces 1/2 in. thick, the width 1/2 in. less than the inside depth of the box, and the length equal to the inside length of the box. 2 Pieces 1/2 in. thick, the width equal to the inside depth of the box, and the length equal to the inside length of the box.
Shelf Cleats. 8 Strips 3/8 in. thick, 1 in. wide, and the length equal to the inside depth of the box. 6 Strips 3/8 in. thick, 1 1/2 in. wide, and the length equal to the outside length of the box.
Door Cleats. 4 Strips 3/8 in. thick, 1 in. wide, and the length 1 in. less than the inside width of the box.
Legs. 2 Strips 1/2 in. thick, 1 1/2 in. wide, 8 in. longer than twice the outside width of the box. 2 Strips 1/2 in. thick, 2 in. wide, 8 in. longer than twice the outside width of the box. 2 Strips 1/2 in. thick, 1 1/2 in. wide, 30 in. longer than twice the outside width of the box. 2 Strips 1/2 in. thick, 2 in. wide, 30 in. longer than twice the outside width of the box.
Back of Rack. 1 Strip 1/2 in. thick, 6 in. wide, 24 in. longer than twice the outside depth of the box.
Top of Rack. 1 Strip 1/2 in. thick, 2 1/2 in. wide, 27 in. longer than twice the outside depth of the box.
Bottom of Rack. 1 Strip 1/2 in. thick, 2 1/2 in. wide, 24 in. longer than twice the outside depth of the box.
Recess Back. 1 Piece 1/2 in. thick, the width twice the outside width of the box, 30 in. long.
Top. 1 Piece 1 in. thick, 2 in. wider than the outside length of the box, 27 in. longer than twice the outside width of the box.
Facing Strips. 4 Strips 1/2 in. thick, 2 in. wide, 8 in. longer than twice the outside width of the box. 4 Strips 1/2 in. thick, 2 in. wide, and the length 2 1/2 in. less than the outside depth of the box.
Hardware. 4 1/4 in. hinges (butts) and screws. 2 pull-knobs. 9 brass hooks.
Construction
Make the legs, two 8 inches and two 30 inches longer than twice the outside width of the box. Remove the covers. Lay one box on its side and place another box upon it sidewise, with both open sides facing alike. Match their edges and nail them together, driving the nails from the inside of the top box, and clinch them in the lower box. Nail the cleats on the inside ends of each box and fit the shelves in. (They need not be fastened.) The shelf in the upper box will be 1/2 inch less in width than the lower ones, to allow the door to close without the door cleats striking the shelf. Turn the boxes end up and put on the front corner leg, also the long facing strip leg, allowing its edge to project half over the recess to hide the ends of the recess shelf cleats. Nail the short facing strips between them, the middle one directly over the joint of both boxes, the upper edge of the top one even with the upper edge of the top of the box, and the lower edge of the bottom one even with the lower edge of the bottom of the box. Reverse the position of the boxes and put on the extended rear leg, keeping it the same distance below the lower box, so the cupboard will stand level. Fit the door between the legs, having the outer face of both the door and legs even. Put the cleats on the inside face of the door and hang it. Do the same with the other two boxes. They are to be made right- and left-handed regarding the position of the legs and the hanging of the door. Set both pairs of compartments upon their legs, 24 inches apart as shown, and fit and nail on the top, allowing it to project 1 inch at the ends and in front over the outside face of the legs, the rear edge being even with the outside face of the rear legs. It will be necessary to cut out both rear corners of the top to allow the legs to set in. Put on the recess shelf cleats, keeping the lower edge of the bottom ones even with the lower side of the bottom box, and those above at such heights as will be best adapted for the articles to be placed on them. Fit in the shelves and nail their ends to the cleats. Nail the 6-inch-wide back for rack across the rear inside face of the top of the extended legs, and put on the top and bottom strips. Gouge or plane a groove in the bottom of the rack 3/8 inch wide, 1/8 inch deep, and 1/2 inch back from the front edge, and cut off the projecting corners at each end to an angle of 45 degrees, as the shelf will project 1 inch outside the front edge of the legs. Allow the strip to butt against the legs at the back below the rack back, to which it should be nailed. Nail through the legs into the ends of the strip. Put the recess back on, which will extend from the under side of the top to the lower edge of the lower shelf cleats. Each end will lap about 3 inches on the cupboards. Arrange the saucers in the rack, and screw a hook directly below each one for holding the cups.
Continue to:
My Books

