How to Make Spitzbergen Sideboard
Description
This section is from the book "Box Furniture", by Louise Brigham. Also available from Amazon: Box Furniture.
How to Make Spitzbergen Sideboard
Requirements
Side Cupboards. 2 Dynamite Boxes (about 11 in. deep, 11 in. wide, 22 in. long).
Center Cupboard. 1 Carbonite Box (about 10 in. deep, 12 in. wide, 31 in. long).
Drawer. 1 Picture Box (about 5 in. deep, 10 in. wide, 31 in. long).
False Top. 1 Piece 1/2 in. thick, 1 1/2 in. wider than the outside depth of the side cupboard box with the cover removed, and 2 in. longer than twice the outside width of the side cupboard box and the outside length of the center cupboard box added.
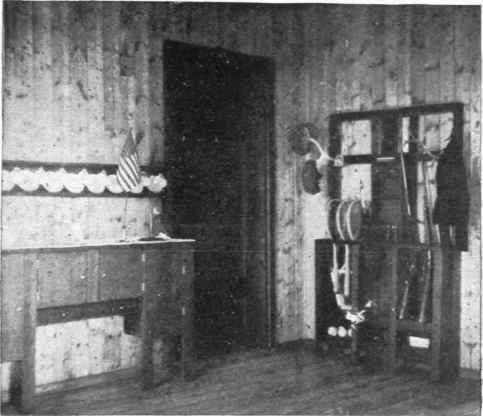
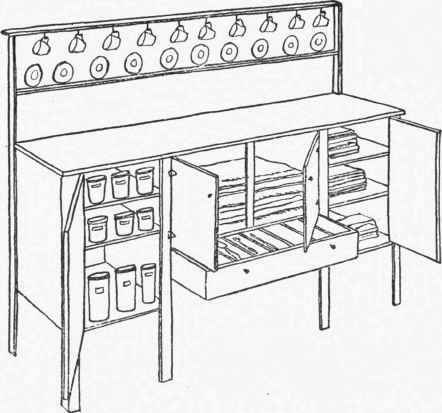
The Spitzbergen Sideboard and Hall Stand.
Kecess Shelves. 2 Pieces 1/2 in. thick, 1/2 in. wider than the outside depth of the side cupboard, and the length equal to the outside length of the center cupboard box.
Cupboard Shelves. 4 Pieces 1/2 in. thick, width equal to the inside depth of the box, and length equal to the inside width of the box.
Doors. Made from the covers removed from the boxes.
Drawer Partitions. 9 Pieces 3/8 in. thick, width equal to the inside depth of the drawer box, and length equal to the inside width of the drawer box.
Corner Legs.
2 Strips 1/2 in. thick, | 2 in. wide, 55 in. long. |
2 Strips 1/2 in. thick, | 2 1/2 in. wide, 55 in. long. |
2 Strips 1/2 in. thick, | 2 in. wide, 35 in. long. |
2 Strips 1/2 in. thick, | 2 1/2 in. wide, 35 in. long. |
Facing Strip Legs. 4 Strips 1/2 in. thick, 2 1/2 in. wide, 35 in. long.
Back of Rack. 1 Piece 1/2 in. thick, 8 in. wide, 2 in. shorter than the false top.
Bottom of Rack. 1 Strip 1/2 in. thick, 3 1/2 in. wide, 2 in. shorter than the false top.
Top of aRack. 1 Strip 1/2 in. thick, 2 1/2 in. wide, 1 in. longer than the false top.
Center Cupboard Dividing Strip. 1 Strip 1/2 in. thick, 2 1/2 in. wide, and length equal to the outside width of the box. Hardware. 8 1 3/4 in. tee hinges and screws. 6 brass pull-knobs. 4 brass buttons and screws. 10 brass screw-hooks.
Construction
Make two legs 35 inches and two 55 inches long. Remove the covers from all the boxes. Fit and nail two shelves in each of the cupboard boxes, forming three equal compartments in each. Place one side cupboard on its side and set the center cupboard on its end upon it, having one side even with the end of the side cupboard and both open compartments facing the same way, with the edges even, and nail them together. Join the other side cupboard box to the other end of the center cupboard box in the same manner. Turn the cupboards upside down and set one recess shelf on the center cupboard and nail it. Upon this set the drawer box, and upon the drawer box place the other recess shelf and nail it. Allow both of the recess shelves to project 1/2 inch outside the front edges of the cupboards. Put on the corner and the facing strip legs, having their upper ends even with the top of the cupboards, their other ends projecting 13 inches below the bottom face of the side cupboards, and the recess edge of the facing strip legs even with the outside side face of the side cupboard. Stand the piece upon its legs and place and nail the top, allowing it to project 1/2 inch over the outside face of the legs at the ends and in front, having its back edge even with the outside face of the rear legs. It will be necessary to cut the rear corners of the top to allow one side of each rear leg to set in about 1 inch. Place the back of the rack across and between the rear projecting legs and nail it to their inside faces, having its upper edge even with the top of the legs. Put the top of the rack across on top of the legs on its flat side, having its rear edge even with the back edge of the legs. Set the rack bottom between the legs and under the lower edge of the rack back, having its rear edge against the inside face of the legs. Nail both the top and bottom of the rack to the edge of the rack back. The end of the top of the rack will project 1 inch over the outside face of the legs. Gouge a groove in the top face of the rack bottom, extending its entire length with the exception of two inches at each end. Have it 3/8 inch wide and 1/8 inch deep, and 3/4inch from the front edge, to prevent the saucers from sliding. Cut off the projecting corners at each end to an angle of 45 degrees, as the shelf will project 1 inch outside the front edge of the legs. Place the saucers in the rack and screw the hooks to the under side of the top for holding the cups, having them hang between the saucers. Fit and nail the center cupboard division strip in the center of the cupboard, having its outer face even with the front edge of the recess shelves. Fit and hang the doors and screw on the pull-knobs and the buttons. Fit and nail the partitions in the drawer, spacing them about 3 inches apart, or to suit the knives, forks, and spoons which they will contain.
Continue to:
My Books

