How to Make Office File
Description
This section is from the book "Box Furniture", by Louise Brigham. Also available from Amazon: Box Furniture.
How to Make Office File
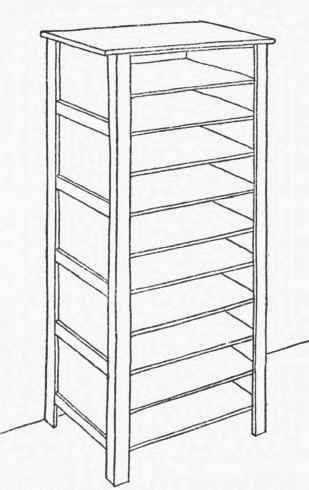
Requirements
Body. 5 Condensed-milk Boxes (about 7 1/4 in. deep, 13 in. wide, 19 3/4 in. long).
Shelves. 5 Pieces 1/2 in. thick, by the inside width and length of the box.
Top. 1 Piece 1/2 in. thick, 3 in. wider and 3 in. longer than the outside width and length of the box.
Legs. 4 Strips 1/2 in. thick, 1/4 in. wide, 38 in. long. 4 Strips 1/2 in. thick, 1 3/4 in. wide, 38 in. long.
Facing Strips. 10 Strips 1/2 in. thick, 1 3/4 in. wide, about 10 in. long. Use the covers and sides removed, in making the shelves.
Construction
Make the legs 38 inches long. Remove the covers from four of the boxes. Turn one box on its side and remove its upper side. Do the same with the second, third, fourth, and fifth boxes. Place the second box, bottom down, upon the open top of the first box, keeping the open top of the second box facing up, and place the third upon the second, and the fourth upon the third, and the fifth upon the fourth, in like manner, keeping all the open sides facing the same way. Fasten the five boxes together by nailing two strips placed vertically across the rear sides about 15 inches apart to hold them together while the legs are put on. Turn all five boxes on their reverse sides and nail on the legs, keeping their upper ends even with the top of the last box added. Turn the stand upon its legs and nail on the top, allowing its edges to project 1 inch over the outside face of the legs all around. Put the facing strips on the ends of the stand and remove the temporary strips from the back.
Note. If two shelves, instead of one, are placed in each of the two upper boxes, as shown in the Office Interior, sheet stationery, in a limited quantity, can be more conveniently accommodated than if made as herein described.

500-VOLUME BOOKCASE Illustration 46. Figure 1
Made from fifteen silk boxes, with their covers removed, twelve of them having also one side removed. Provides space for five hundred volumes.
Requirements
Body. 15 Silk Boxes (about 7 1/2 in. deep, 7 1/2 in. wide, 35 in. long).
Top. 1 Piece 5/8 in. thick, 2 in. wider than the outside depth of the box with the cover removed, and 9 in. longer than the box. 1 Piece 5/8 in: thick, 2 in. wider than the outside depth of the box with the cover removed, and 9 in. longer than twice the length of the box.
Facing Strips. 3 Strips 1/2 in. thick, 2 in. wide, and length equal to about five times the width of the box. 10 Strips 1/2 in. thick, 2 in. wide, and length about 3 in. shorter than the depth of the box.
Corner Trim. 7 Strips 1/2 in. thick, 1 1/2 in. wide, and length equal to about five times the width of the box. 7 Strips 1/2 in. thick, 2 in. wide, and length equal to about five times the width of the box.
Construction
Make the corner trim about five times longer than the width of the box. Remove the covers from all the boxes and also one side from twelve of them. Place on their sides one upon the other, each with its open side up, four of the boxes from which both a cover and one side have been removed, and upon these four place one also on its side from which the cover only has been removed, keeping the top or cover openings all facing the same way. Fasten the five boxes together by, first, putting the rear corner trim at each end, then the front corner trim at one end only. As the other end is to connect with the other two sections of the rack, the corner trim at that end will be put on the reverse way after the sections are ready to join together. Therefore a facing strip will be placed on the end face of each section at the corner end. The front edge of the facing strip is to be placed even with the front edge of the rack and nailed to the ends of the boxes.
The double section of the rack is built up in the same manner as the single section just described. The ends of the two sections forming the double section are placed against each other and joined by nailing together, a facing strip being placed over the joint in both front and rear, two pieces of corner trim at the outer end and one piece of corner trim and a facing strip at the inner or corner end, the same as that of the single section. Place the two sections at right angles to each other and bring the front face corners together. Set the corner trim the reverse way in the angle and nail it to the front faces of both sections to join and hold the sections together. Put the short facing strips on the outer ends and fit and nail the top on, keeping its rear edge even with the outer face of the trim and allowing its ends and front edge to project 1 inch over the front face of the trim, with a miter-joint at the corner.
Continue to:
My Books

