How To Make A Hostess Tray
Description
This section is from the book "Furniture A Girl Can Make", by William W. Klenke. Also available from Amazon: Furniture A Girl Can Make.
How To Make A Hostess Tray
The girl who is handy at art work will find this simple hostess tray a splendid project for trying out her skill. These trays have become more popular than ever in the last few years; serving refreshments in the living room from this tray is so much more pleasant and informal than using your dining room for this purpose. If you are not talented in an artistic way, the decorative motif can be applied in a mechanical manner which is explained further on.
Use a piece of three or five ply laminated wood (plywood) 1/2" thick for the main part. This piece should be very smooth and if possible, use white wood, basswood or any close grained wood for this model. A good size to make this tray is 16"x24". In place of the plywood, you can use some of the laminated fibre wall boards or other specially prepared material of a similar kind.
Method Of Procedure
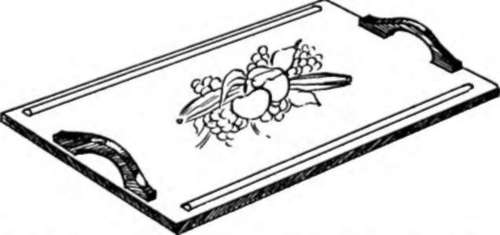
Step No. 1: Cut the one piece of plywood to the size desiredsay 16"x24". Sandpaper this piece very smooth on both sides and all edges.
Step No. 2; Shape out two handles, using wood about 3/4" thick, 15/8" wide and 7" long. Shape these handles to feel comfortable to the hands when holding the tray in a carrying position.
Step No. 3: Fasten the handles to the tray part from the underside of the tray, using two screws 1" long.
Step No. 4: Round up two strips of wood to a semicircle in shape, to run almost the entire length of the tray; these strips should be about 3/8" wide. Nail the strips in place with brads (nails with small heads). The purpose of these strips is to prevent glasses or other articles from sliding off the tray. Sink the heads of the brads below the surface of the wood to allow for puttying.
Step No. 4: Finish the tray in the following manner. Apply a very thin coat of white shellac to the entire model (thin shellac with alcohol). When this coat is dry, lightly sandpaper with No. 0 sandpaper. Now apply a coat of oil paint, using 1/2 Part raw linseed oil and 1/2 Part turpentine. Lightly rub down with No. 0 sandpaper; when dry, follow this with a second coat of paint, containing more oil and less turpentine. Use a rather light color, so that the center fruit design will show out clearly. Now either paint on a fruit design of your own composition, or purchase a transfer design from a paint dealer and apply this to your tray, carefully following the directions given.
In place of the paint, a good waterproof and lasting finish can be obtained by using lacquer, either in color or clear. The clear lacquer should be used on such woods as mahogany, walnut or the like; it will do much to bring out the grain of the wood. Before applying the lacquer, the wood should be given a coat of paste wood filler (follow the directions on the can) and then a coat of shellac. Each coat must be lightly rubbed with No. 0/4 sandpaper.
Continue to:
My Books

