Keeping A House In Repair. Part 3
Description
This section is from the book "The Care Of A House", by T. M. Clark. Also available from Amazon: The Care Of A House.
Keeping A House In Repair. Part 3
The proper dimensions having been ascertained, a pane may be cut from any spare pieces at hand. For amateurs, it is convenient to mark the outline of the pane required on a piece of paper, and put the glass over it, guiding the diamond with a ruler. After each cut is made, the glass may be separated neatly by putting the piece on a board, or table, with the line of the cut exactly over the edge of the board, and trying to bend the glass over the edge. This will cause it to break smoothly on the required line. Evidently, care should be taken not to cut the glass too large. It may be a fraction of an inch too small without harm, but, if cut too large, it is difficult to trim off the excess.
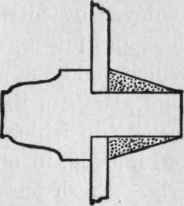
Fig. 31.
Setting glass.
Cutting glass.
The new pane having been cut, the old one is removed by cutting away the putty on the outside, and taking out the triangular "tin tacks" which hold the glass in place, under the putty. The glass can then be taken out; but the "back putty," in which the glass was bedded, must also be removed, in order to bed the new piece properly. Fresh putty is then to be put in place of the old bedding-putty, the new piece of glass pressed firmly into place, the tacks inserted in their old positions, and lightly hammered, or driven in with the putty-knife, and the outside putty put on, smoothing it, when the work is completed, with the putty-knife. After hardening a day or two, the putty may be painted to match the other portions of the window. In the case of large lights, it is most convenient for glazing to take out the sash altogether, which can easily be done by taking out the screws from the "inside beads," or strips which line the sides and top of the window, inside, removing the beads, and swinging the sash in far enough to allow the cords which hold the weights to be reached and detached. After detaching, they must be knotted again, to prevent them from being drawn over the pulleys into the weight boxes. If the broken pane is in the upper sash, it will be necessary, after removing the inside beads, to take out also the "parting bead," or slip of wood which keeps the upper and lower sash apart. This is simply inserted into a groove, and can be readily taken out and replaced. The upper sash, when the parting bead is out, can be swung into the room and detached. After freeing them from the weight lines, the sashes may be laid on a table, or bench, fitted with new glass, and put in place again, the beads being replaced to hold all secure.
Where a window cord is broken, or has escaped from the hands in removing a sash, the trouble may generally be remedied by taking off the inside beads, and removing the screw, or screws, which will be found under them, near the bottom of the frame. These screws hold in place a portion of the frame, which, on being released, can be taken out, disclosing a "pocket," in which one or two weights can be dimly seen. There is usually a pocket on each side of the window, giving access to all the weights, of which each sash has two, one on each side. By putting the hand through the opening any weight can be taken out, a broken cord detached, and a fresh one put in. For the latter purpose the cord should first be attached to the sash requiring it, either by means of a knot, or of a metal anchor, inserted in a hollow provided for it on the side of the sash. The other end of the cord is then to be passed over its appropriate pulley at the top of the frame, and let down, inside the weight box, until it can be reached with the hand, pulled out, and tied to the weight. The sash, after the cord is passed over the pulley into the weight box, should be raised to its full height, and held there with a stick or other support, while the cord is being tied. The cord, which is usually tied to the loop of the weight with several knots, to prevent slipping, should be just long enough to allow the weight to swing clear of the bottom of the weight box while the sash is -raised to its fullest extent. If it is shorter, the top of the weight may, when the sash is pulled down, be drawn against the pulley, breaking the cord; and, if it is longer, the bottom of the weight will rest on the bottom of the weight box before the sash is thrown up to its fullest extent. This fault, which is very common, and is produced by the gradual stretching of the cord, or yielding of the knots, as well as by carelessness in the original adjustment, is most annoying when it occurs in connection with the upper sash, as it shows itself by the refusal of this sash to ascend to its proper place; so that, in order to lock the window, it is necessary to push up the upper sash with a stick or with the hands, while it is being locked. As the weight of the upper sash, if not counterbalanced by the sash-weights hanging free, strains the sash-lock severely, the pockets should be opened, the weights of the upper sash, which are those nearest the outside of the window, taken out, and the cords shortened; the sash being held up meanwhile with a stick, that it may not, when relieved of the weights, fall on the head of the operator.
Broken window cords.
Stretched window cords.
It occasionally happens, particularly with mullioned windows, that the cords and weights become so entangled that they cannot be brought into order from the pocket. In this case it may be necessary to take off the architrave, or interior trim of the window, which will in frame houses expose the whole length of the weight box. The architrave is firmly nailed at one edge to the window-frame, and at the other to a "ground," and unless taken off with care, it is likely to be marred. In order to remove it, the inside bead of the window is first to be taken off. This will show the edge of the architrave where it is nailed to the frame. As this joint is covered under ordinary circumstances by the inside bead, a strong screw-driver may be used to separate the architrave from the frame. Care should be taken to keep the joint at the top and bottom of the architrave, where it meets other portions of the trim, from being damaged; and, after one edge is separated, the other may be reached by the screw-driver from the inside and separated from the "ground" without making any marks which will be visible on the outside. After the necessary work has been accomplished, the architrave may be put back, interposing a piece of board between it and the hammer which will probably be needed to get it into its place. Even with the greatest care, the putty over the heads of the nails in the architrave is likely to fall out, and some small scratches are, perhaps, inevitable; but such defects are not very noticeable, and are easily remedied if necessary.
Continue to:
My Books

