Tabouret
Description
This section is from the book "Shop Projects Based On Community Problems", by Myron G. Burton. Also available from Amazon: Shop Projects Based on Community Problems.
Tabouret

Materials
Oak (Chap. III., Par. 29), plain or quartered.
4 pcs. 1 1/2"x1 1/2"xl8" S4S Legs. 2 pcs. 7/8"x6 "x11" S 2 S Shelf. 2 pcs. 7/8"x6 1/2"xl3" S 2 S Top. 1 pc. 1/2" dowel 24" long.
Introductory Statement
A tabouret is a very useful article as a stand for a flower pot, vase or any other ornament. There are a great many styles of tabouret construction, many of which are equally good; the size, shape and general design are largely matters of personal taste.
In working out a design for your tabouret be sure it is sufficiently substantial for the purpose for which it is intended. Do not undertake a form of construction which is too difficult for you; a simple design well made is much better than a difficult one poorly constructed.
The staining and polishing should be made to correspond with the furniture of the room in which it is to be used. In any piece of household furniture the finish is a very important part of the work and should be given considerable time and attention.
References:
The Tabouret, Noyes, Construction and Design. Manual Arts Press, Peoria, Ill.
Part One, Mission Furniture, Windsor. Popular Mechanics Co., Chicago.
Furniture Repairing, Taylor. Book Supply Co., Chicago.
Tabouret

Suggestions For Original Design
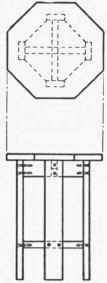
No. 1
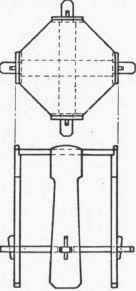
No. 2
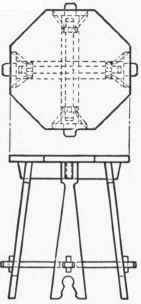
No. 3
Tabouret Specifications
The Top
This top is to be made of two pieces with the edges glued and doweled together. It is inconvenient to get a board wide enough to make this in one piece; furthermore, a glued up top is much better because it does not warp so badly. In gluing up the top, you should arrange the boards so as to match the grain as nearly as possible. Plane the edges which are to come together until they fit perfectly (Chapter II., Paragraph 4). Lay them on your bench top, and test to make sure that the joint will be perfect. Lay out and bore for the dowels (Chapter V., Paragraph 72; Chapter II., Paragraphs 13 and 18). Clamp securely, and leave the glued joint at least twelve hours to harden.
The Shelf
The shelf board is to be glued up in the same manner as the top. Prepare this piece so the glue joint can harden at the same time with the top.
The Legs
Although the legs are furnished S 4 S, you should go over them with a sharp plane set to take a very thin shaving to make them perfectly square and smooth. Finish with a steel scraper (Chapter II., Paragraph 16). Lay out and cut the length of the legs as shown in the drawing (the legs may be cut in a miter box if you have one which you can set at the desired angle). Shape the top end of the legs very carefully; if you have no miter box, this may be done with a back saw and finished with a wood file.
Shaping The Top
When the glue is thoroughly dry, with the compasses lay out the circular top. Saw this out with a compass saw or turning saw. With a wood file carefully square the edge all the way around. This must be perfectly done, for the edge of the material cannot be well finished unless all tool marks are removed.
Notice that the legs are to be gained into the top about half their thickness. Lay out these gains the exact width so as to receive the legs and make the joints fit snugly. Saw these gains the required depth; with a very sharp chisel cut out the wood, making each gain smooth and square. Fasten the legs in position with dowels as shown in the drawing.
Shaping The Shelf
The shelf is to be made perfectly square with the corners cut off where it fits against the legs. These joints are to be fastened with dowels.
Assembling
Assemble all joints with glue, and clamp securely. Clean off any surplus glue.
Finishing
When the work is all assembled, give it a final cleaning with a sharp steel scraper (Chapter II., Paragraph 16) and sandpaper (Chapter II., Paragraph 17). Remove all pencil, tool marks or rough places. Stain the desired color (Chap. IV., Paragraph 54). This piece of work should have a good coat of filler (Chapter IV., Paragraph 55). Shellac may be substituted for the filler; it may then be given a French polish (Chapter IV., Paragraph 57), or varnish finish (Chapter IV., Paragraph 58).
Optional and Home Projects Employing Similar Principles.
Straight Tabouret
1. Suggestion No. 1 shows a very simple yet pleasing design for a straight tabouret.
Straight-Keyed Tabouret
2. The tabouret shown in suggestion No. 2 presents the idea of the keyed mortise and tenon construction. This is a very popular idea, the design of which may be modified to suit one's taste.
Tabouret With Slanting Legs
3. Suggestion No. 3 introduces the idea of slanting legs in tabouret construction. This feature makes the keyed mortise and tenon construction a little more difficult.
Stand Table
4. The idea of a four-legged round-top tabouret, presented in this lesson, with very little modifications, can be employed in making a very pleasing round top card or game table. The stock for the legs should be somewhat heavier than for the tabouret. Such a table should be about 28" or 29" high.
Continue to:
My Books

