73. Outside Finish
Description
This section is from the book "Constructive Carpentry", by Charles A. King. Also available from Amazon: .
73. Outside Finish
Outside Finish. (A.) The lumber used for outside finish should be selected for its ability to stand the weather and to hold its shape. Only well-seasoned wood should be used. The most satisfactory kinds are white pine, cypress, redwood, and poplar. Though the last does not stand so well as the others, yet, if kept painted, it will give good satisfaction.
(B.) Accuracy is needed in putting on the outside finish; the joints should be perfectly square; the time spent in securing plumb and level, framing and finish will be more than compensated for, because the work of finishing down the outside then can be done to marks made by a try-square, instead of scribing or using a bevel, and the use of the block-plane will be reduced to a minimum. For the same reasons the door and window frames should be squared carefully and set perfectly plumb.

Fig. 104. - Lengthening Moldings.
(C.) The narrower the corner boards and the door and window casings, the less chance there is of their shrinking and opening the joints at the end of the siding, and unless a quarter round is used in the corner, as shown at a, Fig. 105, the la}) of the corner board at b should be made upon the side when it will be the least conspicuous. Joints made in splicing corner boards should be made as shown at b, Fig. 105, and doped to prevent the rain from driving into the splice.
( corner boards are usually 4" wide, though they may be of any width to suit the fancy of the builder or architect, provided that a nailing for the ends of the siding is secured upon a stud. Siding, when inhered at the corners, as shown at a,Fig. 106, shows no corner boards, and gives but one joint through which the weather may find access to the house. In making this sort of coiner finish the miter box is used, as shown at b. The distance between the back of the box and the back of the clapboard or siding, at c, should be the same as it will be when it is in place. Care should be used that the clapboard is not sprung in the sawing.
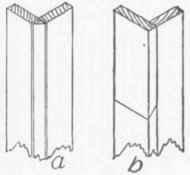
Fig. 105. - Corner boards.

Fig. 10G. - Mitered Clapboards.
(D.) Sheathing paper usually is laid under the siding of a well-built house, and its use always should be encouraged, especially in the colder parts of the country, as nothing else costing as little adds so much to the warmth of the building. It should be laid under the corner boards, casings, frieze, and water table, and should project several inches on the boarding, so that the paper which is laid under the siding will lap over and make a tight joint.
(E.) Fig. 107 shows a few of the different forms of siding. It is largely a matter of preference, which form is the best, though the matched forms are the warmest. A is the form largely used in New England; it is laid from the top, the lower courses being pushed under the upper. In laying this form of siding, the scaffolding may be taken down as soon as the siding has been finished and has received the first, or priming coat of paint; thus when the house is sided the scaffolding is out of the way, and the house has been primed. As the chalk lines will not be covered up, a number may be made at once; this is an advantage over making a line for each course as it is laid, which is necessary if the siding is laid from the bottom.
In finding how much each piece of siding is to be exposed to the weather, it is the usual custom to estimate the exact height which the siding is to cover, and divide it by 4 ½", or the desired exposure, thus allowing the difference to be distributed throughout the entire height, instead of in the last few courses. This method is not used upon matched siding, as the width of that is fixed, and with the exception of a little variation upon the last few courses it is carried up the width of the boards.

Fig. 107. - Forms of Siding.
Beveled siding usually is laid from 4" to 4½ to the weather; the exact distance being found by the above method, and laid out upon the corner boards, or casings of the opening.
As beveled siding is laid from the bottom, it is laid to a chalk line upon the course below a straightened edge, or a siding gauge is often used to assist in keeping the courses above parallel.
All joints in the siding and other vertical square joints, should be cut a little under, not enough to be seen, but to insure that the joint is perfectly tight upon the outside. (F.) It was the custom formerly to lead every joint of the outside finish of a house, but this is one of the good habits of our forefathers which we have allowed to fall into disuse. While it adds to the expense of the labor upon a house, it also adds much to its durability.
(G.) The joints between the tops of all openings and the siding should be flashed with tin, zinc, lead, or copper, as shown at a, Fig. 108. A cap with a wash rabbet is often preferred. (See b.) (H.) If shingles are used for siding, they are laid from 5" to 6" to the weather. There is much to be said in their favor, as they are cheaper, warmer, and more easily kept in repair, and the side walls may be boarded in with sheeting, like the roof, with a space between boards. Besides these advantages, shingles may be stained, a process cheaper than painting, and more artistic; the shingles may be arranged in designs to assist the general effect of the house.

Fig. 108. - Flashing over Openings.
(I.) The water table, or base, Fig. 109, generally is used upon all but the cheapest houses, as it gives a finished appearance to the lower part of the building, besides allowing the drip, from the sides of the house, to fall clear of the foundation, over which it would otherwise wash, depositing the accumulated dirt.
Continue to:
My Books

