Exercises. Part 2
Description
This section is from the "Educational Woodworking For Home And School" book, by Joseph C.Park . Also see Amazon: Educational Woodworking For Home And School.
Exercises. Part 2
Match Box (Fig. 154)
Stock
See Fig. 154.
Supplies
No. 1 sandpaper, burnt umber stain, hard oil, glue, 1/2" 20 steel wire brads (1/2" length, 20 size of wire).
In making the match box proceed as follows: -
Directions For Back
1. Draw center line parallel with the long way of the block.
2. From the center line lay off points on either side near the top and bottom. Draw straight lines through the two points on either side of the center line, forming the side lines of the back.
3. With compasses set at 1/2" radius draw around the right and left corners of the top.
4. With sloyd knife cut to lines, as shown in Fig. 152, and sand. Bore a 1/4" hole which is used in hanging the match box to the wall. Bore through the wood until the point of the bit pricks through the wood, then turn the block and bore through to meet the cut already made. Get a clean-cut hole without tearing the wood.
Directions For Sides
5. Lay off the lines for the sides as shown in Fig. 154.
6. Cut to these lines and sand.
Directions For Front And Bottom Of Box
7. Lay off lines which will give the correct measurements for the front and bottom, as shown in Fig. 154.
8. Cut to these lines and sand.
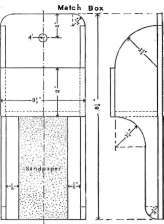
Fig. 151. Match box.
Directions For Putting Parts Together
9. The back is nailed to the sides and bottom, the ends to the bottom, and the front to the ends and top.
Use 1/2" 20 steel wire brads. With compasses set at 3/4" step off points along the edges where the brads are to be driven. Do not drive the brads too near the corners, for the wood will split. Nail the parts together. In doing this do not mar the wood with the hammer. Drive the heads of the brads flush with the surface of the wood, then, with a fine nail set, set the heads of the brads just a little below the surface of the wood.
Directions For Finishing
10. Stain with burnt umber stain, use hard oil, and glue sandpaper in place.
Whisk Broom Holder (Fig. 155)
Stock
See Fig. 155.
Supplies
1/2" 20 steel wire brads, No. 00 sandpaper, burnt Sienna stain, hard oil, varnish, or shellac.
In the construction of the whisk broom holder proceed as follows: -
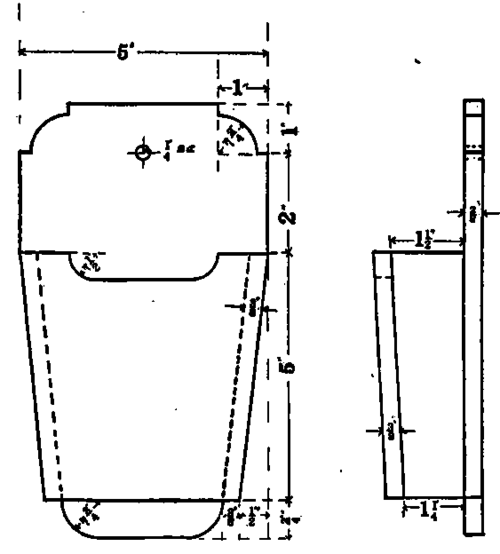
Fig. 165. Whisk broom holder.
Directions For Back
1. Lay off center line parallel with the length of the back. From center line lay off the other necessary construction lines as shown in the drawing.
2. With sloyd knife cut to these lines.
Directions For Front And Sides
3. In a similar way lay off and cut out the front.
4. Cut the sides to the desired length and angle, as shown in the drawing.
Directions For Putting Parts Together
5. The back and front are nailed to the sides with 1/2" 20 steel wire brads. The brads are to be driven three quarters of an inch apart and the heads are to be set a little below the surface of the wood.
Fig. 155. Whisk broom holder.
Finishing
6. After sanding the whisk broom holder it is to be stained with burnt Sienna stain, and then given one or two coats of hard oil as required. Give much attention to good finishing. A model that has been well made may often be spoiled by poor finishing.
B. Bench Work. Shelf (Fig. 156)
The foregoing exercises may be taken up in schools with shops if they have not been made by pupils. There is a certain value in them which should not be overlooked. They require little material and are therefore economical.
Stock
2 (3/8" x 7 1/8" x 24"), 2 (7/8" x 6" x 6"), basswood.
Supplies
No. 1 sandpaper, 1" 16 steel wire brads.
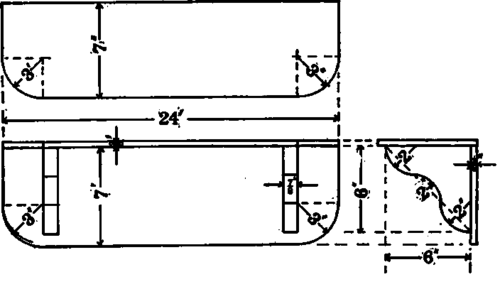
Fig. 156. Shelf.
In the construction of the shelf proceed as follows: -
1. With plane reduce the stock to the desired measurements, as shown in Fig. 156.
2. Lay off lines for curves as shown in drawing.
3. With bracket saw or scroll saw, saw to these lines.
4. If curves are ragged, use a wood rasp, then sandpaper. Keep the edges square. Do not round the corners in sanding.
5. With compasses set at two inches step off points where the nails are to be driven. See that the nails do not come too near the ends of the wood, causing it to split.
6. Nail the parts together. The back is first nailed to the brackets, then the top is nailed to the back and brackets.
7. Set the heads of the nails a little below the surface of the wood.
8. Stain and use hard oil, as in the previous exercises.
Coat Hanger (Fig. 157)
Stock
1 (7/8" x 3" x 16") basswood or pine.
Supplies
Sandpaper, screw hook.

Fig. 157. Coat hanger.
In making the coat hanger proceed as follows: -
1. Lay off the work according to the drawing.
2. With bracket saw or spokeshave cut to these lines.
3. With spokeshave round the top corners.
4. Clean with sandpaper.
5. Apply one or two coats of hard oil, varnish, or shellac.
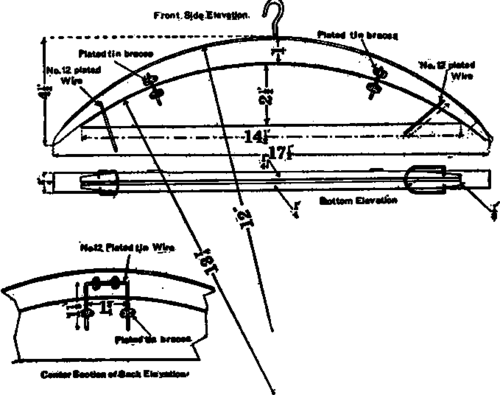
Fig. 158. Combination coat and trousers hanger.
Continue to:
My Books

