Exercises. Part 3
Description
This section is from the "Educational Woodworking For Home And School" book, by Joseph C.Park . Also see Amazon: Educational Woodworking For Home And School.
Exercises. Part 3
Combination Coat And Trousers Hanger (Fig. 158)
Stock
1 (3/4" x 4 1/2" x 17 1/2") maple, 2 (1/4" x 4 3/4" x 15") maple.
Supplies
Sandpaper, No. 12 plated wire, tin for braces, brass nails to fasten braces, screw hook.
In making the combination coat and pants hanger, proceed as in last exercise, with the addition of the wire and tin work. One of the flaps is movable upon a wire hinge (see back elevation) and the other is stationary, being held in place by wire braces (see front elevation). The ends of the flaps are beveled so that when the pants are placed between them the braces (see front and bottom elevations) slide over the ends and press them closely together.
Bread-Cutting Board (Fig. 159)
Stock
3 (7/8" x 1 1/2" x 14") cherry, 2 (7/8" x 1 1/2" x 14") basswood.
Supplies
Sandpaper, glue.

Fig. 159. Bread-cutting board (cherry and basswood).
In making the bread-cutting board, proceed as follows:
1. Use three cherry strips and two basswood strips, as indicated in the drawing.
2. Plane the edges of each strip a very little and fit together for gluing.
3. Determine the direction of the grain of each piece on the face and make arrow indicating the direction of the grain.
4. Arrange the pieces as they are to be glued together, so that the grain of the pieces runs in the same direction, and number these pieces 1, 2, etc.
5. Glue pieces together. Scrape off surplus glue before it hardens.
6. Allow pieces to remain in the clamps overnight while the glue hardens.
7. Remove the clamps and dress the top and bottom surfaces to the desired thickness.
8. Lay off ellipse by the trammel method as shown on page 290.
9. Tilt the scroll saw table to the desired angle and saw out the ellipse form.
10. Smooth the edges with wood rasp and sandpaper.
11. Bore the nail hole near the top so that the bread-cutting board can be hung up, when not in use.
12. Use no finish of any kind on this project. Why?
Toothbrush Holder And Shelf (Fig. 160)
Stock
1 (3/8" x 7 1/8" x 14"), 1 (3/8" x 3 1/8" x 14"), 2 ( 3/8" x 2 3/8" x 7"), 1 (5/8" x 1 5/8" x 9 3/4"), basswood.
Supplies
Sandpaper, 1" 16 steel wire brads.
In making the toothbrush holder and shelf, proceed as follows: -
1. Dress the stock to the desired measurements.
2. Lay off the different parts according to the drawing.
3. Cut curves with bracket saw or scroll saw.
4. In cutting the pockets for the brushes (see Section AB) bore a 1/4" hole at the back to form the semicircle, then cut to the sides of this hole with back saw.
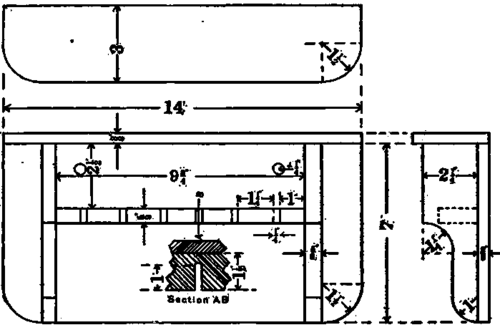
Fig. 160. Toothbrush rack and shelf.
5. In fastening parts together, nail the brackets to the toothbrush holder. Nail the back to the brackets and to the holder. Nail the top to the brackets and to the back.
6. Set the heads of the nails a little below the surface of the wood, using a nail set.
7. Clean with sandpaper and finish as desired (see page 155).
Towel Rollers (Figs. 161 And 162)
Directions
Stock
2 (7/8" x 1 1/2" x 26"), long pieces for back; 1 (7/8" x 3 3/4" x 12"), cross pieces for back; 1 (7/8" x 2 3/4" x 12"), Brackets; 1 (7/8" x 1 3/4" x 19"), Roller. White Pine.

Fig. 161. Towel roller.
1. Get out the stock with cross-cut and rip saw.
2. Plane the face and edge of each of the long pieces (a) square with each other, and reduce to dimensions, using the jack plane.
3. Reduce cross pieces (ft) and brackets (c) to dimensions in the same way.
4. Square up the ends of cross pieces (ft) to dimension, using back saw.
5. Smooth the ends with the block plane.
6. Lay out the ends of the long pieces (a) with the dividers.
7. Lay out the joints on the long pieces (a) and cross pieces (ft) with try-square, knife, and gauge; and remove the stock with back saw and chisel.
8. Saw off the ends of long pieces (a) with back saw and form same with chisel and file.
9. Smooth plane the front and back sides, and screw together.
10. Lay out the position of the grooves and brackets and carve the grooves with the gouge.
11. Lay out the brackets with try-square and dividers and get same out on scroll saw, smooth with chisel and form with knife.
12. Bore holes with auger bit and make groove for roller with back saw and chisel.
13. Screw brackets in place.
14. Reduce roller (d) to 1 1/2" square as in (2).

Fig. 162. Towel roller.
15. Square up the ends of roller to dimension, using back saw,
16. Draw the diagonals on each end and from the centers thus obtained describe 'with the dividers 1 1/2" circles within the squares,
17. Plane off the corners with the hack plane, making the piece octagonal. Plane off the corners again, making it sixteen-sided.
18. Finish to a cylinder with the smoothing plane.
19. Smooth with file and sand paper.
20. Bore holes with auger bit and glue in dowels.
21. Fix in screw eyes.
Exercises
Cross-cut and rip sawing, face planing, edge planing, squaring, gauging, sawing with back saw, planing with block plane, perpendicular chiseling, oblique chiseling, filing, smooth planing, perpendicular gouging, oblique gouging, scroll sawing, modeling with knife, boring with brace and auger bit, chamfer planing, modeling with smoothing plane, gluing, putting in screws, using gimlet bit and countersink, putting in screw eyes.

Fig. 163. Book rack.
Book Rack (Figs. 163 And 164)
Directions
Stock
3/4"oak.
1. Get out the several parts with cross-cut and rip saw, the two ends in one piece.
2. Reduce each piece to dimensions, using the jack plane.
3. Measure the length of the end pieces and square up to dimensions, using the back saw.
4. Smooth the ends with the block plane.
5. Lay out the position of the grooves with rule, try-square, knife, bevel, and gauge.
6. Cut out the grooves with back saw and chisel.

Fig. 164. Book rack. (Pupils are to make original designs for back and sides).
7. Square up the ends of the shelf to dimensions with back saw and block plane.
8. Fit the shelf into the grooves with back saw and chisel.
9. Make the grooving for the back with the plow or rabbet plane.
10. Square up the back to dimensions and fit in position with block plane.
11. Design the ends and back and shape with scroll saw, spokeshave, knife, and file.
12. Smooth all pieces with sandpaper and glue together.
13. Make miter joints on the top corners with miter box and tack in position.
Exercises
Cross-cut and rip sawing, face planing, edge planing, squaring, gauging, back sawing, block planing, perpendicular chiseling, rabbet planing, scroll sawing, smoothing with spokeshave, concave filing, smoothing with sandpaper, gluing, and sawing in miter-box.


Fig. 171. Book rack.
Continue to:
My Books

